Docker 入門
さまざまな Web サーバを Docker Compose で構築する
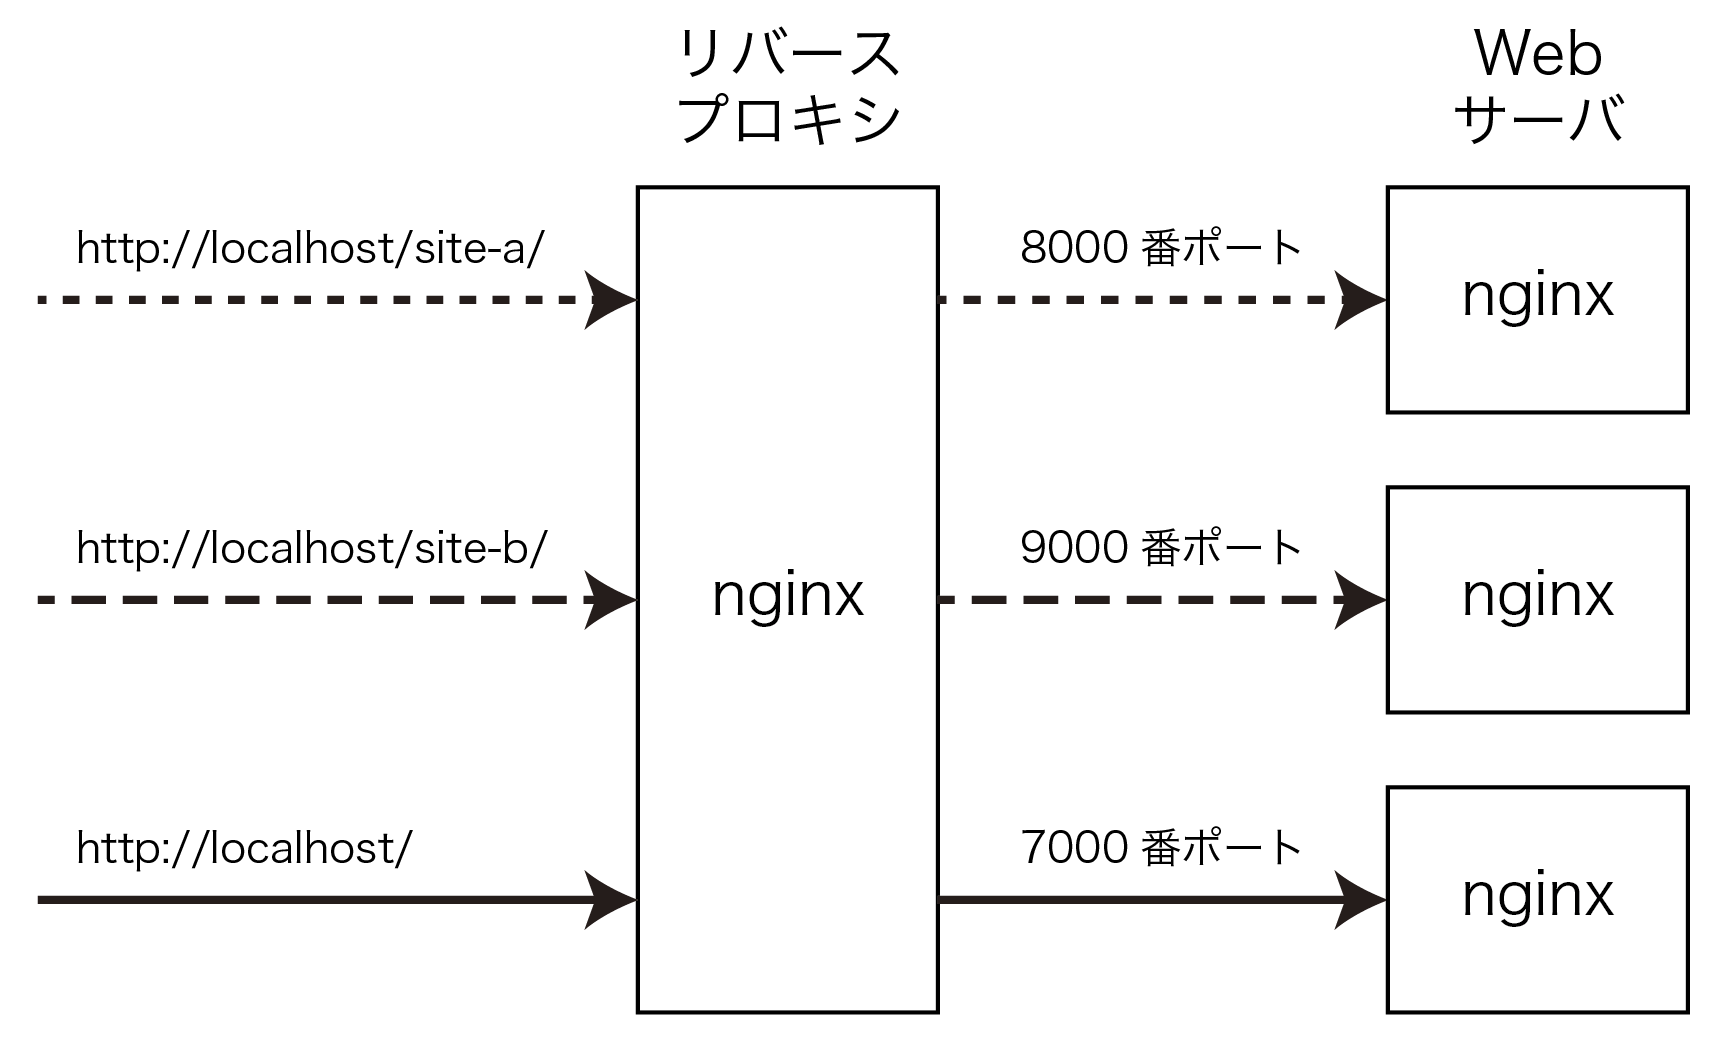
nginx のリバースプロキシ,および複数の nginx コンテナの組合せで /site-a/ と /site-b/ を運用する
ここではリバースプロキシ,リアル Web サーバともに nginx で構築する方法を試します.これまでと同様に http://localhost/site-a/ と http://localhost/site-b/ のサイトがあり,http://localhost/ も運用することを考えます.なお,このページのサンプルコードは GitHub の web06Nginx フォルダで公開しています.
まず,例によって任意の新規ディレクトリを作成し,その中に次の構成でディレクトリとファイルを設置します.なお,ログファイルは実行時に自動的に生成されるのでディレクトリと .gitignore だけを作成します.
% tree -a -F ⏎
./
├── docker-compose.yml
├── nginx/
│   └── conf.d/
│       ├── default7000.conf
│       ├── default8000.conf
│       ├── default9000.conf
│       └── defaultRevProxy.conf
├── Readme.md
└── web/
    ├── html7000/
    │   └── index.html
    ├── html8000/
    │   └── index.html
    ├── html9000/
    │   └── index.html
    └── logs/
        ├── nginx/
        │   ├── .gitignore
        │   ├── access.log
        │   └── error.log
        ├── nginx7000/
        │   ├── .gitignore
        │   ├── access.log
        │   └── error.log
        ├── nginx8000/
        │   ├── .gitignore
        │   ├── access.log
        │   └── error.log
        └── nginx9000/
            ├── .gitignore
            ├── access.log
            └── error.log

12 directories, 21 files
全体の設計図である docker-compose.yml は次のような内容にします.全体で4つのサービスが定義され,32行目からのブロックがリバースプロキシとなる nginx サービスです.リアル Web サーバとなる3つのサービスはそれぞれ2行目,12行目,22行目からのブロックで定義されています.
docker-compose.yml
services:
nginx6_7000:
image: nginx:latest
container_name: nginx6_7000
expose:
- "7000:7000"
volumes:
- ./nginx/conf.d/default7000.conf:/etc/nginx/conf.d/default.conf
- ./web/html7000:/usr/share/nginx/html
- ./web/logs/nginx7000:/var/log/nginx
nginx6_8000:
image: nginx:latest
container_name: nginx6_8000
expose:
- "8000:8000"
volumes:
- ./nginx/conf.d/default8000.conf:/etc/nginx/conf.d/default.conf
- ./web/html8000:/usr/share/nginx/html
- ./web/logs/nginx8000:/var/log/nginx
nginx6_9000:
image: nginx:latest
container_name: nginx6_9000
expose:
- "9000:9000"
volumes:
- ./nginx/conf.d/default9000.conf:/etc/nginx/conf.d/default.conf
- ./web/html9000:/usr/share/nginx/html
- ./web/logs/nginx9000:/var/log/nginx
nginx:
image: nginx:latest
container_name: nginx6
ports:
- "80:80"
depends_on:
- nginx6_7000
- nginx6_8000
- nginx6_9000
volumes:
- ./nginx/conf.d/defaultRevProxy.conf:/etc/nginx/conf.d/default.conf
- ./web/logs/nginx:/var/log/nginx
リバースプロキシとなる nginx の設定を nginx/conf.d/defaultRevProxy.conf に記述します.この内容はリアル Web サーバに apache を利用したときと本質的には変わりません.
nginx/conf.d/defaultRevProxy.conf
server {
listen 80;
server_name localhost;
location /site-a/ {
proxy_pass http://nginx6_8000:8000/;
proxy_set_header Host $host;
proxy_set_header X-Real-IP $remote_addr;
proxy_set_header X-Forwarded-For $proxy_add_x_forwarded_for;
proxy_set_header X-Forwarded-Proto $scheme;
}
location /site-b/ {
proxy_pass http://nginx6_9000:9000/;
proxy_set_header Host $host;
proxy_set_header X-Real-IP $remote_addr;
proxy_set_header X-Forwarded-For $proxy_add_x_forwarded_for;
proxy_set_header X-Forwarded-Proto $scheme;
}
location / {
proxy_pass http://nginx6_7000:7000/;
proxy_set_header Host $host;
proxy_set_header X-Real-IP $remote_addr;
proxy_set_header X-Forwarded-For $proxy_add_x_forwarded_for;
proxy_set_header X-Forwarded-Proto $scheme;
}
}
続いて 7000 番ポートを受け入れてリアル Web サーバとなる nginx の設定を記述します.
nginx/conf.d/default7000.conf
server {
listen 7000;
root /usr/share/nginx/html;
location / {
index index.html index.htm;
}
}
同様に,8000 番ポートと 9000 番ポートを受け入れるそれぞれの nginx についても設定ファイルを準備します.これらの違いはポート番号の設定だけです.
nginx/conf.d/default8000.conf
server {
listen 8000;
root /usr/share/nginx/html;
location / {
index index.html index.htm;
}
}
nginx/conf.d/default9000.conf
server {
listen 9000;
root /usr/share/nginx/html;
location / {
index index.html index.htm;
}
}
さらにそれぞれのサイトで提供するコンテンツを準備します.
web/html7000/index.html
<!DOCTYPE html>
<html lang="ja">
<head>
<meta charset="UTF-8">
<meta name="viewport" content="width=device-width, initial-scale=1.0">
<title>Nginx</title>
</head>
<body>
<h1>Hello Nginx</h1>
<p>
Hello Nginx
</p>
<p>
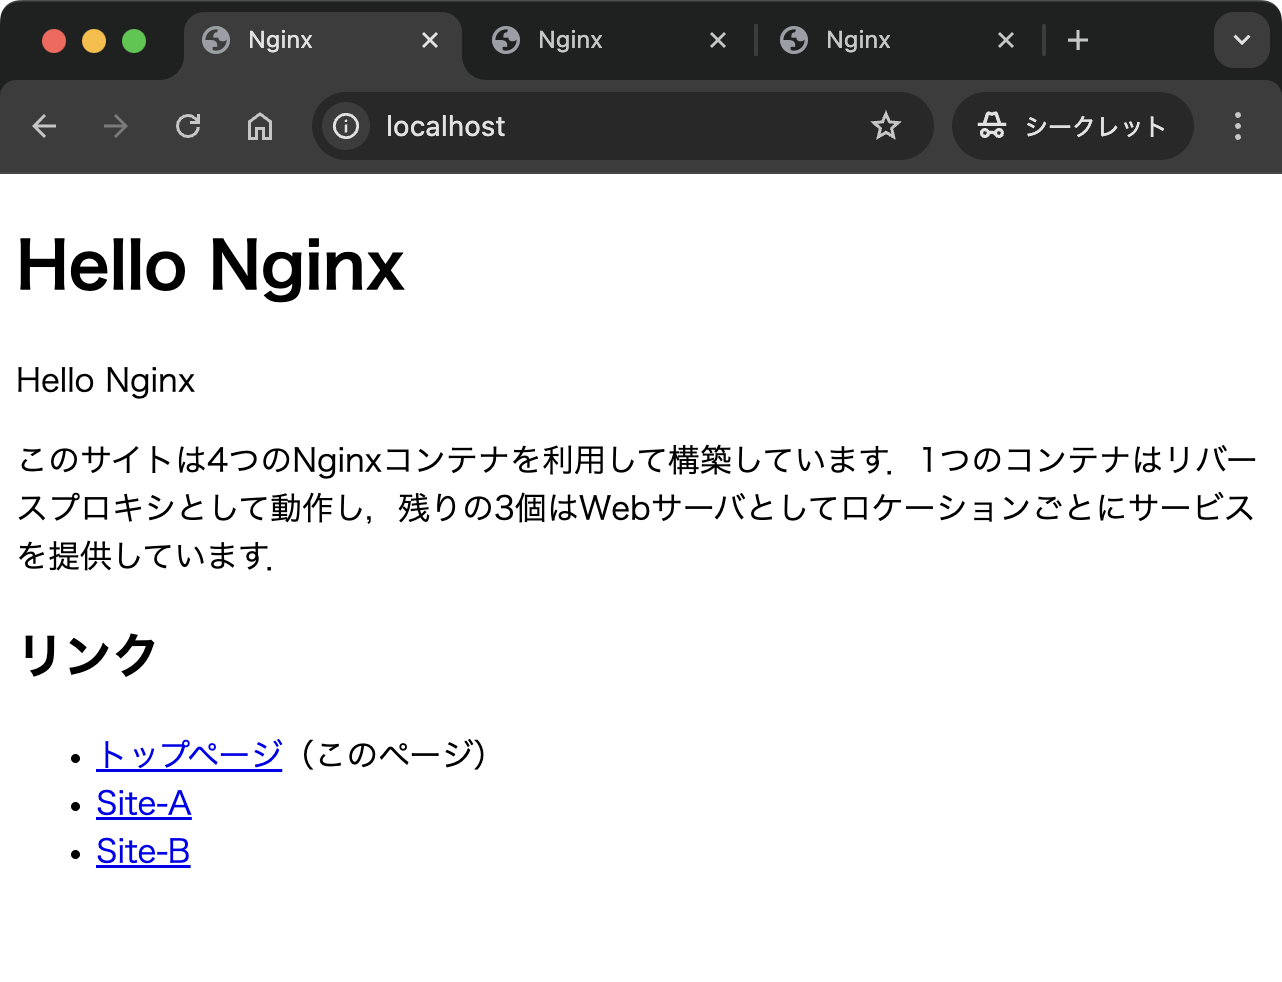
このサイトは4つのNginxコンテナを利用して構築しています.1つのコンテナはリバースプロキシとして動作し,残りの3個はWebサーバとしてロケーションごとにサービスを提供しています.
</p>
<h2>リンク</h2>
<ul>
<li><a href="/">トップページ</a>(このページ)</li>
<li><a href="/site-a/">Site-A</a></li>
<li><a href="/site-b/">Site-B</a></li>
</ul>
</body>
</html>
web/html8000/index.html
<!DOCTYPE html>
<html lang="ja">
<head>
<meta charset="UTF-8">
<meta name="viewport" content="width=device-width, initial-scale=1.0">
<title>Nginx</title>
</head>
<body>
<h1>Hello Nginx</h1>
<p>
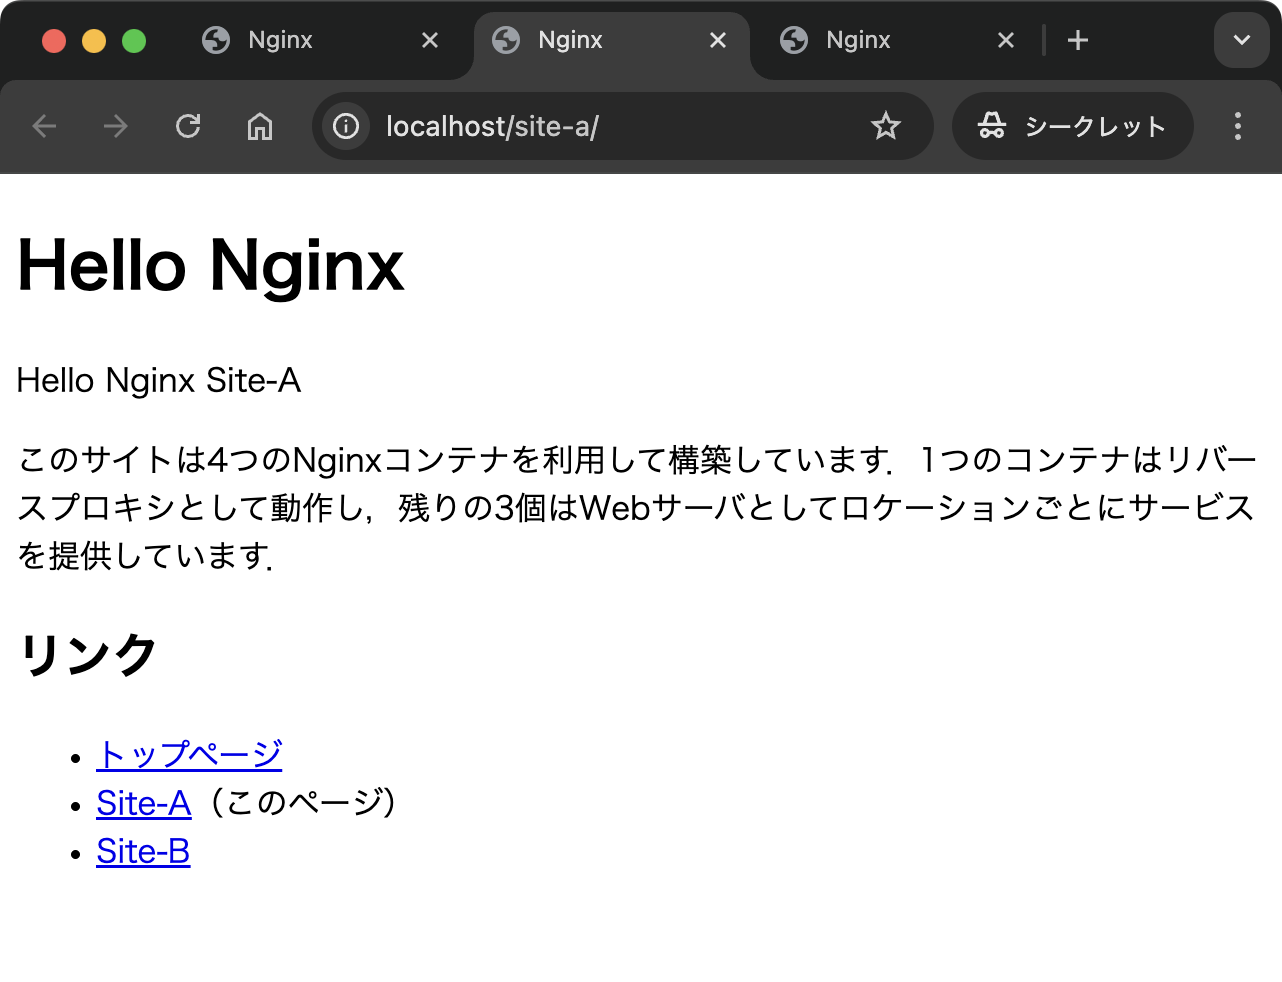
Hello Nginx Site-A
</p>
<p>
このサイトは4つのNginxコンテナを利用して構築しています.1つのコンテナはリバースプロキシとして動作し,残りの3個はWebサーバとしてロケーションごとにサービスを提供しています.
</p>
<h2>リンク</h2>
<ul>
<li><a href="/">トップページ</a></li>
<li><a href="/site-a/">Site-A</a>(このページ)</li>
<li><a href="/site-b/">Site-B</a></li>
</ul>
</body>
</html>
web/html9000/index.html
<!DOCTYPE html>
<html lang="ja">
<head>
<meta charset="UTF-8">
<meta name="viewport" content="width=device-width, initial-scale=1.0">
<title>Nginx</title>
</head>
<body>
<h1>Hello Nginx</h1>
<p>
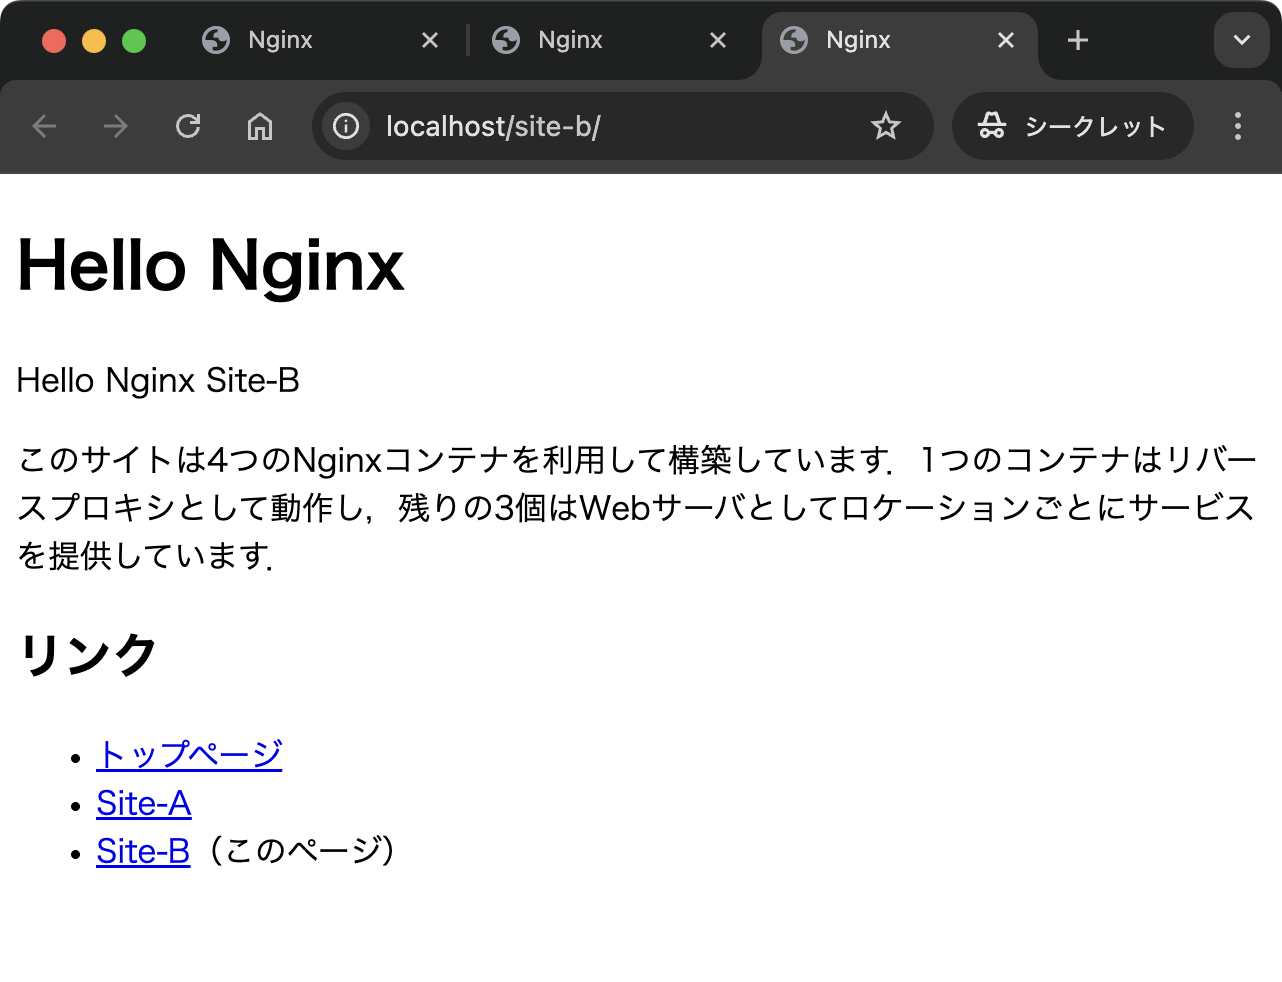
Hello Nginx Site-B
</p>
<p>
このサイトは4つのNginxコンテナを利用して構築しています.1つのコンテナはリバースプロキシとして動作し,残りの3個はWebサーバとしてロケーションごとにサービスを提供しています.
</p>
<h2>リンク</h2>
<ul>
<li><a href="/">トップページ</a></li>
<li><a href="/site-a/">Site-A</a></li>
<li><a href="/site-b/">Site-B</a>(このページ)</li>
</ul>
</body>
</html>
アクセスログはコンテナごとに出力されまずが,ログが Git のリポジトリに含まれないようにするため,4個のディレクトリそれぞれに .gitignore を設置します.
web/logs/*/.gitignore
*
すべてのファイルの準備ができたらコンテナを起動します.
% docker compose up -d ⏎
[+] Running 5/5
 ✔ Network web06nginx_default  Created                    0.0s
 ✔ Container nginx6_7000       Started                    0.2s
 ✔ Container nginx6_9000       Started                    0.2s
 ✔ Container nginx6_8000       Started                    0.2s
 ✔ Container nginx6            Started                    0.2s
%
コンテナの起動が確認できれば Web ブラウザで http://localhost/ や http://localhost/site-a/ および http://localhost/site-b/ に接続します.ブラウザからのリクエストはリバースプロキシから適切なリアル Web サーバに転送されていることが確認できます.
動作確認が終わったので,コンテナを終了して破棄します.
% docker compose down ⏎
[+] Running 5/5
 ✔ Container nginx6            Removed                                      0.2s
 ✔ Container nginx6_9000       Removed                                      0.2s
 ✔ Container nginx6_7000       Removed                                      0.2s
 ✔ Container nginx6_8000       Removed                                      0.3s
 ✔ Network web06nginx_default  Removed                                      0.2s
% docker container ls -a ⏎
CONTAINER ID   IMAGE     COMMAND   CREATED   STATUS    PORTS     NAMES
%