Docker 入門
Python Django サーバを Docker で構築する
MySQL を使った複数の Django プロジェクトを公開する
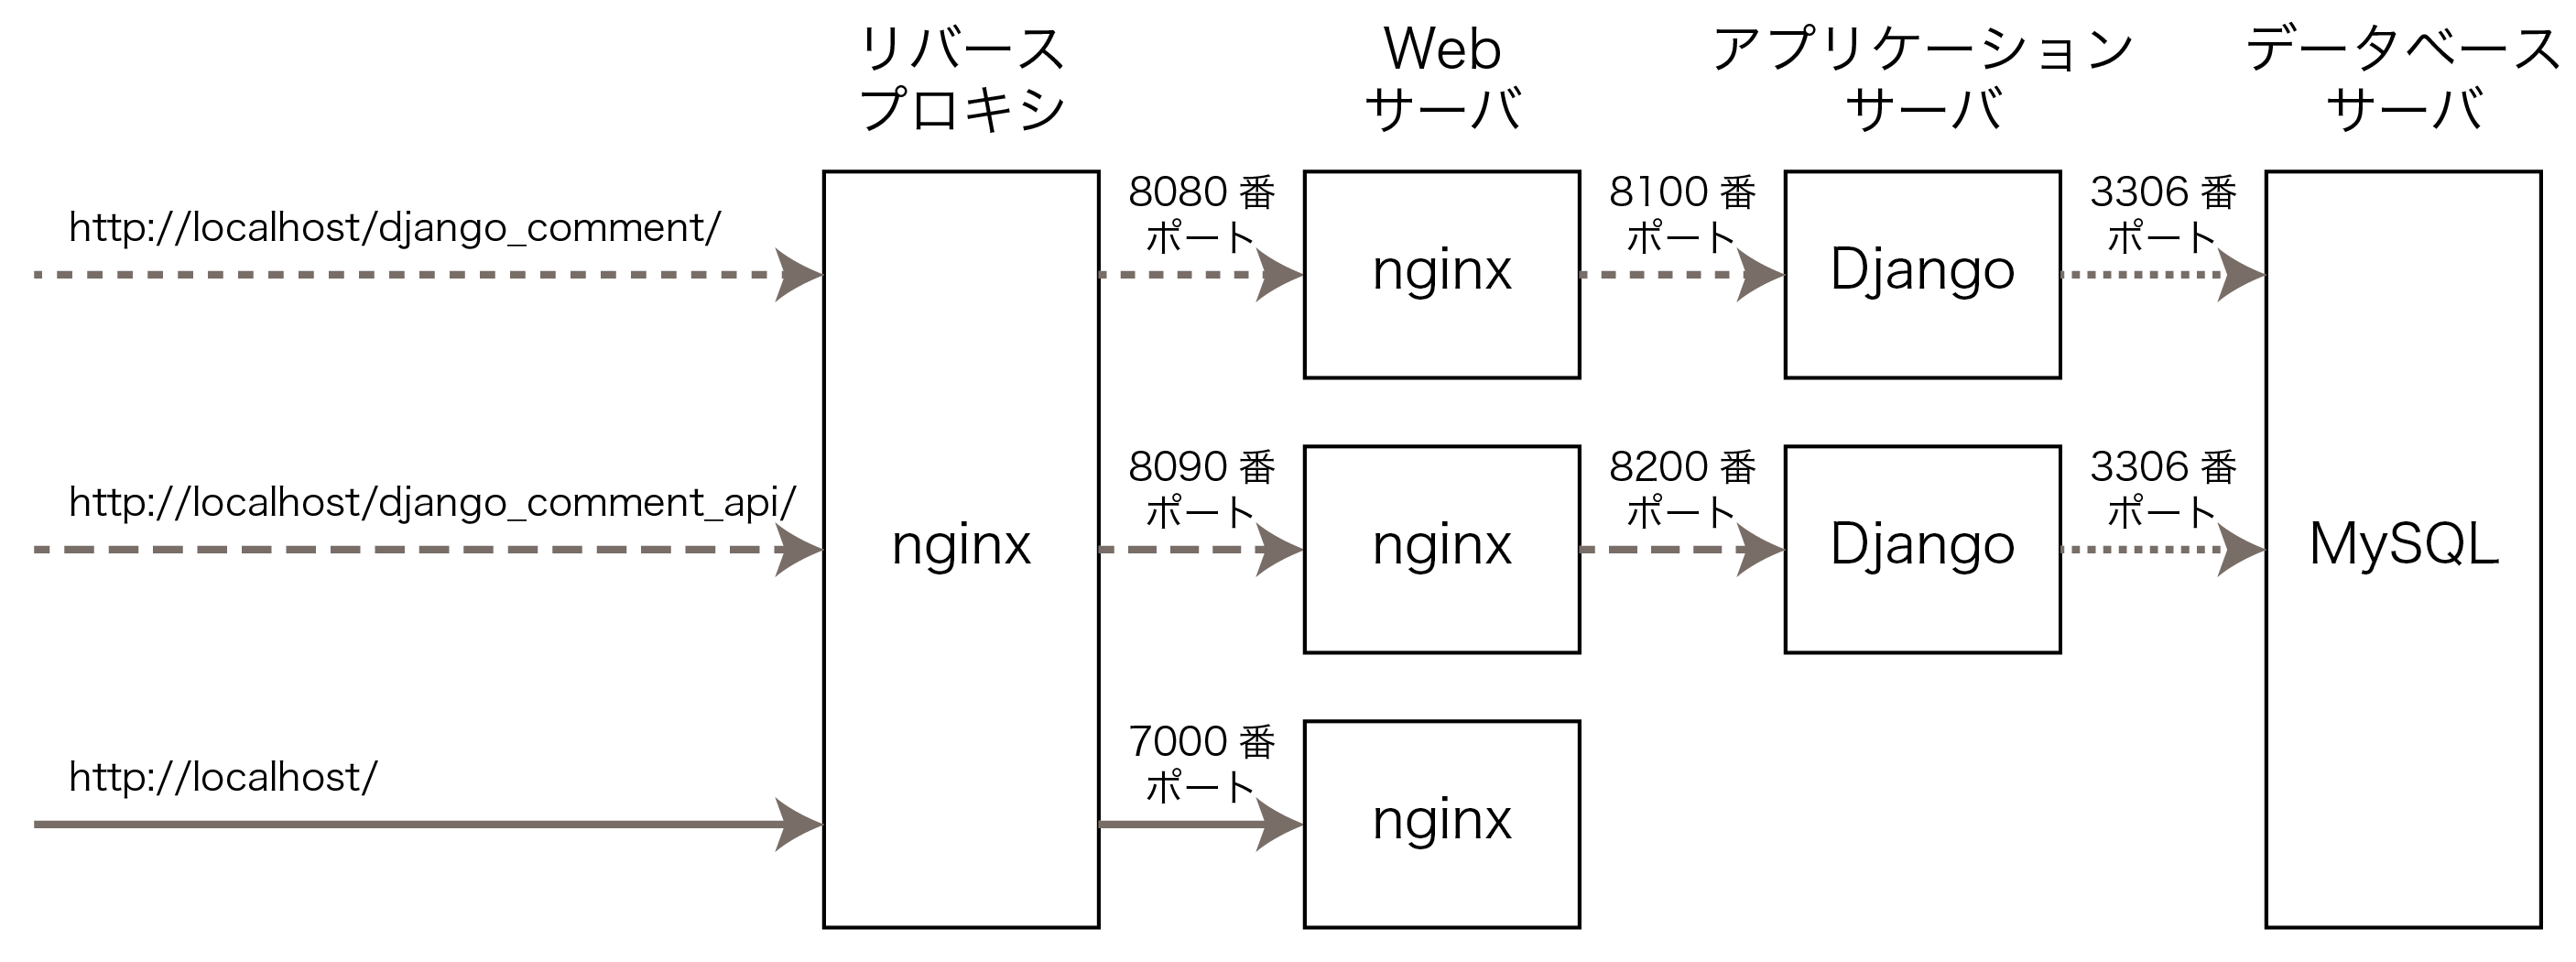
ここでは2種類の Python Django プロジェクトを異なる URL で動作させることを考えます.具体的にはバックエンドのデータベースに MySQL コンテナを使用して掲示板の Web アプリを http://localhost/django_comment/ で動作させます.さらに,同じ MySQL データベースを利用した API エンドポイントを http://localhost/django_comment_api/ で動作させます.加えて,http://localhost/ ではサイトのトップページを運用します.このために,Web サーバとなる3つの Nginx コンテナを利用し,さらにリバースプロキシとなる Nginx コンテナも利用することになります.つまり,ここで説明した複数のサイトを運用する構成の応用例として考えることもできます.
このページの Docker サンプルコードは GitHub の Django03API フォルダで公開しています.また,Python Django のコメント掲示板 とその API バージョンもそれぞれ GitHub で公開しています.
任意の新規ディレクトリを作成し,その中に次の構成でディレクトリとファイルを設置します.なお,Django のプロジェクトは django ディレクトリに設置しますが,Docker の Git リポジトリに Django のコードが含まれないように,django/.gitignore を設置しておきます.また,ログファイルも Git に含まれないように logs/nginx*/.gitignore を設置しておきます.さらに,.env ファイルには MySQL のユーザ名とパスワードを保存しますが,やはりそのファイルが Git のリポジトリに含まれないように .gitignore を設置します.
% tree -a -F ⏎
./
├── .env
├── .env.example
├── .gitignore
├── django/
│   └── .gitignore
├── docker-compose.yml
├── logs/
│   ├── nginx/
│   │   └── .gitignore
│   ├── nginx7000/
│   │   └── .gitignore
│   ├── nginx8080/
│   │   └── .gitignore
│   └── nginx8090/
│       └── .gitignore
├── mysql/
│   ├── my.cnf
│   └── script/
│       └── init-db.sql
├── nginx/
│   ├── conf.d/
│   │   ├── default7000.conf
│   │   ├── default8080.conf
│   │   ├── default8090.conf
│   │   └── defaultRevProxy.conf
│   └── Dockerfile
├── python/
│   ├── Dockerfile
│   ├── entrypoint_api.sh
│   └── entrypoint.sh
├── Readme.md
└── web/
    └── html7000/
        └── index.html

14 directories, 21 files
%
全体の設計図である docker-compose.yml は次のような内容にします.合計7個のサービス(コンテナ)で環境を構築します.まず,MySQL データベースのコンテナ(サービス名 mysql)は2つの Django プロジェクトで共通して利用されます.コメント掲示板のアプリケーションサーバとなるコンテナ(サービス名 python_app)とその API アプリケーションサーバとなるコンテナ(サービス名 python_api)があります.さらに4個の Nginx コンテナとなるサービスがあり,サービス名 nginx はリバースプロキシとして運用し,サービス名 nginx8080,nginx8090,nginx7000 はそれぞれ Webサーバとして運用します.
docker-compose.yml
services:
mysql:
image: mysql:8.0
container_name: python_mysql_03
environment:
MYSQL_ROOT_PASSWORD: ${MYSQL_ROOT_PASSWORD}
# MYSQL_DATABASE: ${MYSQL_DATABASE} # データベースの作成は script で実行
MYSQL_USER: ${MYSQL_USER}
MYSQL_PASSWORD: ${MYSQL_PASSWORD}
volumes:
- ./mysql/my.cnf:/etc/mysql/conf.d/my.cnf
- mysqlvolume:/var/lib/mysql
- ./mysql/script:/docker-entrypoint-initdb.d
ports:
- 3306:3306
python_app:
build:
context: .
dockerfile: ./python/Dockerfile
container_name: python_app_03
volumes:
- ./python/entrypoint.sh:/entrypoint.sh
- ./django/django_comment2022_mysql:/code
expose:
- "8100"
command: /bin/sh -c "pip install -r /code/requirements.txt && chmod +x /entrypoint.sh && /entrypoint.sh"
python_api:
build:
context: .
dockerfile: ./python/Dockerfile
container_name: python_api_03
volumes:
- ./python/entrypoint_api.sh:/entrypoint.sh
- ./django/django_comment_api_mysql:/code
expose:
- "8200"
command: /bin/sh -c "pip install -r /code/requirements.txt && chmod +x /entrypoint.sh && /entrypoint.sh"
nginx8080:
image: nginx:1.25.5
container_name: python_nginx_03_8080
volumes:
- ./nginx/conf.d/default8080.conf:/etc/nginx/conf.d/default.conf
- ./django/django_comment2022_mysql/comments/static:/static
- ./logs/nginx8080:/var/log/nginx
expose:
- "8080:8080"
depends_on:
- python_app
nginx8090:
image: nginx:1.25.5
container_name: python_nginx_03_8090
volumes:
- ./nginx/conf.d/default8090.conf:/etc/nginx/conf.d/default.conf
- ./django/django_comment_api_mysql/staticfiles:/static
- ./logs/nginx8090:/var/log/nginx
expose:
- "8090:8090"
depends_on:
- python_api
nginx7000:
image: nginx:1.25.5
container_name: python_nginx_03_7000
expose:
- "7010:7000"
volumes:
- ./nginx/conf.d/default7000.conf:/etc/nginx/conf.d/default.conf
- ./web/html7000:/usr/share/nginx/html7000
- ./logs/nginx7000:/var/log/nginx
nginx:
image: nginx:1.25.5
container_name: python_nginx_03_rev
ports:
- "80:80"
depends_on:
- nginx7000
- nginx8080
- nginx8090
volumes:
- ./nginx/conf.d/defaultRevProxy.conf:/etc/nginx/conf.d/default.conf
- ./logs/nginx:/var/log/nginx
volumes:
mysqlvolume:
まず,MySQL については管理者パスワード (MYSQL_ROOT_PASSWORD) とユーザ (docker-user) 用のパスワード (MYSQL_PASSWORD) を .env に保存します.実際には複雑なパスワードを指定し,かつ,2種類のパスワードが異なるようにしてください.これらの値は docker-compose.yml の6-9行目において ${MYSQL_ROOT_PASSWORD} などの記述で読み込まれます.
.env
MYSQL_ROOT_PASSWORD=password
MYSQL_USER=docker-user
MYSQL_PASSWORD=password
また,機密情報を含む .env が Git のリポジトリに含まれないようにするために .gitignore を作成します.
.gitignore
.env
一方で GitHub からクローンを作成したときに,.env のサンプルとなるように .env.example を作成しておき,これは Git リポジトリに含めておきます.
.env.example
MYSQL_ROOT_PASSWORD=password
MYSQL_USER=docker-user
MYSQL_PASSWORD=password
MySQL の設定を次のファイルに加えます.これらの設定は日本語文字がターミナルで文字化けしないようにするための設定です.
mysql/my.cnf
[mysqld]
character-set-server = utf8mb4
collation-server = utf8mb4_general_ci
[client]
default-character-set=utf8mb4
MySQL の初期設定として django-comments データベースを作成し,権限を付与するスクリプトを作成します.ここで,5行目にユーザ名 docker-user が指定されていますが,このユーザ名は .env の MYSQL_USER と同じものを指定するようにしてください.
mysql/script/init-db.sql
-- ユーザの作成とパスワードの設定は docker-compose.yml で実行済み
-- djangoデータベースの作成と権限付与
CREATE DATABASE IF NOT EXISTS `django-comments`;
GRANT ALL PRIVILEGES ON `django-comments`.* TO 'docker-user';
FLUSH PRIVILEGES;
次に Django の Web アプリケーションサーバとして利用するコンテナと API サーバとして利用するコンテナについてその Dockerfile を作成します.今回はどちらも同じ内容でよいので次のファイルを共通して利用します.
python/Dockerfile
FROM python:3.11
# pycファイル(および__pycache__)の生成を行わないようにする
ENV PYTHONDONTWRITEBYTECODE=1
# 標準出力・標準エラーのストリームのバッファリングを行わない
ENV PYTHONUNBUFFERED=1
# コンテナのワークディレクトリを/codeに指定
WORKDIR /code
RUN pip install --upgrade pip
Django の Web アプリケーションサーバ用コンテナが起動するときに実行されるスクリプトを作成します.
#!/bin/bash
gunicorn django_comment.wsgi:application --bind 0.0.0.0:8100
一方で Django の API サーバ用コンテナが起動するときに実行されるスクリプトを作成します.アプリケーションサーバとは公開 URL,ポート番号が異なることに注意してください.
#!/bin/bash
gunicorn django_comment_api.wsgi:application --bind 0.0.0.0:8200
続いて,Nginx の設定を行います.4個の Nginx コンテナを利用しますが,Dockerfile は共通して次の内容を利用します.
nginx/Dockerfile
FROM nginx:1.25.5
COPY conf.d/default.conf /etc/nginx/conf.d/default.conf
リバースプロキシとして利用する Nginx の設定ファイルを次のとおり準備します.具体的には,http://localhost/django_comment/ へのリクエストは8080番ポートを通じてサービス名 nginx8080 のコンテナへ転送され,http://localhost/django_comment_api/ へのリクエストは8090番ポートを通じてサービス名 nginx8090 のコンテナへ転送されます.それ以外のリクエストは7000番ポートを通じてサービス名 nginx7000 のコンテナへ転送されることを意味しています.
nginx/conf.d/defaultRevProxy.conf
server {
listen 80;
server_name localhost;
location /django_comment/ {
proxy_pass http://nginx8080:8080/;
proxy_set_header Host $host;
proxy_set_header X-Real-IP $remote_addr;
proxy_set_header X-Forwarded-For $proxy_add_x_forwarded_for;
proxy_set_header X-Forwarded-Proto $scheme;
}
location /django_comment_api/ {
proxy_pass http://nginx8090:8090/;
proxy_set_header Host $host;
proxy_set_header X-Real-IP $remote_addr;
proxy_set_header X-Forwarded-For $proxy_add_x_forwarded_for;
proxy_set_header X-Forwarded-Proto $scheme;
}
location / {
proxy_pass http://nginx7000:7000/;
proxy_set_header Host $host;
proxy_set_header X-Real-IP $remote_addr;
proxy_set_header X-Forwarded-For $proxy_add_x_forwarded_for;
proxy_set_header X-Forwarded-Proto $scheme;
}
}
サービス名 nginx7000 のコンテナは固定ページ (index.html) を公開することとするので,次のような設定にします.
nginx/conf.d/default7000.conf
server {
listen 7000;
server_name localhost;
root /usr/share/nginx/html7000;
location / {
index index.html index.htm;
}
}
一方でサービス名 nginx8080 のコンテナは Python Django の Web アプリケーションサーバへ8100番ポートを利用してリクエストを転送するため,次のような設定にします.
nginx/conf.d/default8080.conf
upstream python {
server python_app:8100;
}
server {
listen 8080;
server_name 0.0.0.0;
location / {
proxy_pass http://python;
proxy_set_header Host $host;
proxy_set_header X-Forwarded-For $proxy_add_x_forwarded_for;
proxy_redirect off;
}
location /static/ {
alias /static/;
}
}
さらにサービス名 nginx8090 のコンテナは Python Django の API サーバへ8200番ポートを利用してリクエストを転送するため,次のような設定にします.
nginx/conf.d/default8090.conf
upstream python_api {
server python_api:8200;
}
server {
listen 8090;
server_name 0.0.0.0;
location / {
proxy_pass http://python_api;
proxy_set_header Host $host;
proxy_set_header X-Forwarded-For $proxy_add_x_forwarded_for;
proxy_redirect off;
}
location /static/ {
alias /static/;
}
}
また,Nginx へのアクセスログ(access.log および error.log)は4個のコンテナでそれぞれ作成されます.これらのログファイルは Git のリポジトリに含める必要がないので .gitignore を各ディレクトリに作成します.
logs/nginx/.gitignore, logs/nginx7000/.gitignore, logs/nginx8080/.gitignore, logs/nginx8090/.gitignore
*
サイトのトップページ http://localhost/ として公開する静的コンテンツ (index.html) は web/html7000/ ディレクトリに設置します.この設定は docker-compose.yml の72行目,および default7000.conf の5行目で設定されていることに注意してください.
web/html7000/index.html
<!DOCTYPE html>
<html lang="ja">
<head>
<meta charset="UTF-8">
<meta name="viewport" content="width=device-width, initial-scale=1.0">
<title>Hello Docker</title>
</head>
<body>
<h1>
Hello Docker Nginx
</h1>
<p>
nginx バーチャルホスト: 7000
</p>
<p>
<a href="django_comment/">8080ポートのnginxトップ (Django コメントアプリケーション) へ</a>
</p>
<p>
<a href="django_comment_api/comments/">8090ポートのトップ (Django API) へ</a>
</p>
</body>
</html>
Python Django の2つのプロジェクトは django/ 以下に配置することになります.Django のプロジェクト自体が Git で管理されるはずなので,Docker のリポジトリには Django のプロジェクトが含まれないように django/.gitignore を作成します.
django/.gitignore
*
Docker に関する設定が終われば,Python Django のプロジェクトに関する2つのコードを設置します.まず,GitHub で公開している Django コメントアプリケーションのプロジェクトについて,リポジトリのクローンを作成します.具体的には (1) で django ディレクトリに移動し,(2) ディレクトリの内のファイル/ディレクトリを一覧で確認します.(3) ではクローンを作成してコメント掲示板のソースコードをダウンロードします.(4) ではダウンロードされたディレクトリ名を確認し,(5) でそのディレクトリに移動します.なお,このディレクトリ名が docker-compose.yml の24行目や46行目に指定されている内容と一致していなければならないことに注意してください.(6) では .env.example というサンプルからコピー .env を作成しています.
% cd django ⏎  # (1) ディレクトの移動
% ls -a ⏎  # (2) ファイル/ディレクトリ一覧の確認
.               ..              .gitignore
% git clone https://github.com/rinsaka/django_comment2022_mysql.git ⏎  # (3) クローンを作成
Cloning into 'django_comment2022_mysql'...
remote: Enumerating objects: 461, done.
remote: Counting objects: 100% (461/461), done.
remote: Compressing objects: 100% (251/251), done.
remote: Total 461 (delta 222), reused 438 (delta 199), pack-reused 0 (from 0)
Receiving objects: 100% (461/461), 419.40 KiB | 688.00 KiB/s, done.
Resolving deltas: 100% (222/222), done.
%
% ls ⏎  # (4) ファイル/ディレクトリの確認
django_comment2022_mysql
% cd django_comment2022_mysql ⏎  # (5) ディレクトリの移動
% cp .env.example .env ⏎  # (6) ファイルのコピー
% cd .. ⏎  # (7) 一つ上のディレクトリに移動
%
上の作業で django/django_comment2022_mysql/ ディレクトリに .env ファイルが作成されました.このサンプルファイルは次のようになっています.
django/django_comment2022_mysql/.env(サンプル)
# 公開する URL をサブディレクトリにする場合は APP_URL に指定する
APP_URL=
# APP_URL=/django_comment
# Falseにすると本番環境としてエラーページが 404 ページになる
DEBUG=True
# DEBUG=False
# データベースを sqlite か mysql のどちらかを選ぶ
# mysql の場合は DB_NAME 以下の設定も必要
DB=sqlite
# DB=mysql
# DB_NAME=django-comments
# DB_USER=docker-user
# DB_PASSWORD=password
# DB_HOST=mysql
# DB_PORT=3306
これを次のとおり書き換えます.ここで,15行目の DB_NAME は init-db.sql の4行目で指定したデータベース名と同じ設定にしてください.また,16行目の DB_USER や17行目の DB_PASSWORD は .env に設定した MYSQL_USER や MYSQL_PASSWORD と同じ内容を指定してください.さらに,Django アプリケーションを http://localhost/django_comment/ で運用したいので2行目をコメントアウトし,3行目を有効にしてください.
django/django_comment2022_mysql/.env
# 公開する URL をサブディレクトリにする場合は APP_URL に指定する
# APP_URL=
APP_URL=/django_comment
# Falseにすると本番環境としてエラーページが 404 ページになる
DEBUG=True
# DEBUG=False
# データベースを sqlite か mysql のどちらかを選ぶ
# mysql の場合は DB_NAME 以下の設定も必要
# DB=sqlite
DB=mysql
DB_NAME=django-comments
DB_USER=docker-user
DB_PASSWORD=password
DB_HOST=mysql
DB_PORT=3306
次に Django API のプロジェクトについてもクローンを作成します.具体的には,(1) で カレントディレクトリが django ディレクトリである(つまり,django_comment2022_msql ディレクトリが見える)ことを確認し,(2) でクローンを作成します.(3) ではクローンが作成されたディレクトリ名を確認し,(4) でそのディレクトリに移動します.ここでもディレクトリ名が docker-compose.yml の36行目や58行目に指定されている内容と一致していなければならないことに注意してください.(5) では .env のサンプルからコピーを作成します.(6), (7) では上の階層のディレクトリ(つまり,最上位のディレクトリ)に戻っています.
% ls ⏎  # (1) ファイル/ディレクトリ一覧の確認
django_comment2022_mysql
% git clone https://github.com/rinsaka/django_comment_api_mysql.git ⏎  # (2) クローンの作成
Cloning into 'django_comment_api_mysql'...
remote: Enumerating objects: 272, done.
remote: Counting objects: 100% (272/272), done.
remote: Compressing objects: 100% (216/216), done.
remote: Total 272 (delta 73), reused 252 (delta 53), pack-reused 0 (from 0)
Receiving objects: 100% (272/272), 1.01 MiB | 10.39 MiB/s, done.
Resolving deltas: 100% (73/73), done.
% ls ⏎  # (3) ファイル/ディレクトリ一覧の確認
django_comment_api_mysql        django_comment2022_mysql
% cd django_comment_api_mysql ⏎  # (4) ディレクトリの移動
% cp .env.example .env ⏎  # (5) ファイルをコピー
% cd .. ⏎  # (6) 1階層上に移動
% cd .. ⏎  # (7) 1階層上に移動
%
上の作業で django/django_comment_api_mysql/ ディレクトリに .env ファイルが作成されました.このサンプルファイルは次のようになっています.
django/django_comment_api_mysql/.env(サンプル)
# 公開する URL をサブディレクトリにする場合は APP_URL に指定する
APP_URL=
# APP_URL=/django_comment_api
# Falseにすると本番環境としてエラーページが 404 ページになる
DEBUG=True
# DEBUG=False
# データベースを sqlite か mysql のどちらかを選ぶ
# mysql の場合は DB_NAME 以下の設定も必要
DB=sqlite
# DB=mysql
# DB_NAME=django-comments
# DB_USER=docker-user
# DB_PASSWORD=password
# DB_HOST=mysql
# DB_PORT=3306
# ローカル開発用
DJANGO_ENV=development
DJANGO_USE_HTTPS=False
# 本番環境用
# DJANGO_ENV=production
# DJANGO_USE_HTTPS=True
ここでは http://localhost/django_comment_api で API を公開したいので2行目をコメントアウトして3行目を有効にします.また,データベースには MySQL を利用するので,その設定を行います.なお,ユーザ名やパスワードは Docker の .env に指定したものと同じ内容にしてください
django/django_comment_api_mysql/.env(サンプル)
# 公開する URL をサブディレクトリにする場合は APP_URL に指定する
# APP_URL=
APP_URL=/django_comment_api
# Falseにすると本番環境としてエラーページが 404 ページになる
DEBUG=True
# DEBUG=False
# データベースを sqlite か mysql のどちらかを選ぶ
# mysql の場合は DB_NAME 以下の設定も必要
# DB=sqlite
DB=mysql
DB_NAME=django-comments
DB_USER=docker-user
DB_PASSWORD=password
DB_HOST=mysql
DB_PORT=3306
# ローカル開発用
DJANGO_ENV=development
DJANGO_USE_HTTPS=False
# 本番環境用
# DJANGO_ENV=production
# DJANGO_USE_HTTPS=True
すべてのファイルの準備ができました.念のためコンテナが起動していないことを確認します.
% docker container ls -a ⏎
CONTAINER ID   IMAGE     COMMAND   CREATED   STATUS    PORTS     NAMES
%
また,現時点でのイメージの一覧を確認しておきます.
% docker image ls ⏎
REPOSITORY                  TAG       IMAGE ID       CREATED          SIZE
django02mysql-python_app    latest    27da249c9d9d   40 minutes ago   1.13GB
django01sqlite-python_app   latest    aefe61bf7d8d   40 minutes ago   1.13GB
mysql                       8.0       4b0d5362c262   2 weeks ago      776MB
nginx                       1.25.5    8dd77ef2d82e   17 months ago    193MB
%
コンテナを起動します.
% docker compose up -d ⏎
[+] Running 5/5
 ✔ mysql Pulled                                                                       3.6s
 ✔ nginx8080 Pulled                                                                   3.5s
 ✔ nginx7000 Pulled                                                                   3.5s
 ✔ nginx Pulled                                                                       3.5s
 ✔ nginx8090 Pulled                                                                   3.6s
[+] Building 1.7s (11/11) FINISHED
 => [internal] load local bake definitions                                            0.0s
 => => reading from stdin 1.08kB                                                      0.0s
 => [python_app internal] load build definition from Dockerfile                       0.0s
 => => transferring dockerfile: 385B                                                  0.0s
 => [python_api internal] load metadata for docker.io/library/python:3.11             1.5s
 => [python_api internal] load .dockerignore                                          0.0s
 => => transferring context: 2B                                                       0.0s
 => [python_api 1/3] FROM docker.io/library/python:3.11@sha256:a2bd92ce584000ca1a93a  0.0s
 => CACHED [python_api 2/3] WORKDIR /code                                             0.0s
 => CACHED [python_api 3/3] RUN pip install --upgrade pip                             0.0s
 => [python_api] exporting to image                                                   0.0s
 => => exporting layers                                                               0.0s
 => => writing image sha256:cc22eac0d5642e8ec38680a3993d6ec447384aad8519695862a9b1f1  0.0s
 => => naming to docker.io/library/django03api-python_api                             0.0s
 => [python_app] exporting to image                                                   0.0s
 => => exporting layers                                                               0.0s
 => => writing image sha256:d36420676ef33ff1f3c95bd6b774def4389bb7c1b1c56e87b72dc7a5  0.0s
 => => naming to docker.io/library/django03api-python_app                             0.0s
 => [python_api] resolving provenance for metadata file                               0.0s
 => [python_app] resolving provenance for metadata file                               0.0s
[+] Running 11/11
 ✔ django03api-python_app            Built                                            0.0s
 ✔ django03api-python_api            Built                                            0.0s
 ✔ Network django03api_default       Created                                          0.0s
 ✔ Volume "django03api_mysqlvolume"  Created                                          0.0s
 ✔ Container python_app_03           Started                                          0.3s
 ✔ Container python_api_03           Started                                          0.3s
 ✔ Container python_nginx_03_7000    Started                                          0.3s
 ✔ Container python_mysql_03         Started                                          0.3s
 ✔ Container python_nginx_03_8080    Started                                          0.4s
 ✔ Container python_nginx_03_8090    Started                                          0.3s
 ✔ Container python_nginx_03_rev     Started                                          0.4s
%
コンテナの起動状態を確認します.合計で7個のコンテナが起動しているはずです.
% docker container ls ⏎
CONTAINER ID   IMAGE                    COMMAND                   CREATED              STATUS              PORTS                                         NAMES
eeb2f5fe8632   nginx:1.25.5             "/docker-entrypoint.…"   About a minute ago   Up About a minute   0.0.0.0:80->80/tcp, [::]:80->80/tcp           python_nginx_03_rev
416e02842922   nginx:1.25.5             "/docker-entrypoint.…"   About a minute ago   Up About a minute   0/tcp, 80/tcp                                 python_nginx_03_8090
ef0c94efbd5a   nginx:1.25.5             "/docker-entrypoint.…"   About a minute ago   Up About a minute   0/tcp, 80/tcp                                 python_nginx_03_8080
0ac0a9c76b01   mysql:8.0                "docker-entrypoint.s…"   About a minute ago   Up About a minute   0.0.0.0:3306->3306/tcp, [::]:3306->3306/tcp   python_mysql_03
ad0e2f6bf852   django03api-python_app   "/bin/sh -c 'pip ins…"   About a minute ago   Up About a minute   8100/tcp                                      python_app_03
970caed39fae   django03api-python_api   "/bin/sh -c 'pip ins…"   About a minute ago   Up About a minute   8200/tcp                                      python_api_03
cab8e24d51fa   nginx:1.25.5             "/docker-entrypoint.…"   About a minute ago   Up About a minute   0/tcp, 80/tcp                                 python_nginx_03_7000
%
MySQL データベースのコンテナにログインしてみます.
% docker compose exec mysql /bin/bash ⏎
bash-5.1# mysql -u docker-user -p ⏎
Enter password:  ⏎
Welcome to the MySQL monitor.  Commands end with ; or \g.
Your MySQL connection id is 8
Server version: 8.0.43 MySQL Community Server - GPL

Copyright (c) 2000, 2025, Oracle and/or its affiliates.

Oracle is a registered trademark of Oracle Corporation and/or its
affiliates. Other names may be trademarks of their respective
owners.

Type 'help;' or '\h' for help. Type '\c' to clear the current input statement.

mysql> show databases; ⏎
+--------------------+
| Database           |
+--------------------+
| django-comments    |
| information_schema |
| performance_schema |
+--------------------+
3 rows in set (0.01 sec)

mysql> exit ⏎
Bye
bash-5.1# exit ⏎
exit
%
Django のアプリケーションコンテナにログインしてデータベースのマイグレーションとサンプルデータの投入を行います.まず,アプリケーションサーバにログインし,マイグレーションが実行されていない(つまり,テーブルが作成されていない)ことを確認します.
% docker compose exec python_app /bin/bash ⏎
root@ad0e2f6bf852:/code# ls ⏎
comments           django_comment  readme.md         staticfiles
db.sqlite3.sample  manage.py       requirements.txt
root@ad0e2f6bf852:/code#
root@ad0e2f6bf852:/code# python manage.py showmigrations ⏎
System check identified some issues:

WARNINGS:
?: (staticfiles.W004) The directory '/code/static' in the STATICFILES_DIRS setting does not exist.
admin
 [ ] 0001_initial
 [ ] 0002_logentry_remove_auto_add
 [ ] 0003_logentry_add_action_flag_choices
auth
 [ ] 0001_initial
 [ ] 0002_alter_permission_name_max_length
 [ ] 0003_alter_user_email_max_length
 [ ] 0004_alter_user_username_opts
 [ ] 0005_alter_user_last_login_null
 [ ] 0006_require_contenttypes_0002
 [ ] 0007_alter_validators_add_error_messages
 [ ] 0008_alter_user_username_max_length
 [ ] 0009_alter_user_last_name_max_length
 [ ] 0010_alter_group_name_max_length
 [ ] 0011_update_proxy_permissions
 [ ] 0012_alter_user_first_name_max_length
comments
 [ ] 0001_initial
 [ ] 0002_alter_comment_options
contenttypes
 [ ] 0001_initial
 [ ] 0002_remove_content_type_name
sessions
 [ ] 0001_initial
root@ad0e2f6bf852:/code#
マイグレーションを実行してテーブルを作成します.
root@ad0e2f6bf852:/code# python manage.py migrate ⏎
System check identified some issues:

WARNINGS:
?: (staticfiles.W004) The directory '/code/static' in the STATICFILES_DIRS setting does not exist.
Operations to perform:
  Apply all migrations: admin, auth, comments, contenttypes, sessions
Running migrations:
  Applying contenttypes.0001_initial... OK
  Applying auth.0001_initial... OK
  Applying admin.0001_initial... OK
  Applying admin.0002_logentry_remove_auto_add... OK
  Applying admin.0003_logentry_add_action_flag_choices... OK
  Applying contenttypes.0002_remove_content_type_name... OK
  Applying auth.0002_alter_permission_name_max_length... OK
  Applying auth.0003_alter_user_email_max_length... OK
  Applying auth.0004_alter_user_username_opts... OK
  Applying auth.0005_alter_user_last_login_null... OK
  Applying auth.0006_require_contenttypes_0002... OK
  Applying auth.0007_alter_validators_add_error_messages... OK
  Applying auth.0008_alter_user_username_max_length... OK
  Applying auth.0009_alter_user_last_name_max_length... OK
  Applying auth.0010_alter_group_name_max_length... OK
  Applying auth.0011_update_proxy_permissions... OK
  Applying auth.0012_alter_user_first_name_max_length... OK
  Applying comments.0001_initial... OK
  Applying comments.0002_alter_comment_options... OK
  Applying sessions.0001_initial... OK
root@ad0e2f6bf852:/code#
マイグレーションが実行されたことを確認します.
root@ad0e2f6bf852:/code# python manage.py showmigrations ⏎
System check identified some issues:

WARNINGS:
?: (staticfiles.W004) The directory '/code/static' in the STATICFILES_DIRS setting does not exist.
admin
 [X] 0001_initial
 [X] 0002_logentry_remove_auto_add
 [X] 0003_logentry_add_action_flag_choices
auth
 [X] 0001_initial
 [X] 0002_alter_permission_name_max_length
 [X] 0003_alter_user_email_max_length
 [X] 0004_alter_user_username_opts
 [X] 0005_alter_user_last_login_null
 [X] 0006_require_contenttypes_0002
 [X] 0007_alter_validators_add_error_messages
 [X] 0008_alter_user_username_max_length
 [X] 0009_alter_user_last_name_max_length
 [X] 0010_alter_group_name_max_length
 [X] 0011_update_proxy_permissions
 [X] 0012_alter_user_first_name_max_length
comments
 [X] 0001_initial
 [X] 0002_alter_comment_options
contenttypes
 [X] 0001_initial
 [X] 0002_remove_content_type_name
sessions
 [X] 0001_initial
root@ad0e2f6bf852:/code#
サンプルデータを投入し,アプリケーションサーバからログアウトします.
root@ad0e2f6bf852:/code# python manage.py loaddata comments/fixtures/comments-data.json ⏎
System check identified some issues:

WARNINGS:
?: (staticfiles.W004) The directory '/code/static' in the STATICFILES_DIRS setting does not exist.
Installed 10 object(s) from 1 fixture(s)
root@ad0e2f6bf852:/code# exit ⏎
exit
%
次にデータベースコンテナにログインしてデータが登録されていることを確認します.
% docker compose exec mysql /bin/bash ⏎
bash-5.1# mysql -u docker-user -p ⏎
Enter password:  ⏎
Welcome to the MySQL monitor.  Commands end with ; or \g.
Your MySQL connection id is 16
Server version: 8.0.43 MySQL Community Server - GPL

Copyright (c) 2000, 2025, Oracle and/or its affiliates.

Oracle is a registered trademark of Oracle Corporation and/or its
affiliates. Other names may be trademarks of their respective
owners.

Type 'help;' or '\h' for help. Type '\c' to clear the current input statement.

mysql> SHOW DATABASES; ⏎
+--------------------+
| Database           |
+--------------------+
| django-comments    |
| information_schema |
| performance_schema |
+--------------------+
3 rows in set (0.00 sec)

mysql> USE django-comments; ⏎
Reading table information for completion of table and column names
You can turn off this feature to get a quicker startup with -A

Database changed
mysql> SHOW TABLES; ⏎
+----------------------------+
| Tables_in_django-comments  |
+----------------------------+
| auth_group                 |
| auth_group_permissions     |
| auth_permission            |
| auth_user                  |
| auth_user_groups           |
| auth_user_user_permissions |
| comments_comment           |
| django_admin_log           |
| django_content_type        |
| django_migrations          |
| django_session             |
+----------------------------+
11 rows in set (0.01 sec)

mysql> DESC comments_comment; ⏎
+------------+---------------+------+-----+---------+----------------+
| Field      | Type          | Null | Key | Default | Extra          |
+------------+---------------+------+-----+---------+----------------+
| id         | bigint        | NO   | PRI | NULL    | auto_increment |
| title      | varchar(200)  | NO   |     | NULL    |                |
| body       | varchar(1000) | NO   |     | NULL    |                |
| created_at | datetime(6)   | NO   |     | NULL    |                |
| updated_at | datetime(6)   | NO   |     | NULL    |                |
+------------+---------------+------+-----+---------+----------------+
5 rows in set (0.00 sec)

mysql> SELECT * FROM comments_comment; ⏎
+----+--------------------------+---------------------------+----------------------------+----------------------------+
| id | title                    | body                      | created_at                 | updated_at                 |
+----+--------------------------+---------------------------+----------------------------+----------------------------+
|  1 | 最初のコメント           | コメントの本文            | 2022-07-01 12:00:00.000000 | 2022-07-01 12:00:00.000000 |
|  2 | 2個目のコメント          | 2個目の本文              | 2022-07-02 13:00:00.000000 | 2022-07-02 13:00:00.000000 |
|  3 | <3個目>のコメント        | <h1>3個目の本文</h1>      | 2022-07-02 13:03:00.000000 | 2022-07-02 13:03:00.000000 |
|  4 | 4個目のコメント          | 4個目の本文               | 2022-07-02 13:04:00.000000 | 2022-07-02 13:04:00.000000 |
|  5 | 5個目のコメント          | 5個目の本文               | 2022-07-02 13:05:00.000000 | 2022-07-02 13:05:00.000000 |
|  6 | 6個目のコメント          | 6個目の本文               | 2022-07-02 13:06:00.000000 | 2022-07-02 13:06:00.000000 |
|  7 | 7個目のコメント          | 7個目の本文               | 2022-07-02 13:07:00.000000 | 2022-07-02 13:07:00.000000 |
|  8 | 8個目のコメント          | 8個目の本文               | 2022-07-02 13:08:00.000000 | 2022-07-02 13:08:00.000000 |
|  9 | 9個目のコメント          | 9個目の本文               | 2022-07-02 13:09:00.000000 | 2022-07-02 13:20:00.000000 |
| 10 | 10個目のコメント         | 10個目の本文              | 2022-07-02 13:10:00.000000 | 2022-07-02 13:10:00.000000 |
+----+--------------------------+---------------------------+----------------------------+----------------------------+
10 rows in set (0.00 sec)

mysql> exit ⏎
Bye
bash-5.1# exit ⏎
exit
%
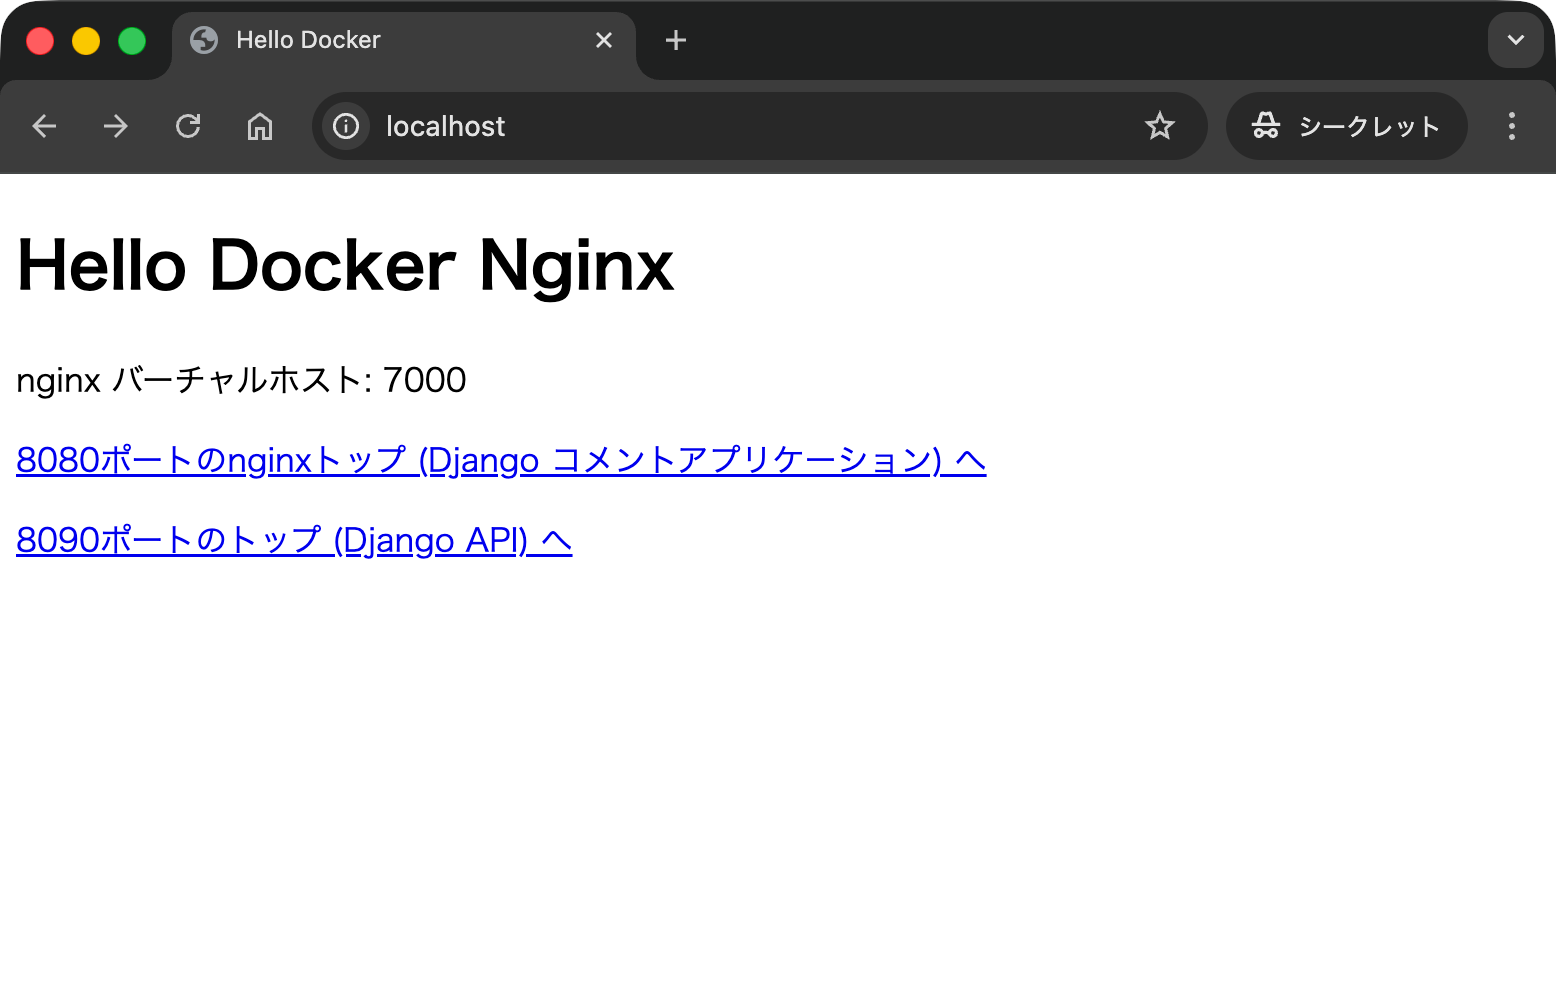
すべての準備が整ったので,ブラウザで http://localhost/ に接続します.まず,7000番ポートで運用している nginx の固定ページ (index.html) が表示されました.続いて,「8080ポートのnginxトップ」のリンクをクリックして移動します.
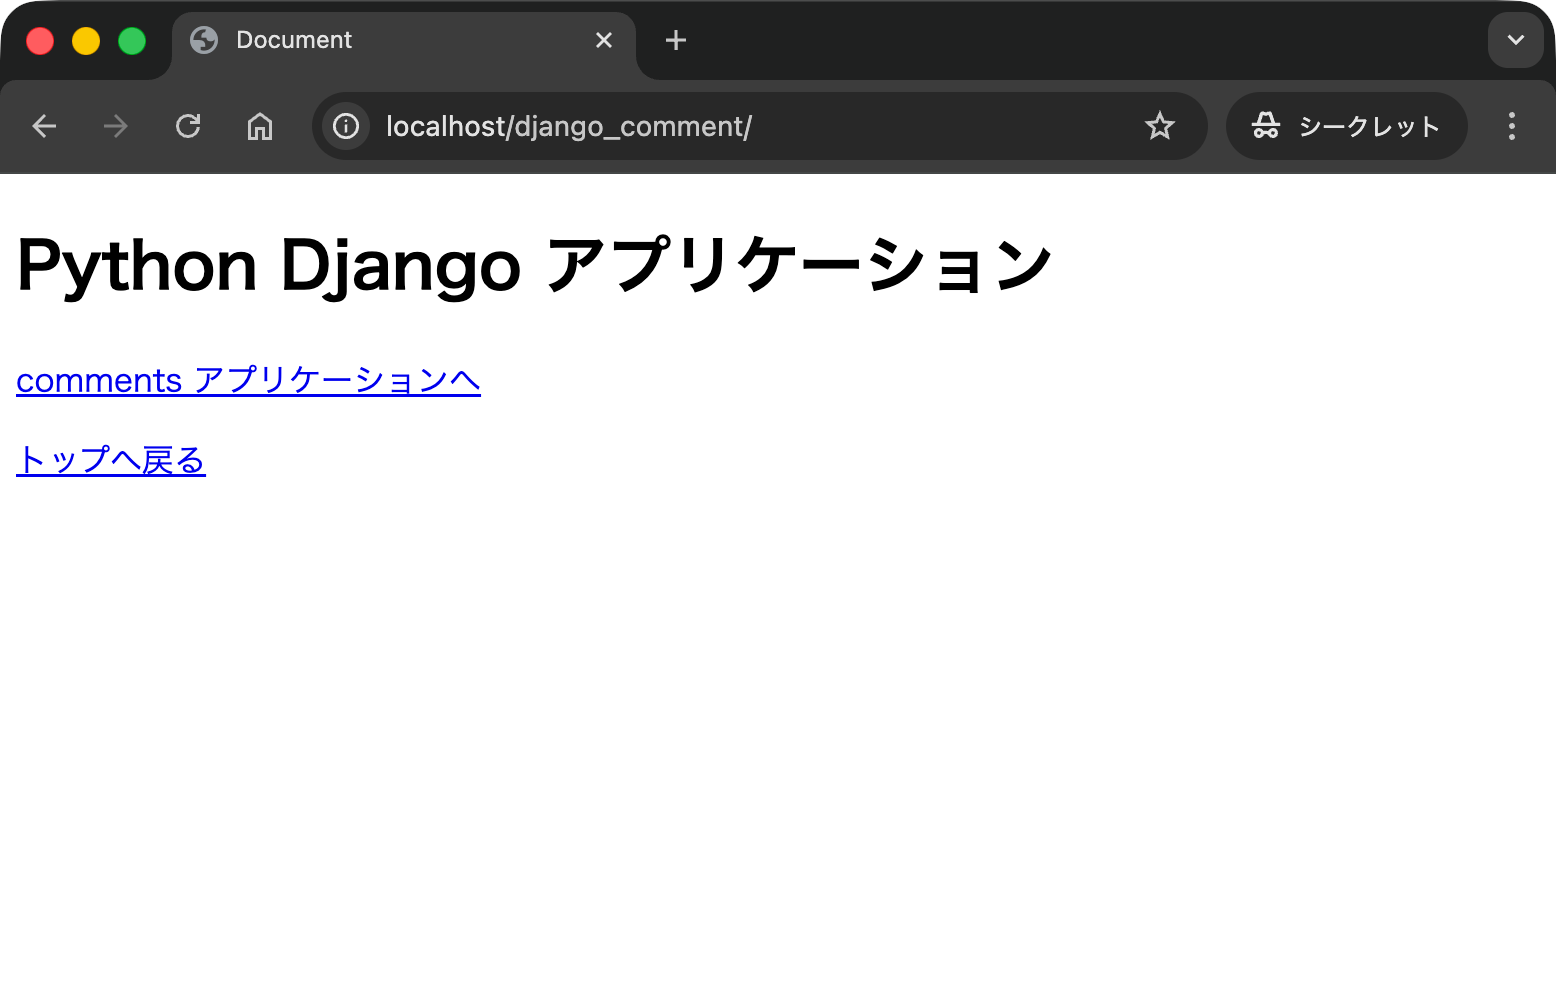
http://localhost/django_comment に移動しました.さらにアプリケーションへと移動します.
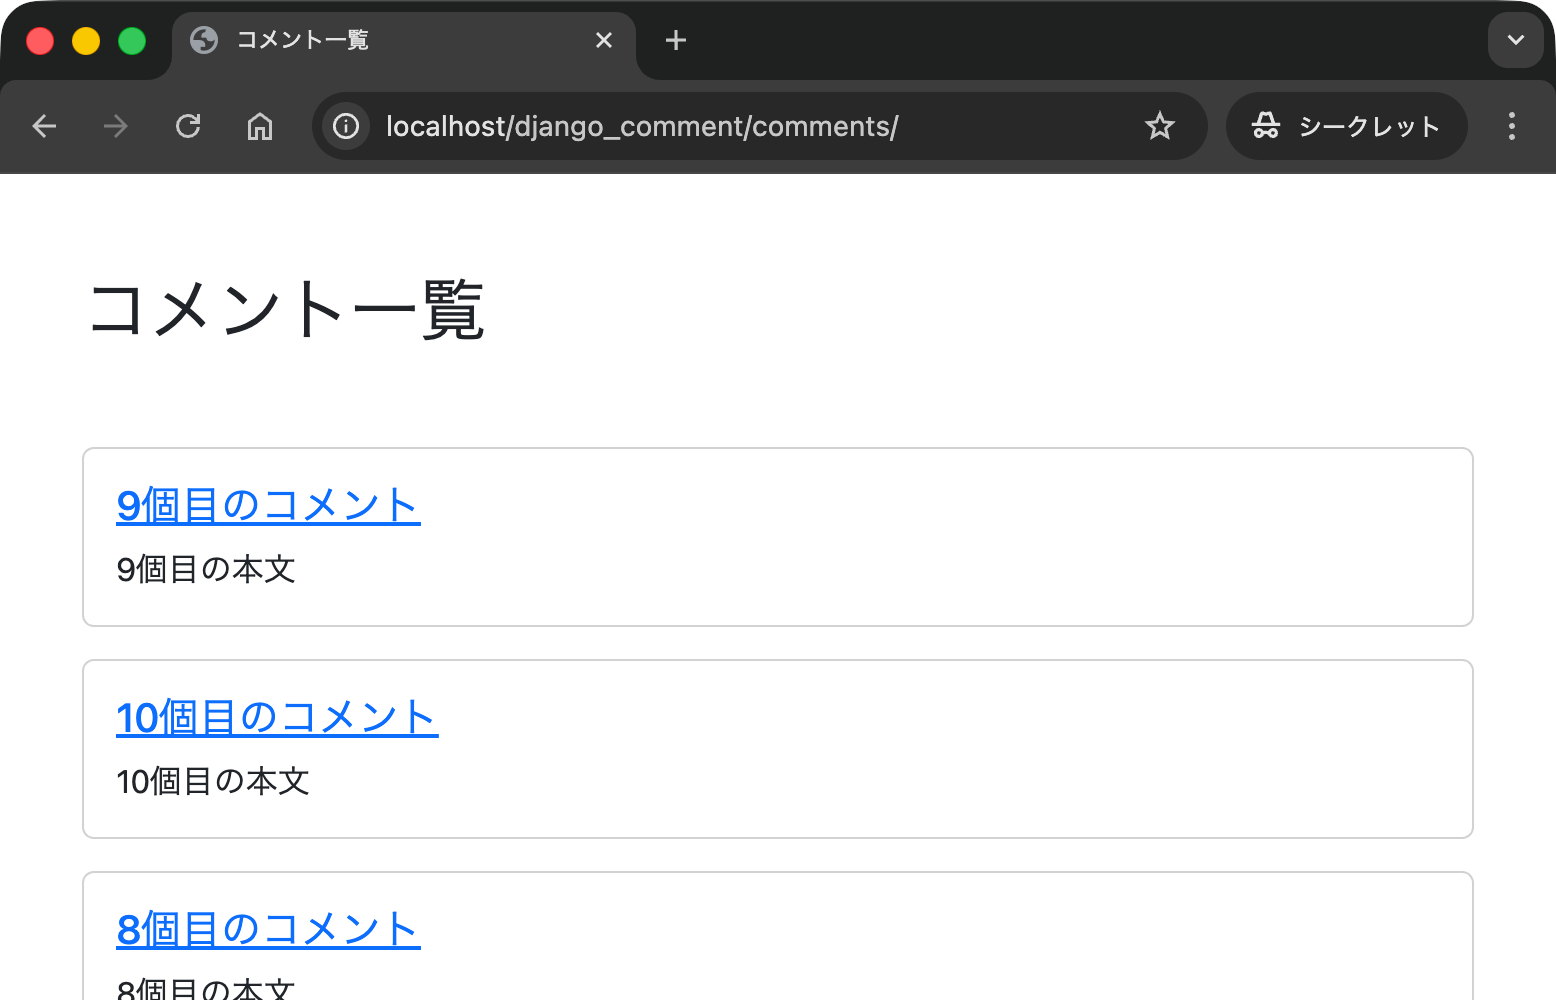
コメントの一覧が表示されました.このページから新規にコメントを登録したり,更新したりできるはずです.
トップページに戻って今度は「8090ポートのトップ (Django API) へ」に移動します.すると次のような画面が表示されるはずです.API の開発方法や利用方法の詳細はこちらで説明しています.
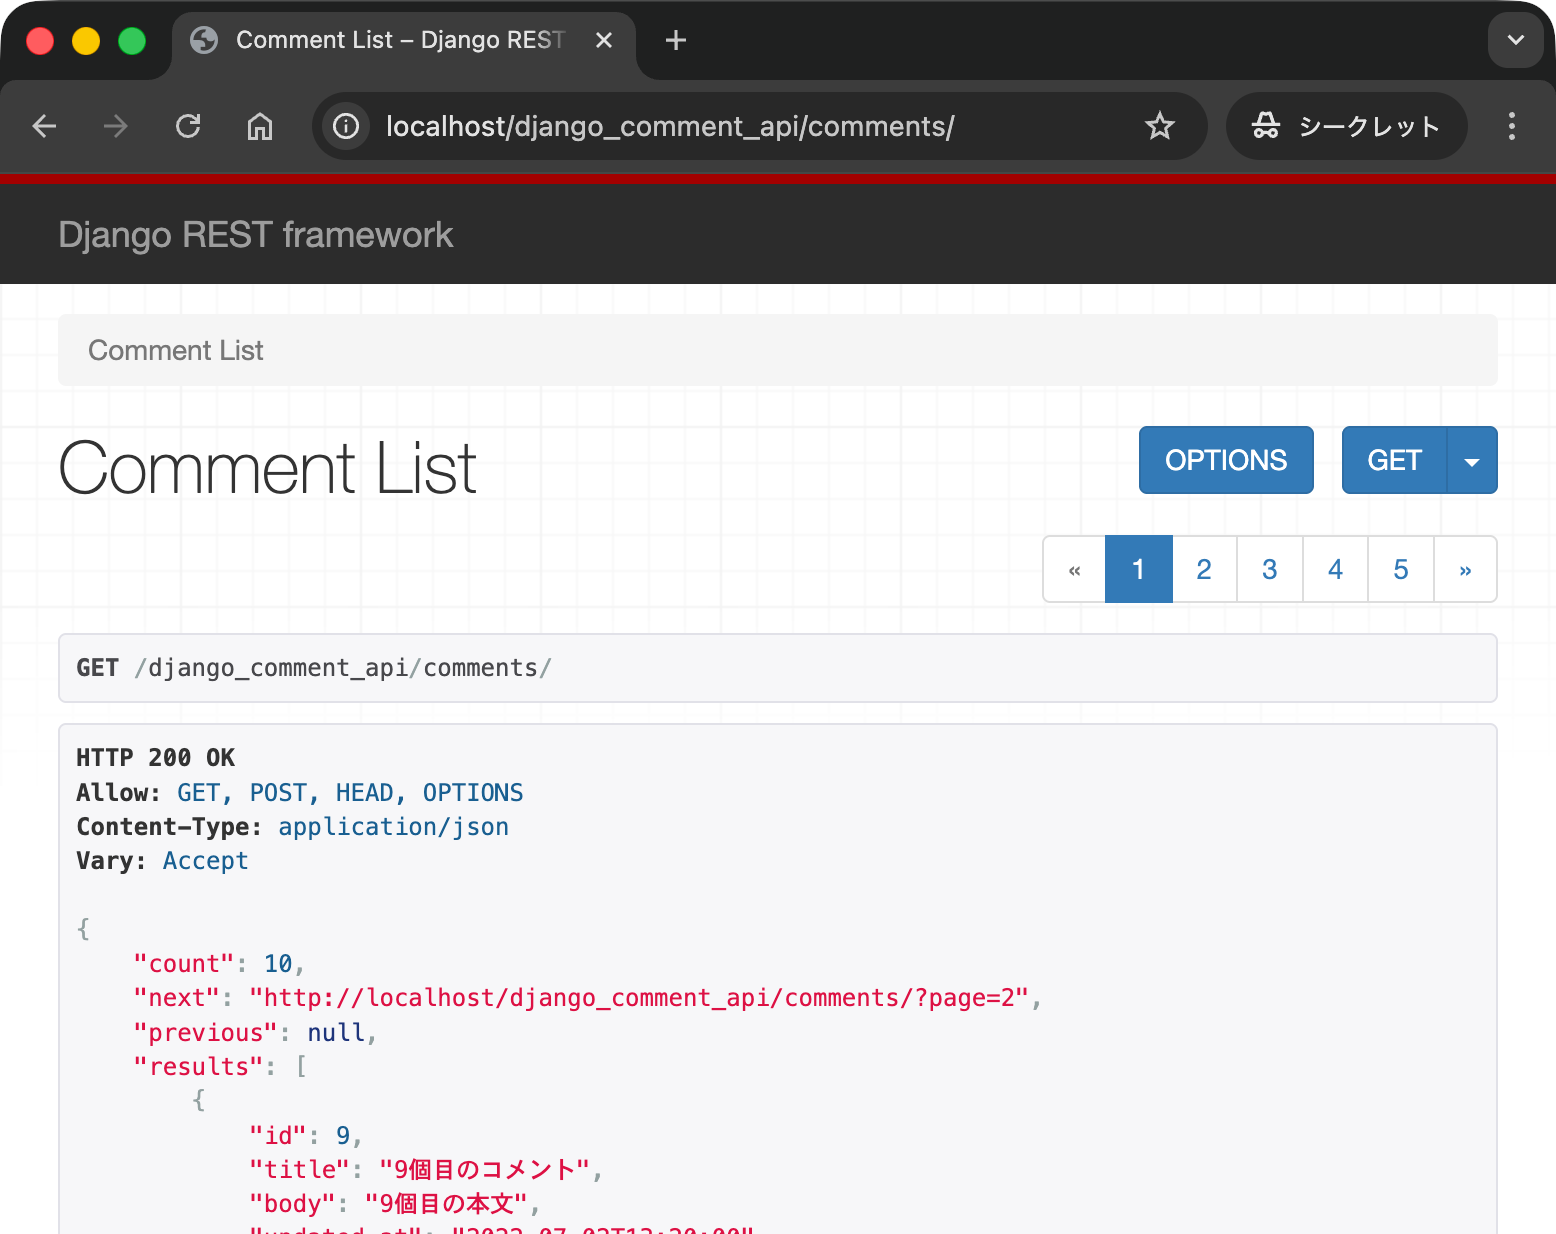
ターミナルなどのコマンドラインから API のエンドポイントにアクセスしてみます.具体的には curl コマンドを使ってコメントの一覧を取得します.
% curl http://localhost/django_comment_api/comments/ ⏎
{"count":10,"next":"http://localhost/django_comment_api/comments/?page=2","previous":null,"results":[{"id":9,"title":"9個目のコメント","body":"9個目の本文","updated_at":"2022-07-02T13:20:00"},{"id":10,"title":"10個目のコメント","body":"10個目の本文","updated_at":"2022-07-02T13:10:00"}]}%
%
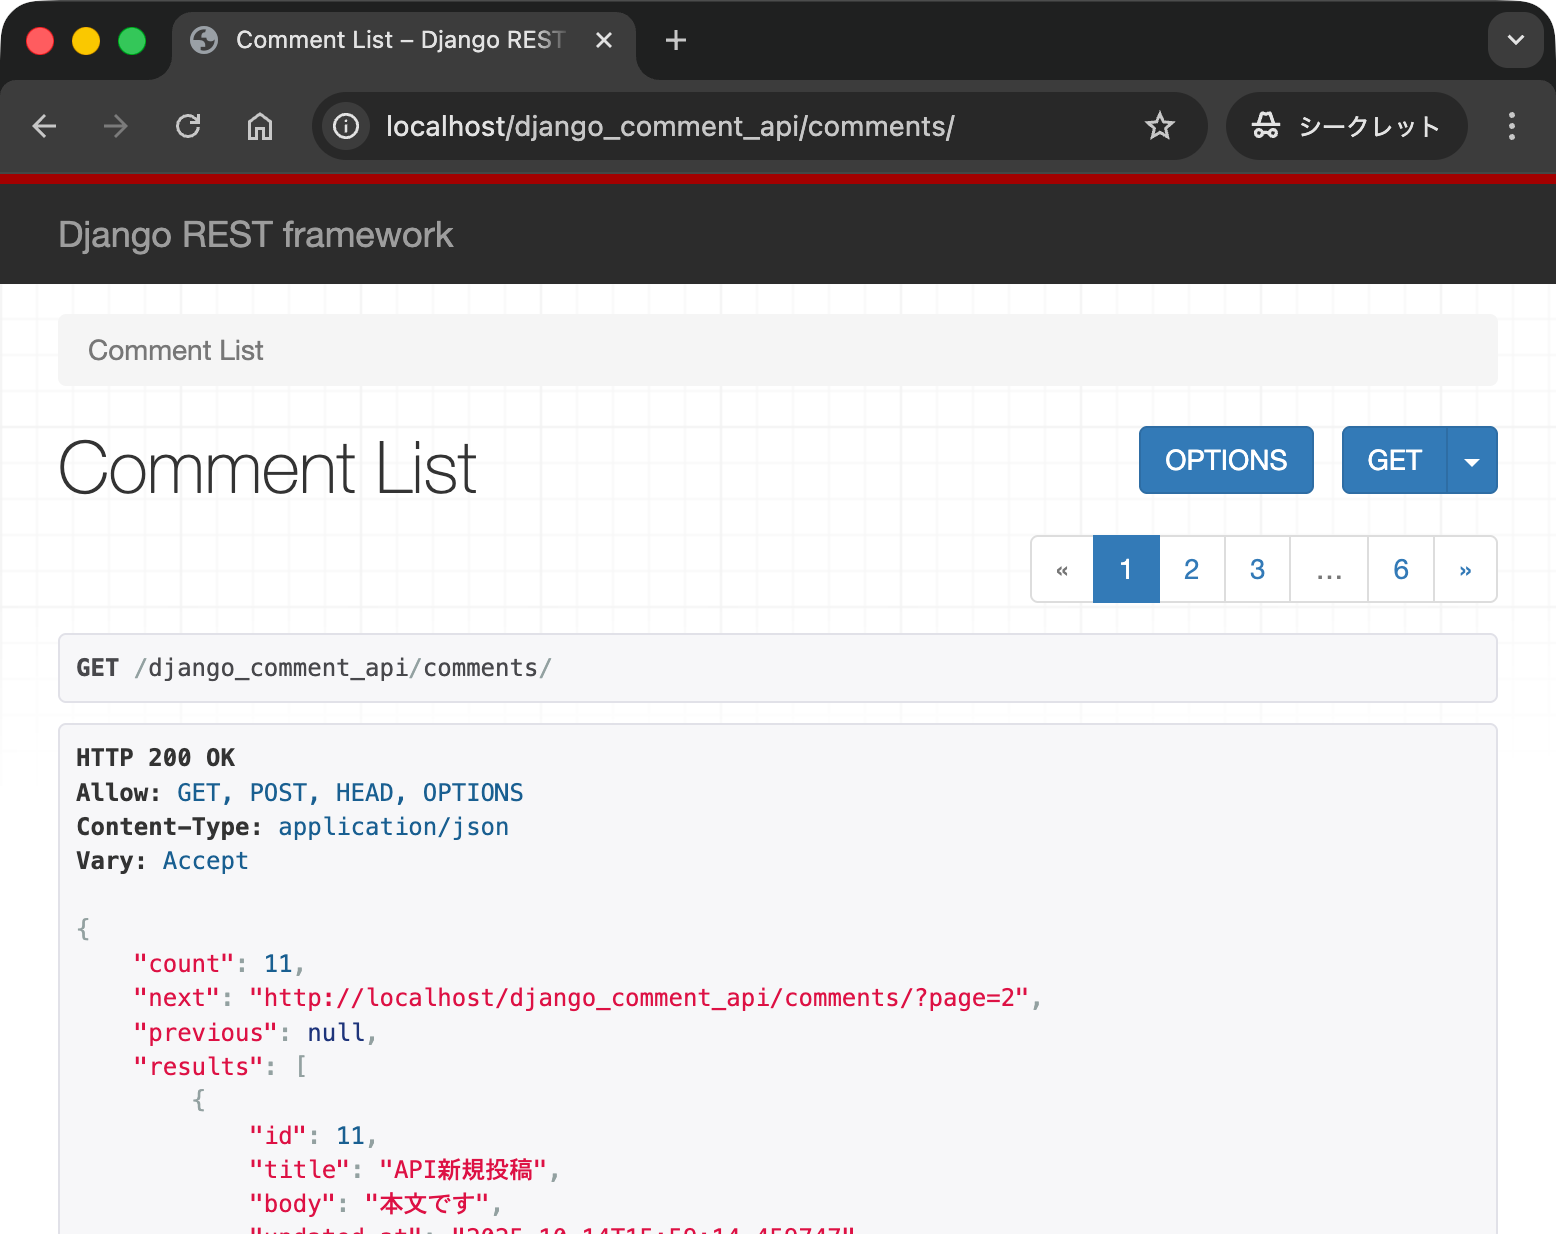
次に POST メソッドを用いて新規にコメントを投稿します.
% curl -X POST -d "title=API新規投稿" -d "body=本文です" http://localhost/django_comment_api/comments/ ⏎
{"id":11,"title":"API新規投稿","body":"本文です","updated_at":"2025-10-14T15:59:14.459747"}
%
登録できたことを確認します.
% curl http://localhost/django_comment_api/comments/ ⏎
{"count":11,"next":"http://localhost/django_comment_api/comments/?page=2","previous":null,"results":[{"id":11,"title":"API新規投稿","body":"本文です","updated_at":"2025-10-14T15:59:14.459747"},{"id":9,"title":"9個目のコメント","body":"9個目の本文","updated_at":"2022-07-02T13:20:00"}]}%
%
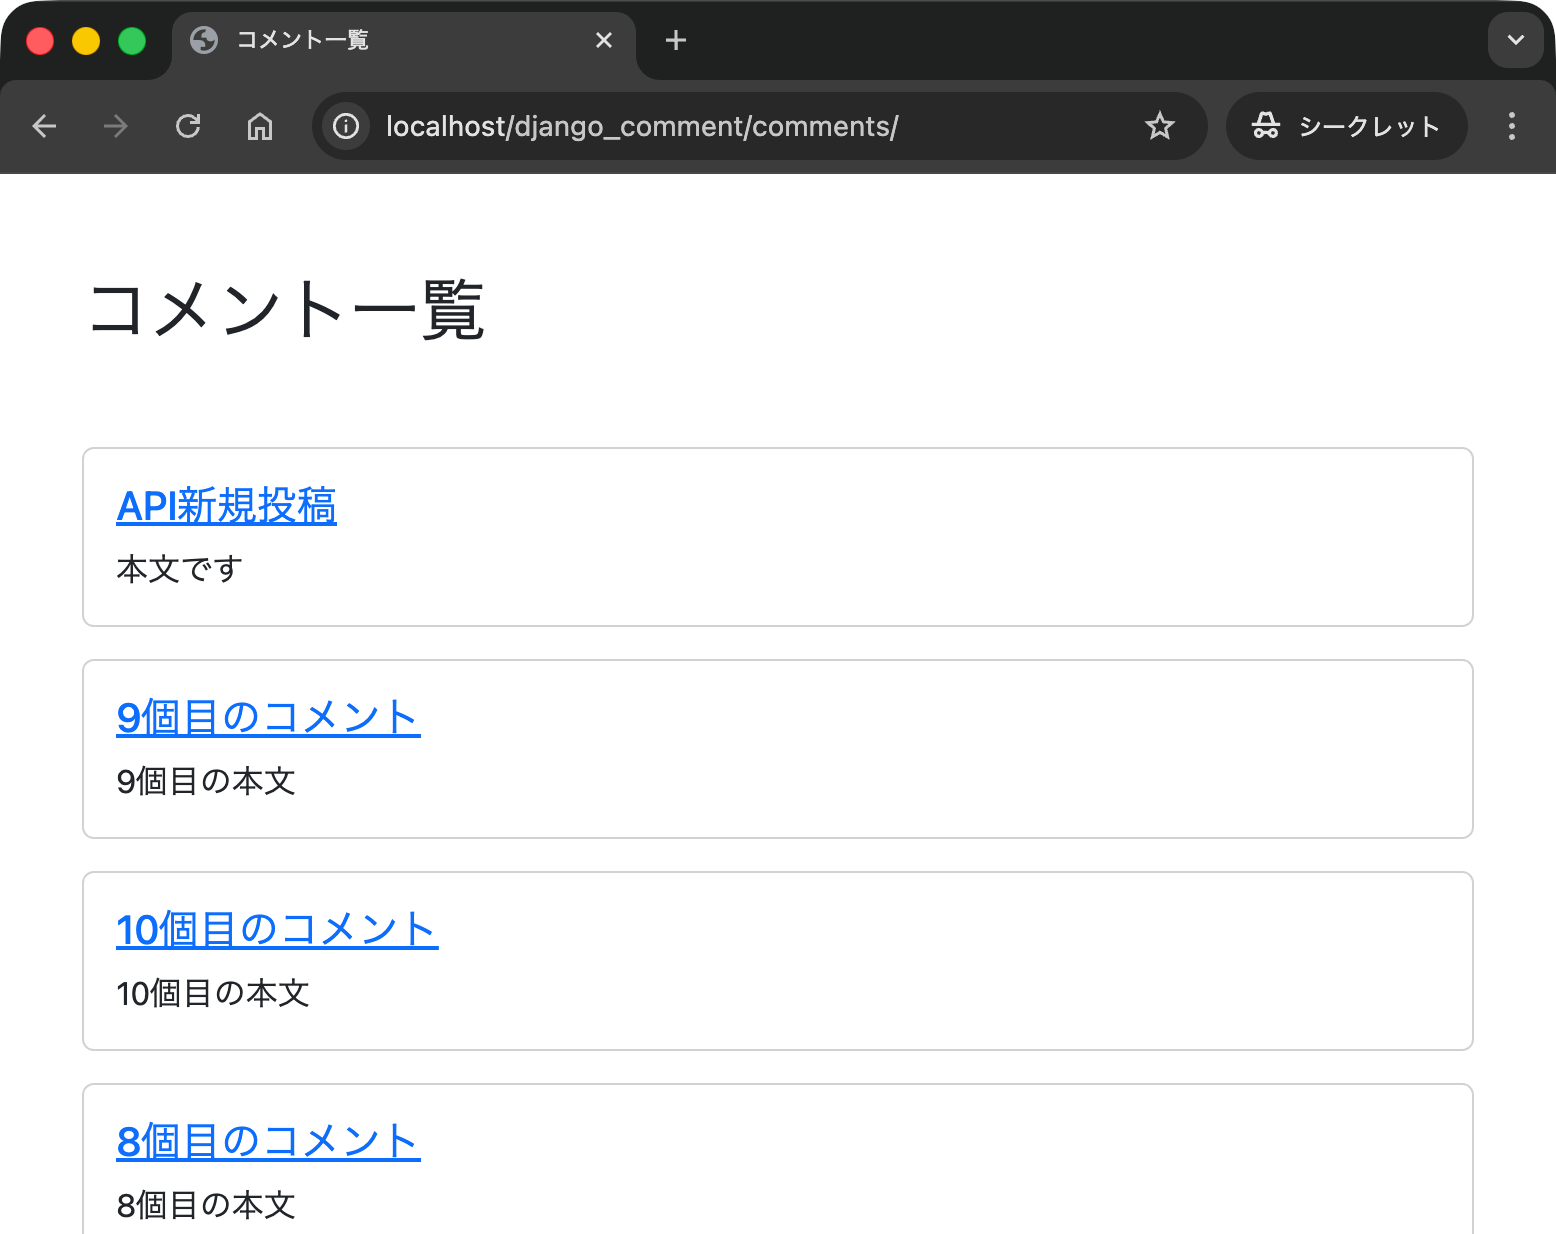
ブラウザでも登録結果が確認できるはずです.
Web アプリケーション (http://localhost/django_comment/comments/) と API アプリケーション (http://localhost/django_comment_api/comments/) で同じデータベースを共有していることから,API で投稿した内容は Web アプリケーションにも反映されます(もちろん逆方向でも同じです).
動作中のコンテナを確認します.
% docker container ls ⏎
CONTAINER ID   IMAGE                    COMMAND                   CREATED          STATUS          PORTS                                         NAMES
eeb2f5fe8632   nginx:1.25.5             "/docker-entrypoint.…"   10 minutes ago   Up 10 minutes   0.0.0.0:80->80/tcp, [::]:80->80/tcp           python_nginx_03_rev
416e02842922   nginx:1.25.5             "/docker-entrypoint.…"   10 minutes ago   Up 10 minutes   0/tcp, 80/tcp                                 python_nginx_03_8090
ef0c94efbd5a   nginx:1.25.5             "/docker-entrypoint.…"   10 minutes ago   Up 10 minutes   0/tcp, 80/tcp                                 python_nginx_03_8080
0ac0a9c76b01   mysql:8.0                "docker-entrypoint.s…"   10 minutes ago   Up 10 minutes   0.0.0.0:3306->3306/tcp, [::]:3306->3306/tcp   python_mysql_03
ad0e2f6bf852   django03api-python_app   "/bin/sh -c 'pip ins…"   10 minutes ago   Up 10 minutes   8100/tcp                                      python_app_03
970caed39fae   django03api-python_api   "/bin/sh -c 'pip ins…"   10 minutes ago   Up 10 minutes   8200/tcp                                      python_api_03
cab8e24d51fa   nginx:1.25.5             "/docker-entrypoint.…"   10 minutes ago   Up 10 minutes   0/tcp, 80/tcp                                 python_nginx_03_7000
%
すべてのコンテナを終了し,破棄します.
% docker compose down ⏎
[+] Running 8/8
 ✔ Container python_nginx_03_rev   Removed                                            0.2s
 ✔ Container python_mysql_03       Removed                                            1.7s
 ✔ Container python_nginx_03_7000  Removed                                            0.2s
 ✔ Container python_nginx_03_8080  Removed                                            0.2s
 ✔ Container python_nginx_03_8090  Removed                                            0.2s
 ✔ Container python_app_03         Removed                                           10.2s
 ✔ Container python_api_03         Removed                                           10.2s
 ✔ Network django03api_default     Removed                                            0.2s
%
コンテナが破棄されたことを確認します.
% docker container ls -a ⏎
CONTAINER ID   IMAGE     COMMAND   CREATED   STATUS    PORTS     NAMES
%
Docker イメージの一覧を確認します.
% docker image ls ⏎
REPOSITORY                  TAG       IMAGE ID       CREATED          SIZE
django01sqlite-python_app   latest    aefe61bf7d8d   52 minutes ago   1.13GB
django03api-python_api      latest    cc22eac0d564   52 minutes ago   1.13GB
django03api-python_app      latest    d36420676ef3   52 minutes ago   1.13GB
django02mysql-python_app    latest    27da249c9d9d   52 minutes ago   1.13GB
mysql                       8.0       4b0d5362c262   2 weeks ago      776MB
nginx                       1.25.5    8dd77ef2d82e   17 months ago    193MB
%
さらにボリュームの一覧も確認します.MySQL データベースの内容はボリュームに格納されているので,コンテナを終了したり破棄したりしてもデータは残ることに注意してください.
% docker volume ls ⏎
DRIVER    VOLUME NAME
local     django02mysql_mysqlvolume
local     django03api_mysqlvolume
%