目次
- Composerのダウンロードとインストール
- コメント掲示板を作成してみよう
- リレーションシップを使いこなそう
- ユーザ認証の機能を実現しよう
- マルチ認証の機能を実現しよう
- MongoDB に接続しよう
- キューを利用しよう
- コマンド(コンソール)を利用しよう
- 本番環境にデプロイしよう
コメント掲示板を作成してみよう
コメント掲示板を作ってみよう
ここではユーザがタイトルと本文を入力してコメントを書き込めるような掲示板を作成してみよう.
- データベースの作成
- テスト用データの設定
- Commentモデルの作成
- Commentsコントローラの作成
- ルートの定義
- データベースからデータを取り出そう
- ビューを使ってレコードを表示しよう
- コメントを個別に表示するページを作ろう
- コメント投稿機能を実装しよう
- 入力内容を検証しよう
- 投稿内容を編集しよう
- 投稿を削除しよう
- テストの自動化を実現しよう
- ビューをレイアウト化しよう
データベースの作成
コメントの内容を格納するcommentsテーブルを作成する.なお,テーブル名は小文字で,複数形で指定するようにしよう.Laravelではテーブルの作成や変更,ロールバックなどのデータベースの操作をマイグレーションファイルを通して行う.まずは,commentsテーブルを作成するために,マイグレーションファイルを生成しよう.マイグレーションファイルの生成には php artisanコマンドを使用する.このコマンドによって,database/migrations/ ディレクトリ以下に実行日時から始まるファイルが作成される.
[GakuinHana@rin06 myapp]$ pwd ⏎
/home/students/GakuinHana/Documents/laravel/myapp
[GakuinHana@rin06 myapp]$ php artisan make:migration create_comments_table --create=comments ⏎
Created Migration: 2019_09_26_100151_create_comments_table
[GakuinHana@rin06 myapp]$
生成されたマイグレーションファイルを修正する.次のとおり,up 関数にcommentsテーブルの構造を指定する.idフィールドには自動的に番号が付けられる.titleフィールドはコメントのタイトルを255文字以内で指定し,本文はbodyフィールドに格納する.また最初の投稿日時と更新日時を保存するためのフィールドも準備しておく.
database/migrations/yyyy_mm_dd_hhmmss_create_comments_table.php (抜粋)
    public function up()
    {
        Schema::create('comments', function (Blueprint $table) {
            $table->bigIncrements('id');
            $table->string('title', 255);
            $table->text('body');
            $table->timestamps();
        });
    }
テーブルの作成には php artisan migrate コマンドを実行する.これによって database/migrations/ ディレクトリにあるマイグレーションファイルのうち,まだ実行されていないファイルだけが実行される.どのファイルが実行されているかを確認するためには php artisan migrate:statusコマンドを実行する.また,マイグレーションの実行を元に戻す(つまりロールバックする)には php artisan migrate:rollback コマンドを実行する.
次の例では,マイグレーションの確認,実行,確認,ロールバック,確認,再実行を順に行っている.
[GakuinHana@rin06 myapp]$ php artisan migrate:status ⏎
Migration table not found.
[GakuinHana@rin06 myapp]$ php artisan migrate ⏎
Migration table created successfully.
Migrating: 2014_10_12_000000_create_users_table
Migrated:  2014_10_12_000000_create_users_table (0 seconds)
Migrating: 2014_10_12_100000_create_password_resets_table
Migrated:  2014_10_12_100000_create_password_resets_table (0 seconds)
Migrating: 2019_09_26_100151_create_comments_table
Migrated:  2019_09_26_100151_create_comments_table (0 seconds)
[GakuinHana@rin06 myapp]$ php artisan migrate:status ⏎
+------+------------------------------------------------+-------+
| Ran? | Migration                                      | Batch |
+------+------------------------------------------------+-------+
| Yes  | 2014_10_12_000000_create_users_table           | 1     |
| Yes  | 2014_10_12_100000_create_password_resets_table | 1     |
| Yes  | 2019_09_26_100151_create_comments_table        | 1     |
+------+------------------------------------------------+-------+
[GakuinHana@rin06 myapp]$ php artisan migrate:rollback ⏎
Rolling back: 2019_09_26_100151_create_comments_table
Rolled back:  2019_09_26_100151_create_comments_table (0 seconds)
Rolling back: 2014_10_12_100000_create_password_resets_table
Rolled back:  2014_10_12_100000_create_password_resets_table (0 seconds)
Rolling back: 2014_10_12_000000_create_users_table
Rolled back:  2014_10_12_000000_create_users_table (0 seconds)
[GakuinHana@rin06 myapp]$ php artisan migrate:status ⏎
+------+------------------------------------------------+-------+
| Ran? | Migration                                      | Batch |
+------+------------------------------------------------+-------+
| No   | 2014_10_12_000000_create_users_table           |       |
| No   | 2014_10_12_100000_create_password_resets_table |       |
| No   | 2019_09_26_100151_create_comments_table        |       |
+------+------------------------------------------------+-------+
[GakuinHana@rin06 myapp]$ php artisan migrate ⏎
Migrating: 2014_10_12_000000_create_users_table
Migrated:  2014_10_12_000000_create_users_table (0.01 seconds)
Migrating: 2014_10_12_100000_create_password_resets_table
Migrated:  2014_10_12_100000_create_password_resets_table (0 seconds)
Migrating: 2019_09_26_100151_create_comments_table
Migrated:  2019_09_26_100151_create_comments_table (0 seconds)
[GakuinHana@rin06 myapp]$
今回は,ユーザ管理を行わないので,usersテーブルやpassword_resetsテーブルは不要である.よって,ロールバックしたあと,二つのマイグレーションファイルを削除し,再度マイグレーションを実行してみよう.なお,rm は削除 (remove) のための Linux コマンドである.もちろんマウスを使ってファイルをゴミ箱に入れる要領で削除してもかまわない.
[GakuinHana@rin06 myapp]$ php artisan migrate:status ⏎
+------+------------------------------------------------+-------+
| Ran? | Migration                                      | Batch |
+------+------------------------------------------------+-------+
| Yes  | 2014_10_12_000000_create_users_table           | 1     |
| Yes  | 2014_10_12_100000_create_password_resets_table | 1     |
| Yes  | 2019_09_26_100151_create_comments_table        | 1     |
+------+------------------------------------------------+-------+
[GakuinHana@rin06 myapp]$ php artisan migrate:rollback ⏎
Rolling back: 2019_09_26_100151_create_comments_table
Rolled back:  2019_09_26_100151_create_comments_table (0 seconds)
Rolling back: 2014_10_12_100000_create_password_resets_table
Rolled back:  2014_10_12_100000_create_password_resets_table (0 seconds)
Rolling back: 2014_10_12_000000_create_users_table
Rolled back:  2014_10_12_000000_create_users_table (0 seconds)
[GakuinHana@rin06 myapp]$ rm database/migrations/2014_10_12_000000_create_users_table.php  ⏎
[GakuinHana@rin06 myapp]$ rm database/migrations/2014_10_12_100000_create_password_resets_table.php  ⏎
[GakuinHana@rin06 myapp]$ php artisan migrate ⏎
Migrating: 2019_09_26_100151_create_comments_table
Migrated:  2019_09_26_100151_create_comments_table (0 seconds)
[GakuinHana@rin06 myapp]$ php artisan migrate:status ⏎
+------+-----------------------------------------+-------+
| Ran? | Migration                               | Batch |
+------+-----------------------------------------+-------+
| Yes  | 2019_09_26_100151_create_comments_table | 1     |
+------+-----------------------------------------+-------+
[GakuinHana@rin06 myapp]$
このあたりでGit でコミットしておこう.このとき,git add . コマンドによって新規ファイルや変更されたファイルがステージングエリアにアップされるが,削除したファイルはアップされない.削除したファイルは git rm file名 コマンドでステージングエリアにアップされる.
[GakuinHana@rin06 myapp]$ git status ⏎
# On branch master
# Changes not staged for commit:
#   (use "git add/rm <file>..." to update what will be committed)
#   (use "git checkout -- <file>..." to discard changes in working directory)
#
#	deleted:    database/migrations/2014_10_12_000000_create_users_table.php
#	deleted:    database/migrations/2014_10_12_100000_create_password_resets_table.php
#	modified:   database/migrations/2019_09_26_100151_create_comments_table.php
#
no changes added to commit (use "git add" and/or "git commit -a")
[GakuinHana@rin06 myapp]$ git add . ⏎
warning: You ran 'git add' with neither '-A (--all)' or '--ignore-removal',
whose behaviour will change in Git 2.0 with respect to paths you removed.
Paths like 'database/migrations/2014_10_12_000000_create_users_table.php' that are
removed from your working tree are ignored with this version of Git.

* 'git add --ignore-removal <pathspec>', which is the current default,
  ignores paths you removed from your working tree.

* 'git add --all <pathspec>' will let you also record the removals.

Run 'git status' to check the paths you removed from your working tree.

[GakuinHana@rin06 myapp]$ git status ⏎
# On branch master
# Changes to be committed:
#   (use "git reset HEAD <file>..." to unstage)
#
#	modified:   database/migrations/2019_09_26_100151_create_comments_table.php
#
# Changes not staged for commit:
#   (use "git add/rm <file>..." to update what will be committed)
#   (use "git checkout -- <file>..." to discard changes in working directory)
#
#	deleted:    database/migrations/2014_10_12_000000_create_users_table.php
#	deleted:    database/migrations/2014_10_12_100000_create_password_resets_table.php
#
[GakuinHana@rin06 myapp]$ git rm database/migrations/2014_10_12_000000_create_users_table.php ⏎
rm 'database/migrations/2014_10_12_000000_create_users_table.php'
[GakuinHana@rin06 myapp]$ git rm database/migrations/2014_10_12_100000_create_password_resets_table.php ⏎
rm 'database/migrations/2014_10_12_100000_create_password_resets_table.php'
[GakuinHana@rin06 myapp]$ git status ⏎
# On branch master
# Changes to be committed:
#   (use "git reset HEAD <file>..." to unstage)
#
#	deleted:    database/migrations/2014_10_12_000000_create_users_table.php
#	deleted:    database/migrations/2014_10_12_100000_create_password_resets_table.php
#	modified:   database/migrations/2019_09_26_100151_create_comments_table.php
#
[GakuinHana@rin06 myapp]$ git commit -m'migration' ⏎
[master 3a993f3] migration
 3 files changed, 2 insertions(+), 68 deletions(-)
 delete mode 100644 database/migrations/2014_10_12_000000_create_users_table.php
 delete mode 100644 database/migrations/2014_10_12_100000_create_password_resets_table.php
[GakuinHana@rin06 myapp]$
テスト用データの設定
次に,シーダを用いてデータベースにテスト用データを投入しよう.まずはシーダを生成する.
[GakuinHana@rin06 myapp]$ php artisan make:seeder CommentsTableSeeder ⏎
Seeder created successfully.
[GakuinHana@rin06 myapp]$
上のコマンドで database/seeds/ ディレクトリに CommentsTableSeeder.php が作成されたので,このファイルにテスト用のデータを記述するとともに,database/seeds/DatabaseSeeder.php には CommentsTableSeeder.php を実行するためのコードを記述する.なお,特に Windows の秀丸エディタなどを使っているときには,保存するときの文字コードが Unicode (UTF-8) になっているかを確認しよう.秀丸エディタでは特に指定しなければ Shift-JIS で保存されるため,実行時にブラウザで文字化けが発生することになる.
database/seeds/CommentsTableSeeder.php (抜粋)
    public function run()
    {
        // 一旦中身を削除する
        DB::table('comments')->delete();

        DB::table('comments')->insert([
            'title' => '最初のコメント',
            'body' => '最初のコメントです!'
        ]);

        DB::table('comments')->insert([
            'title' => '2つ目',
            'body' => '2つ目のコメントです!'
        ]);

        DB::table('comments')->insert([
            'title' => '<三個目>のコメント',
            'body' => 'シーダによってテストデータを設定します.'
        ]);

    }
database/seeds/DatabaseSeeder.php (抜粋)
    public function run()
    {
        $this->call(CommentsTableSeeder::class);
    }
テストデータを設定するにはphp artisan db:seedを実行すれば良い.しかし,シーダファイルを設定しただけでは,Class CommentsTableSeeder does not exist のようなエラーが表示されることがある.このような場合はphp ../composer.phar dump-autoloadを実行してから,再度シーダを実行する.
[GakuinHana@rin06 myapp]$ php artisan migrate:status ⏎
+------+-----------------------------------------+-------+
| Ran? | Migration                               | Batch |
+------+-----------------------------------------+-------+
| Yes  | 2019_09_26_100151_create_comments_table | 1     |
+------+-----------------------------------------+-------+
[GakuinHana@rin06 myapp]$ php artisan db:seed ⏎

   ReflectionException  : Class CommentsTableSeeder does not exist

  at /home/students/GakuinHana/Documents/laravel/myapp/vendor/laravel/framework/src/Illuminate/Container/Container.php:788
    784|         if ($concrete instanceof Closure) {
    785|             return $concrete($this, $this->getLastParameterOverride());
    786|         }
    787|
  > 788|         $reflector = new ReflectionClass($concrete);
    789|
    790|         // If the type is not instantiable, the developer is attempting to resolve
    791|         // an abstract type such as an Interface or Abstract Class and there is
    792|         // no binding registered for the abstractions so we need to bail out.

  Exception trace:

  1   ReflectionClass::__construct("CommentsTableSeeder")
      /home/students/GakuinHana/Documents/laravel/myapp/vendor/laravel/framework/src/Illuminate/Container/Container.php:788

  2   Illuminate\Container\Container::build("CommentsTableSeeder")
      /home/students/GakuinHana/Documents/laravel/myapp/vendor/laravel/framework/src/Illuminate/Container/Container.php:667

  Please use the argument -v to see more details.
[GakuinHana@rin06 myapp]$ php ../composer.phar dump-autoload ⏎
Generating optimized autoload files> Illuminate\Foundation\ComposerScripts::postAutoloadDump
> @php artisan package:discover --ansi
Discovered Package: beyondcode/laravel-dump-server
Discovered Package: fideloper/proxy
Discovered Package: laravel/tinker
Discovered Package: nesbot/carbon
Discovered Package: nunomaduro/collision
Package manifest generated successfully.
Generated optimized autoload files containing 3638 classes
[GakuinHana@rin06 myapp]$ php artisan db:seed ⏎
Seeding: CommentsTableSeeder
Database seeding completed successfully.
[GakuinHana@rin06 myapp]$
Commentモデルの作成
Laravel ではモデル,ビュー,コントローラ (MVC) がそれぞれの役割を分担する.モデルはデータ構造とその操作の役割を担当する.ここではコメントのデータ構造と操作を担当するためのCommentモデルを作成する.php artisan make:model モデル名 でモデルを作成すれば,app/モデル名.php ファイルがひな形として生成される.なお,モデル名は先頭大文字の単数形を使うようにしよう(データベースのテーブル名は小文字の複数形).
[GakuinHana@rin06 myapp]$ php artisan make:model Comment ⏎
Model created successfully.
[GakuinHana@rin06 myapp]$ ls app ⏎
Comment.php  Console  Exceptions  Http  Providers  User.php
[GakuinHana@rin06 myapp]$
Commentsコントローラの作成
コントローラはユーザからの入力を受け取ったり,ビューを選択して生成したりする役割を担当する.ここではコメントの入力を受け取ったりするCommentsControllerを生成する(先頭大文字の複数形を使おう).php artisan make:controller CommentsControllerコマンドで app/Http/Controllers/ ディレクトリにファイルが生成される.
[GakuinHana@rin06 myapp]$ php artisan make:controller CommentsController ⏎
Controller created successfully.
[GakuinHana@rin06 myapp]$ ls app/Http/Controllers ⏎
Auth  CommentsController.php  Controller.php
[GakuinHana@rin06 myapp]$
CommentsController.php に index 関数を設置して,簡単な文字列だけを表示するコードを入力してみる.
app/Http/Controllers/CommentsController.php
<?php

namespace App\Http\Controllers;

use Illuminate\Http\Request;

class CommentsController extends Controller
{
    public function index()
    {
        dd("コメントのindex");
    }
}
ルートの定義
ルートはどのURIが指定されたときに,どんな処理を呼び出すかを指定する.現在のルート定義の一覧を確認するには,php artisan route:list を実行する.例えば,初期設定のままであれば,/(つまりトップページ)が呼ばれたときの処理が定義されている.
[GakuinHana@rin06 myapp]$ php artisan route:list ⏎
+--------+----------+----------+------+---------+--------------+
| Domain | Method   | URI      | Name | Action  | Middleware   |
+--------+----------+----------+------+---------+--------------+
|        | GET|HEAD | /        |      | Closure | web          |
|        | GET|HEAD | api/user |      | Closure | api,auth:api |
+--------+----------+----------+------+---------+--------------+
[GakuinHana@rin06 myapp]$
実際のルートの定義は routes/web.php に次のように記述されている.つまり,/ のリクエストに対して,welcome という名前のビューを呼び出すことが定義されている.
routes/web.php (抜粋)
Route::get('/', function () {
    return view('welcome');
});
これに,/comments のURI が指定されたときにCommentsControllerのindex関数を呼び出すように設定してみよう.
routes/web.php (抜粋)
Route::get('/', function () {
    return view('welcome');
});

Route::get('/comments', 'CommentsController@index');
上の記述によってルートの定義が変更されたことを確認しよう.
[GakuinHana@rin06 myapp]$ php artisan route:list ⏎
+--------+----------+----------+------+-----------------------------------------------+--------------+
| Domain | Method   | URI      | Name | Action                                        | Middleware   |
+--------+----------+----------+------+-----------------------------------------------+--------------+
|        | GET|HEAD | /        |      | Closure                                       | web          |
|        | GET|HEAD | api/user |      | Closure                                       | api,auth:api |
|        | GET|HEAD | comments |      | App\Http\Controllers\CommentsController@index | web          |
+--------+----------+----------+------+-----------------------------------------------+--------------+
[GakuinHana@rin06 myapp]$
Webサーバを起動して,実際に /comments にアクセスしてみよう.
[GakuinHana@rin06 myapp]$ php artisan serve --host=rin06.ba.kobegakuin.ac.jp --port 8385 ⏎
Laravel development server started: <http://rin06.ba.kobegakuin.ac.jp:8385>

データベースからデータを取り出そう
では実際にコメントデータをデータベースから取り出してみよう.これは主にコントローラで処理を行う.なお,データベースのcommentsテーブルから全てのデータを取り出すには,Comment::get();と記述するだけで良い.またCommentクラスを使いたいので,コントローラの先頭に use App\Comment; を追加する.
app/Http/Controllers/CommentsController.php
<?php

namespace App\Http\Controllers;

use Illuminate\Http\Request;
use App\Comment;   // 追加する

class CommentsController extends Controller
{
  public function index()
  {
    $comments = Comment::get();    // SELECT * FROM comments; のイメージ
    dd($comments);
  }
}
Webサーバを起動して,実際に /comments にアクセスしてみよう.
[GakuinHana@rin06 myapp]$ php artisan serve --host=rin06.ba.kobegakuin.ac.jp --port 8385 ⏎
Laravel development server started: <http://rin06.ba.kobegakuin.ac.jp:8385>
データベースからarray形式で3件のレコードが取得できていることがわかる.三角形のアイコンをクリックすると,その中身を確認できる.

例えば1件目のレコードにシーダに登録した内容が記録されていることがわかる.このように,dd() コマンドはクラスや変数の内容をデバッグ用としてブラウザに書き出してアプリケーションの実行を停止することができる.なお,dd() は dump and die の略らしい.

ビューを使ってレコードを表示しよう
コントローラでデータベースのテーブルからレコードを取り出すことができたので,この結果をビューに渡して実際にブラウザに一覧を表示してみよう.ビューはユーザに対して情報を出力する役割を担当する.
Laravelプロジェクトのトップページのルート定義では,次のように welcome のビューを呼び出していた.
routes/web.php (抜粋)
Route::get('/', function () {
    return view('welcome');
});

ビューは resources/views ディレクトリに保存されている.例えば,welcome のビューは,welcome.blade.php という名前で保存さている.Laravel では独自の Blade テンプレートエンジンを利用することができる.Blade を利用するために,ファイル名は「ビュー名.blade.php」とする.welcome.blade.php には次のような記述があり,アプリケーションがログインの機能(ルート定義)を備えていれば,ログインされているかを判定し,ホーム画面へのリンクを表示したり,ログインのためのリンクを表示したりする.また,19行目の文字列「Laravel」を変更すれば,トップページに表示される文字列を変更できる.
resources/views/welcome.blade.php (抜粋)
    <body>
        <div class="flex-center position-ref full-height">
            @if (Route::has('login'))
                <div class="top-right links">
                    @auth
                        <a href="{{ url('/home') }}">Home</a>
                    @else
                        <a href="{{ route('login') }}">Login</a>

                        @if (Route::has('register'))
                            <a href="{{ route('register') }}">Register</a>
                        @endif
                    @endauth
                </div>
            @endif

            <div class="content">
                <div class="title m-b-md">
                    Laravel
                </div>

                <div class="links">
                    <a href="https://laravel.com/docs">Docs</a>
                    <a href="https://laracasts.com">Laracasts</a>
                    <a href="https://laravel-news.com">News</a>
                    <a href="https://blog.laravel.com">Blog</a>
                    <a href="https://nova.laravel.com">Nova</a>
                    <a href="https://forge.laravel.com">Forge</a>
                    <a href="https://github.com/laravel/laravel">GitHub</a>
                </div>
            </div>
        </div>
    </body>
現状ではログインの機能は不要であるので,その部分を削除する.また,タイトルを変更するとともに,/comments というURIへのリンクを作成しておこう.
resources/views/welcome.blade.php (抜粋)
<body>
    <div class="flex-center position-ref full-height">
        <div class="content">
            <div class="title m-b-md">
                Comment掲示板
            </div>

            <div class="links">
                <a href="/comments">Comments</a>
            </div>
        </div>
    </div>
</body>
Webサーバを起動して,実際に / にアクセスしてみよう.
[GakuinHana@rin06 myapp]$ php artisan serve --host=rin06.ba.kobegakuin.ac.jp --port 8385 ⏎
Laravel development server started: <http://rin06.ba.kobegakuin.ac.jp:8385>

では,実際にコントローラからビューにデータを渡すように app/Http/Controllers/CommentsController.php を編集しよう.index関数で $comments 変数に全レコードが格納されているので,comments.index というビューにcommentsパラメータを渡せば良い.具体的には以下のように記述する.なお,comments.index とは resources/views/comments/ ディレクトリにある,index.blade.php を呼び出すという意味である.また,withを使ってパラメータをビューに渡すことができる.
app/Http/Controllers/CommentsController.php (抜粋)
    public function index()
    {
        $comments = Comment::get();  // SELECT * FROM comments; のイメージ
        return view('comments.index')
                  ->with('comments', $comments);
    }
次に,resources/views ディレクトリ内に comments サブディレクトリを作成し,index.blade.php ファイルを次のように作成してみよう.
resources/views/comments/index.blade.php
<!DOCTYPE html>
<html lang="ja">
<head>
    <meta charset="UTF-8">
    <title>コメント一覧</title>
</head>
<body>
    <h1>コメント一覧</h1>
</body>
</html>
Webサーバを起動して,実際に /comments にアクセスしてみよう.
[GakuinHana@rin06 myapp]$ php artisan serve --host=rin06.ba.kobegakuin.ac.jp --port 8385 ⏎
Laravel development server started: <http://rin06.ba.kobegakuin.ac.jp:8385>
ビューではまだコントローラから渡された情報を利用していない.タイトルだけが表示された.

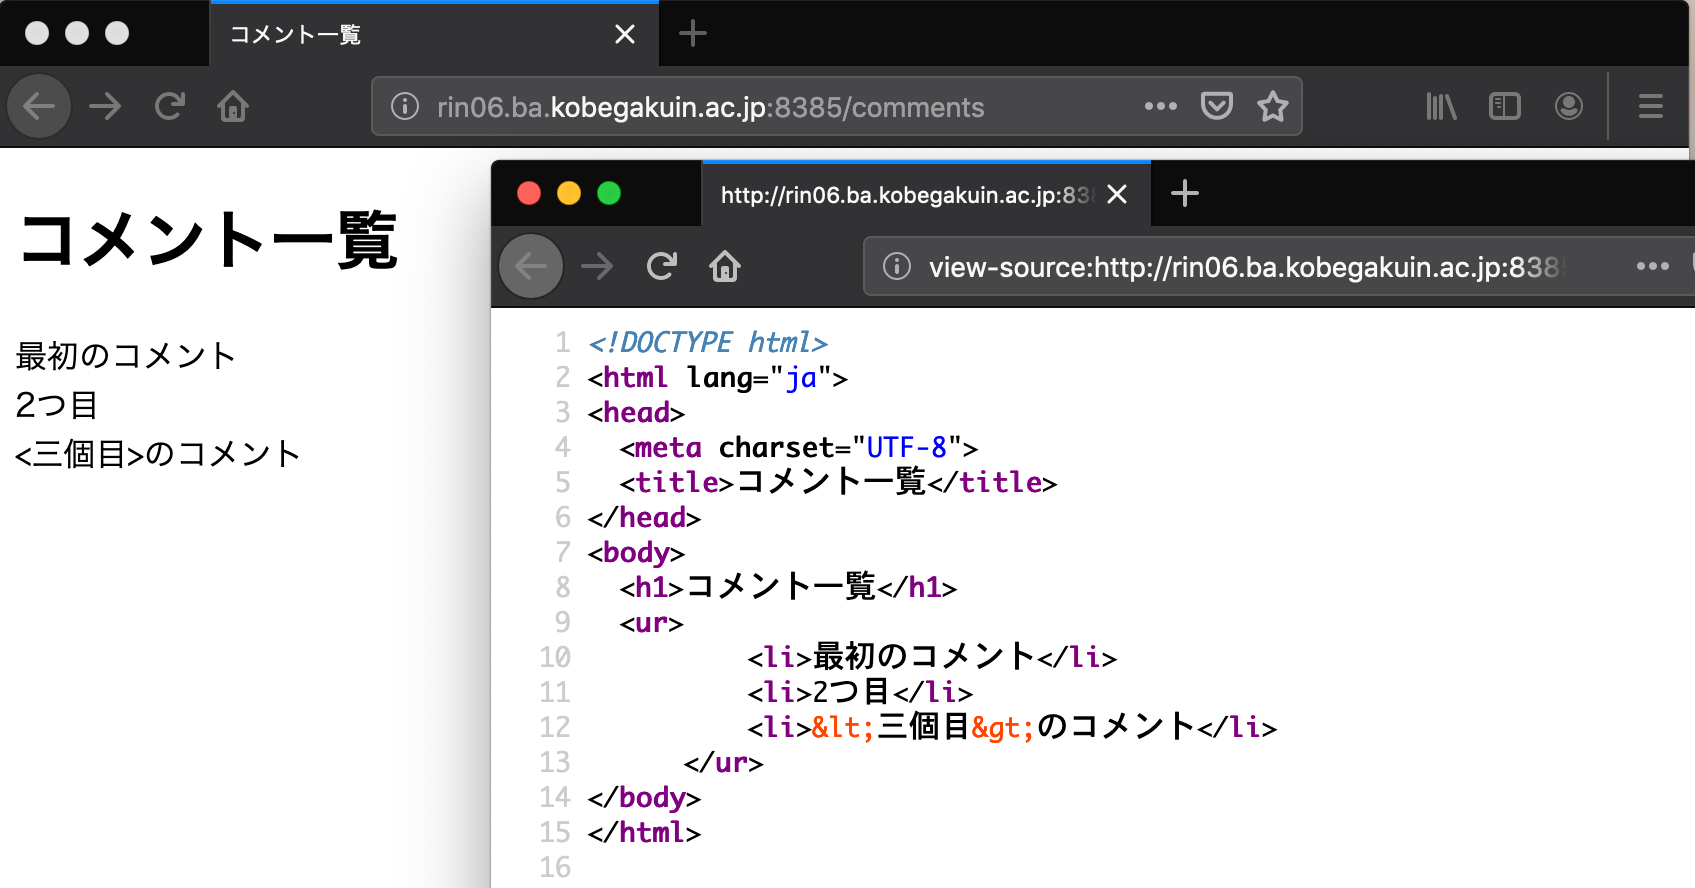
ではコントローラから受け取った情報をビューで表示してみよう.渡されたパラメータはcommentクラスの配列形式になっているはずなので,@foreach を使って順番に取り出してタイトルだけを箇条書きのリストとして表示してみよう.resources/views/comments/index.blade.php を次のように修正する.Blade では変数の中身を表示するために {{ }} を用いる.この方法で出力される内容はXSS(クロスサイトスクリプティング)攻撃を防ぐためにタグの記号などがエスケープされるため,安心して利用できる.
resources/views/comments/index.blade.php
<!DOCTYPE html>
<html lang="ja">
<head>
  <meta charset="UTF-8">
  <title>コメント一覧</title>
</head>
<body>
  <h1>コメント一覧</h1>
  <ul>
    @foreach ($comments as $comment)
      <li>{{ $comment->title }}</li>
    @endforeach
  </ul>
</body>
</html>
Webサーバを起動して,実際に /comments にアクセスし,出力されたHTMLソースも確認してみよう.{{ $comment->title }} で出力されたHTMLソースを確認すると,12行目のタグ記号が自動的にエスケープされていることがわかる.
[GakuinHana@rin06 myapp]$ php artisan serve --host=rin06.ba.kobegakuin.ac.jp --port 8385 ⏎
Laravel development server started: <http://rin06.ba.kobegakuin.ac.jp:8385>
コメントを個別に表示するページを作ろう
ここでは,/comments/1 や /comments/2 のようにidを指定してアクセスすれば指定した投稿の詳細情報が表示されるような機能を実装する.
まずは,routes/web.php にルート定義を追加する.具体的には次のように記述すればよい.つまり,URI で /comments/ のあとに文字列が指定されていれば,それを ID として認識し,CommentsController の show という関数に渡す,という定義である.
routes/web.php (抜粋)
Route::get('/', function () {
    return view('welcome');
});

Route::get('/comments', 'CommentsController@index');
Route::get('/comments/{id}', 'CommentsController@show');  // 追加
次にCommentsController に show 関数(10〜13行目)を追加しよう.とりあえずの動作を確認したいので,show 関数では受け取ったidを表示するだけの機能を持たせておく.
app/Http/Controllers/CommentsController.php (抜粋)
class CommentsController extends Controller
{
  public function index()
  {
    $comments = Comment::get();    // SELECT * FROM comments; のイメージ
    return view('comments.index')
              ->with('comments', $comments);
  }

  public function show($id)
  {
    dd($id);    // URLのメータ $id をそのまま表示するだけ
  }
}
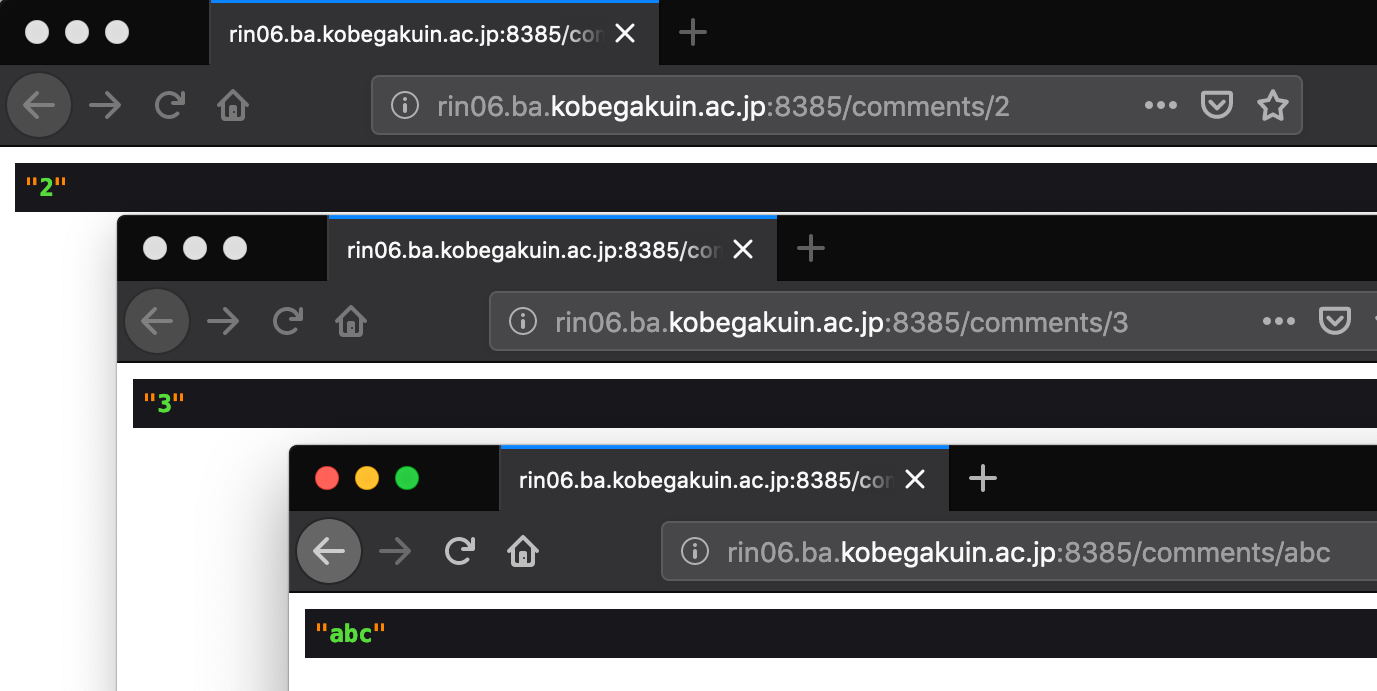
Webサーバを起動して,実際に /comments/2 や /comments/3, /comments/abc にアクセスしてみよう.
[GakuinHana@rin06 myapp]$ php artisan serve --host=rin06.ba.kobegakuin.ac.jp --port 8385 ⏎
Laravel development server started: <http://rin06.ba.kobegakuin.ac.jp:8385>
いまのところ,id の値が正しいかどうかを判定することなく,指定した id がそのまま表示されていることが確認できる.
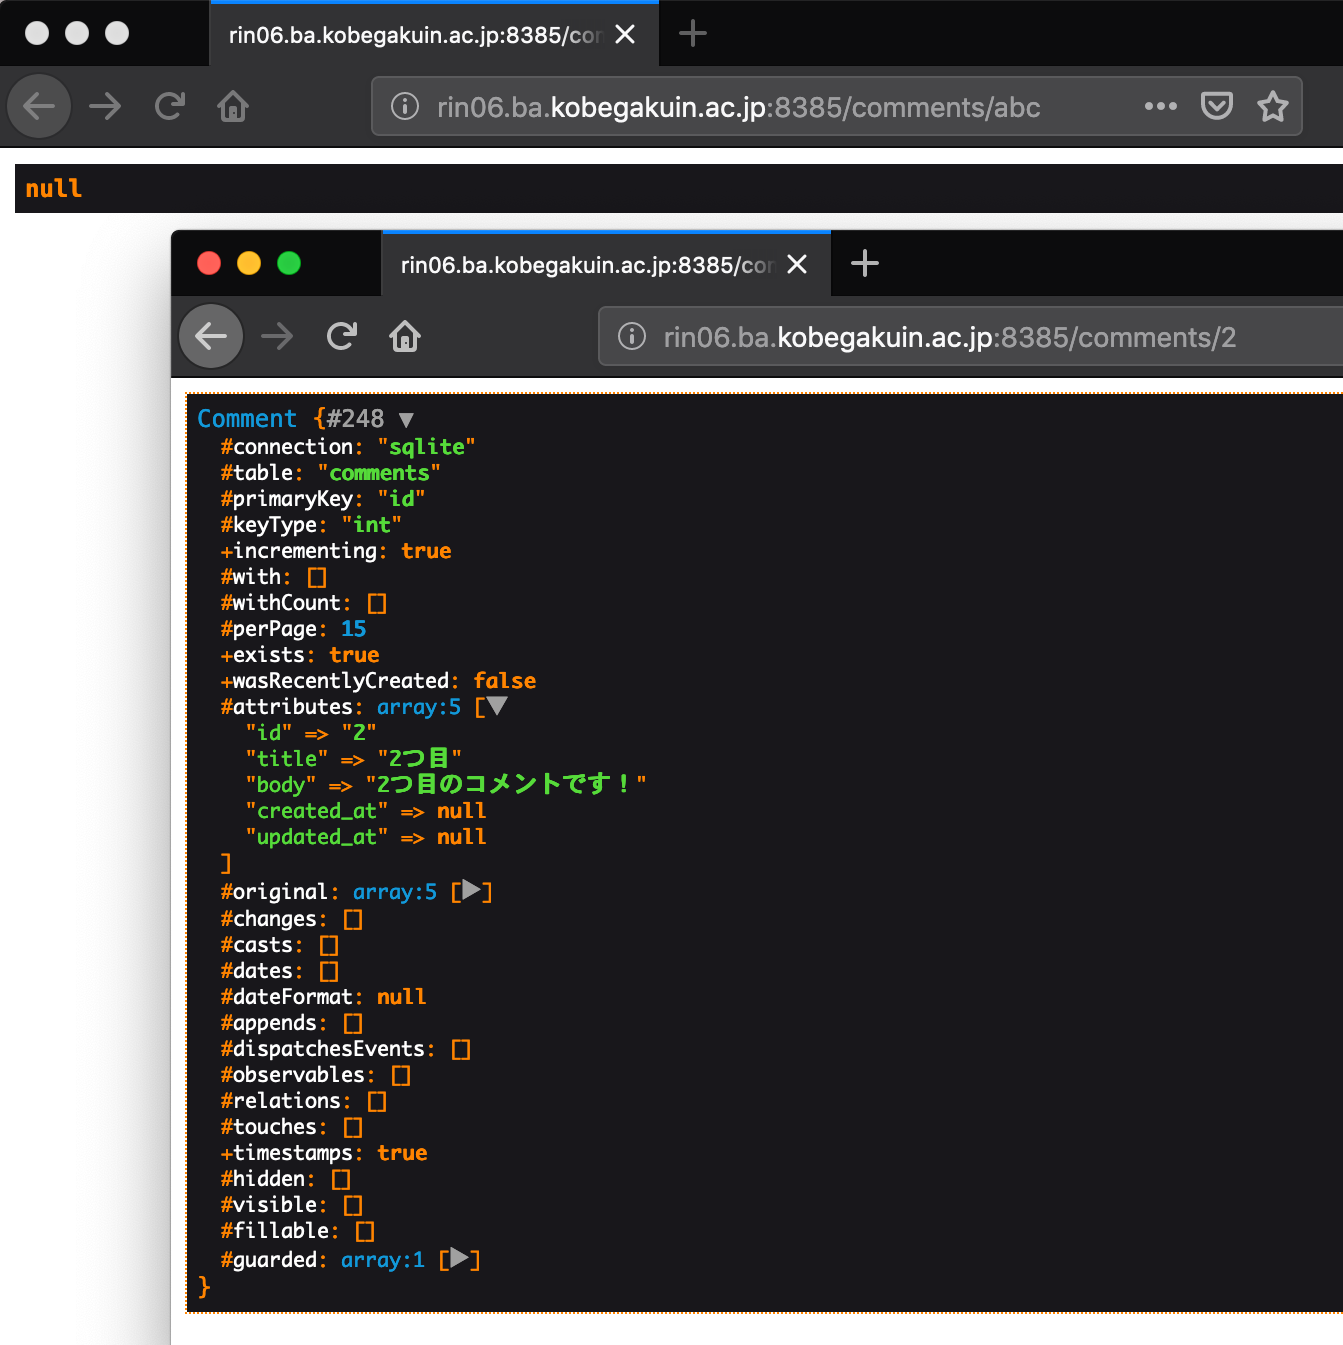
CommentsController の show 関数で,指定した id のコメントをデータベースから取得してみる.なお,条件は where() で検索条件を指定することができる.また,get() ではヒットする全てのレコード(行)を取得するのに対し,first() ではヒットした結果から1件だけを取得する.条件を指定してもヒット件数が複数になることが考えられる場合,ヒット件数が1件のときと2件以上のときに得られる結果のデータ形式が異なってしまうとバグの原因となってしまう.よって,ここでは first() を利用している.また,得られる件数が1件であるので,4行目と6行目の $comment は単数形にしていることに注意しよう(複数形でも動作はするが,自身も含めて後日ソースを見た開発者が混乱するだけです.).
app/Http/Controllers/CommentsController.php (抜粋)
  public function show($id)
  {
    // SELECT * FROM comments WHERE id = 2;  のイメージ
    $comment = Comment::where('id', '=', $id)
                ->first();
    dd($comment);
  }
実行すれば,次のような結果になる.id が正しければ,Comment オブジェクトが取得でき,id が不正(例えば abc)であれば null となる.
CommentsController の show 関数で得られた結果をビューに渡すように記述する.
app/Http/Controllers/CommentsController.php (抜粋)
  public function show($id)
  {
    // SELECT * FROM comments WHERE id = 2;  のイメージ
    $comment = Comment::where('id', '=', $id)
                ->first();
    return view('comments.show')
            ->with('comment', $comment);
  }
resources/views/comments/ ディレクトリに show.blade.php ファイルを作成する.空のファイルを作成して全て入力しても良いが,index.blade.php と大きくは変わらないので,cp コマンド(copyのこと)でコピーしてから適宜変更すると良い.(もちろん,マウスを使ってコピーしても良い.)
[GakuinHana@rin06 myapp]$ ls resources/views/comments/ ⏎
index.blade.php
[GakuinHana@rin06 myapp]$ cp resources/views/comments/index.blade.php resources/views/comments/show.blade.php ⏎
[GakuinHana@rin06 myapp]$ ls resources/views/comments/ ⏎
index.blade.php  show.blade.php
[GakuinHana@rin06 myapp]$
show.blade.php を次のように修正する.
resources/views/comments/show.blade.php
<!DOCTYPE html>
<html lang="ja">
<head>
  <meta charset="UTF-8">
  <title>コメント</title>
</head>
<body>
  <h1>コメント</h1>
  <dl>
    <dt>ID:</dt>
    <dd>{{ $comment->id }}</dd>
    <dt>Title:</dt>
    <dd>{{ $comment->title }}</dd>
    <dt>Body:</dt>
    <dd>{{ $comment->body }}</dd>
  </dl>
</body>
</html>
この時点で,/comments/2 や /comments/3 のように ID を指定すれば,個別のコメントの詳細を表示できるようになった.

ただし,/comments/abc や /comments/10 のように不正な ID を指定した場合には,エラーが表示されてしまう.
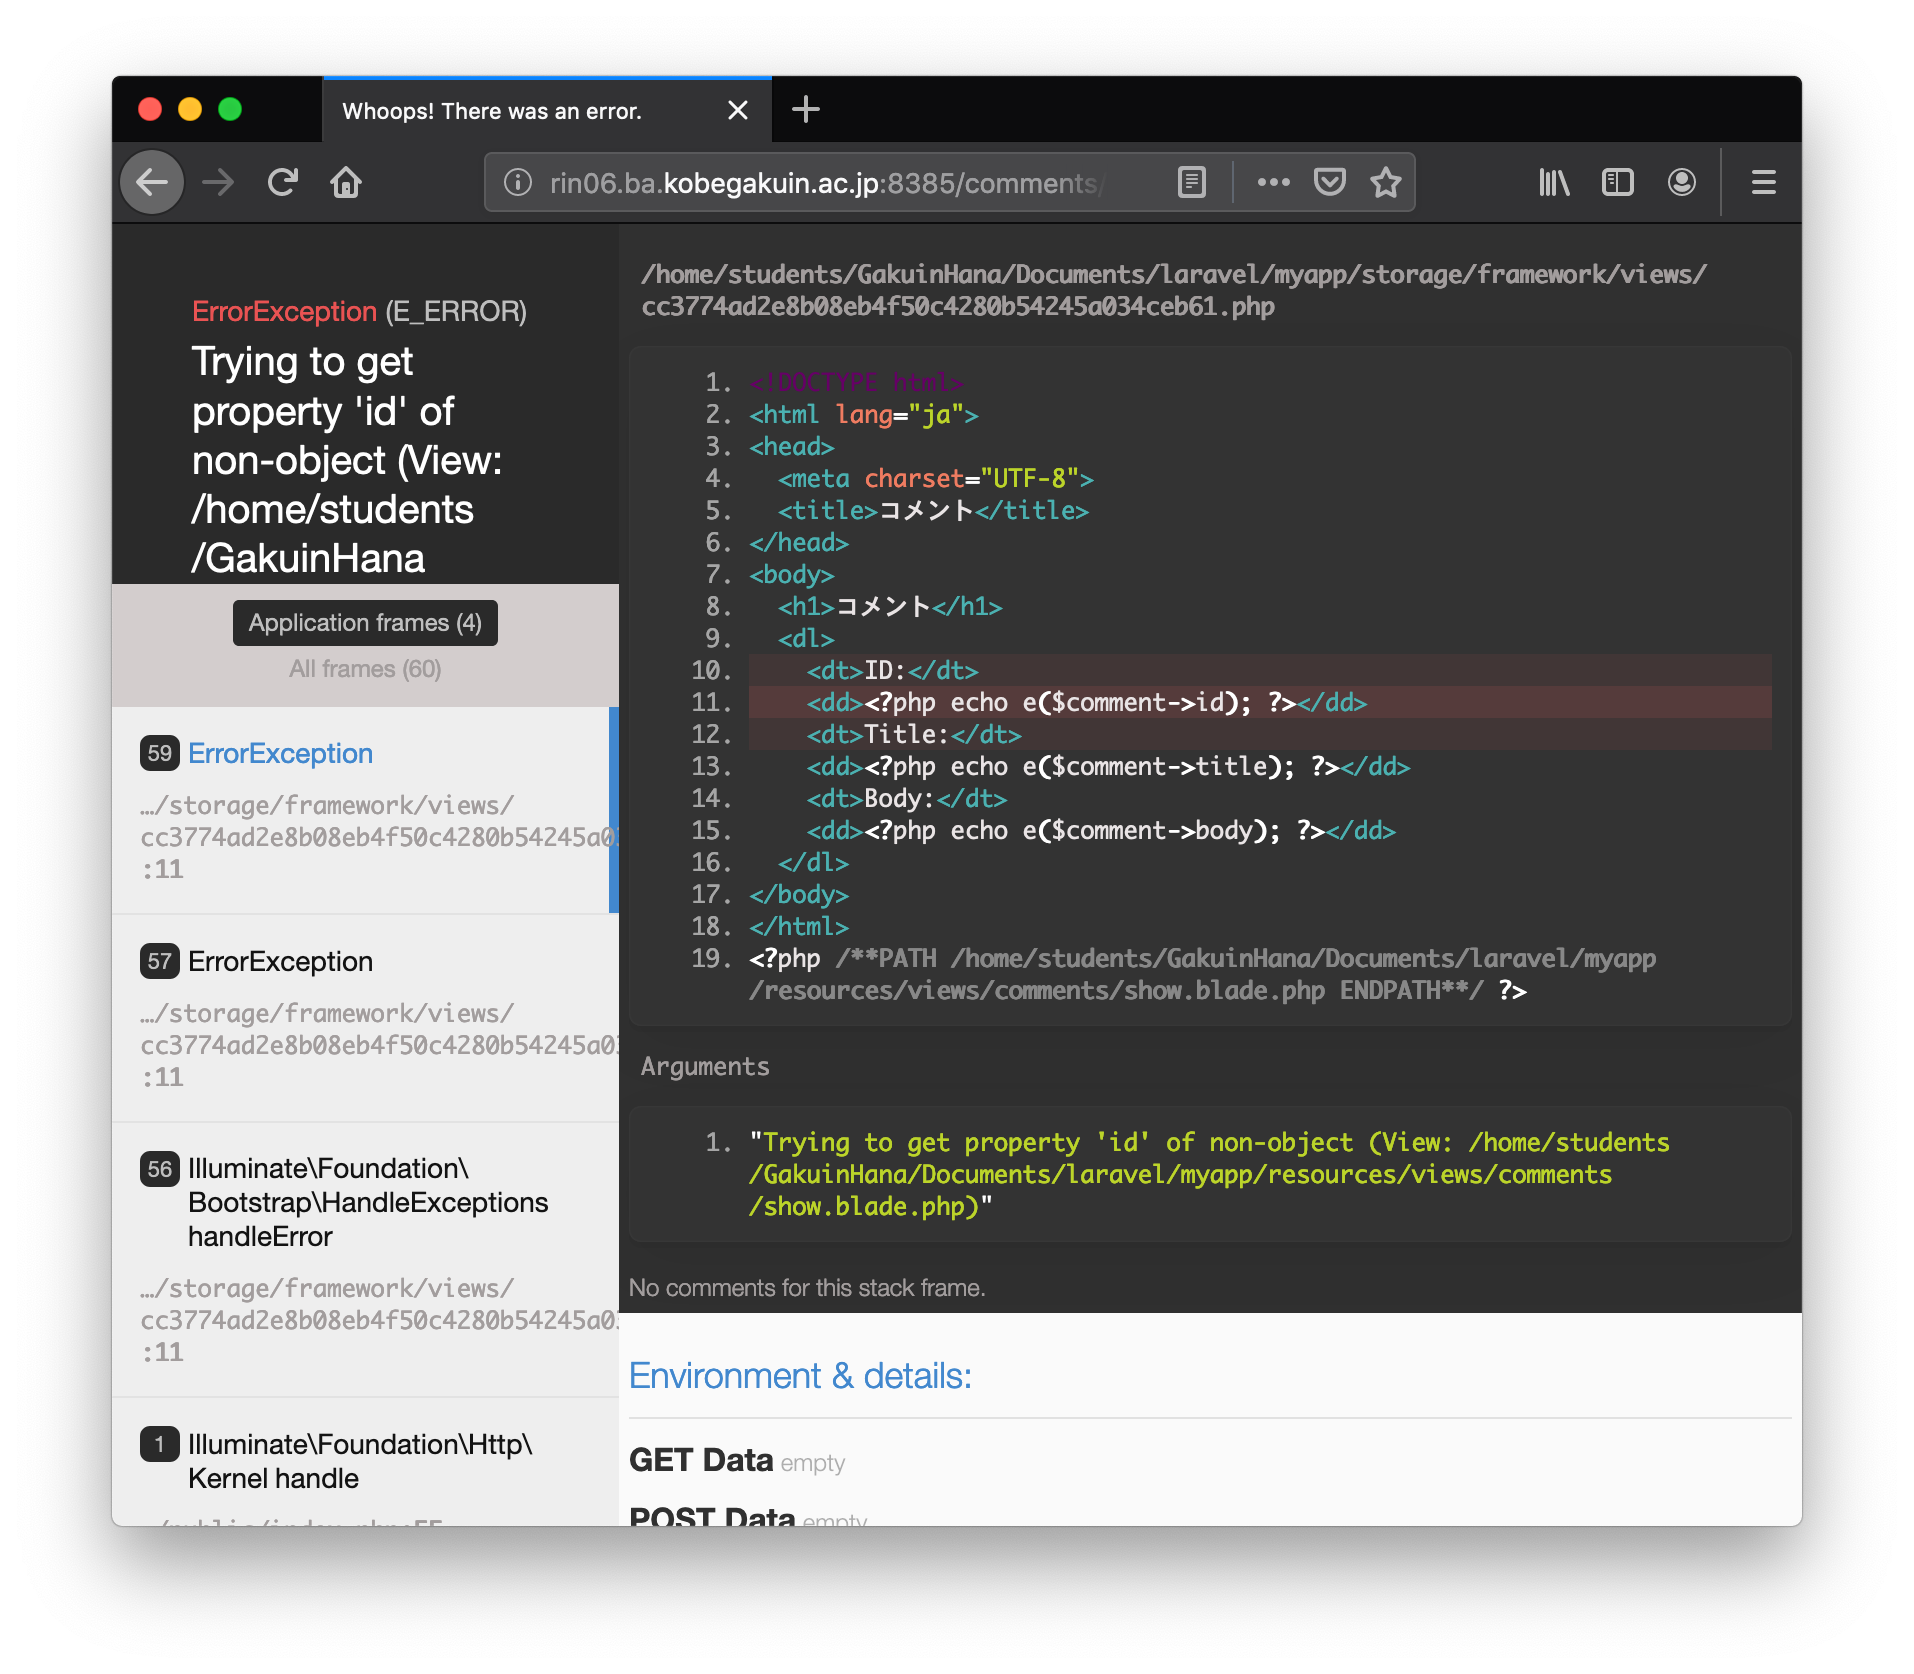
不正な ID が指定されたときには /comments へ強制的に移動(リダイレクト)するような処理を CommentsController の show 関数に加えてみよう(6-8行目).実際にリダイレクトされることも確かめること.
app/Http/Controllers/CommentsController.php (抜粋)
  public function show($id)
  {
    // SELECT * FROM comments WHERE id = 2;  のイメージ
    $comment = Comment::where('id', '=', $id)
                ->first();
    if (!$comment) {  // コメントが取得できない(IDが不正の)場合はリダイレクト
      return redirect('/comments');
    }
    return view('comments.show')
            ->with('comment', $comment);
  }
個別ページがうまく表示できるようになったので,/comments の各コメントにリンクを設置しよう./resources/views/comments/index.blade.php を次のように修正すれば良い.つまり,リンク先の生成で,action() を使って,CommentsController の show に $comment の id を渡すようにしている.
resources/views/comments/index.blade.php (抜粋)
<body>
  <h1>コメント一覧</h1>
  <ul>
    @foreach ($comments as $comment)
      <li>
        <a href="{{ action('CommentsController@show', $comment->id) }}">
          {{ $comment->title }}
        </a>
      </li>
    @endforeach
  </ul>
</body>
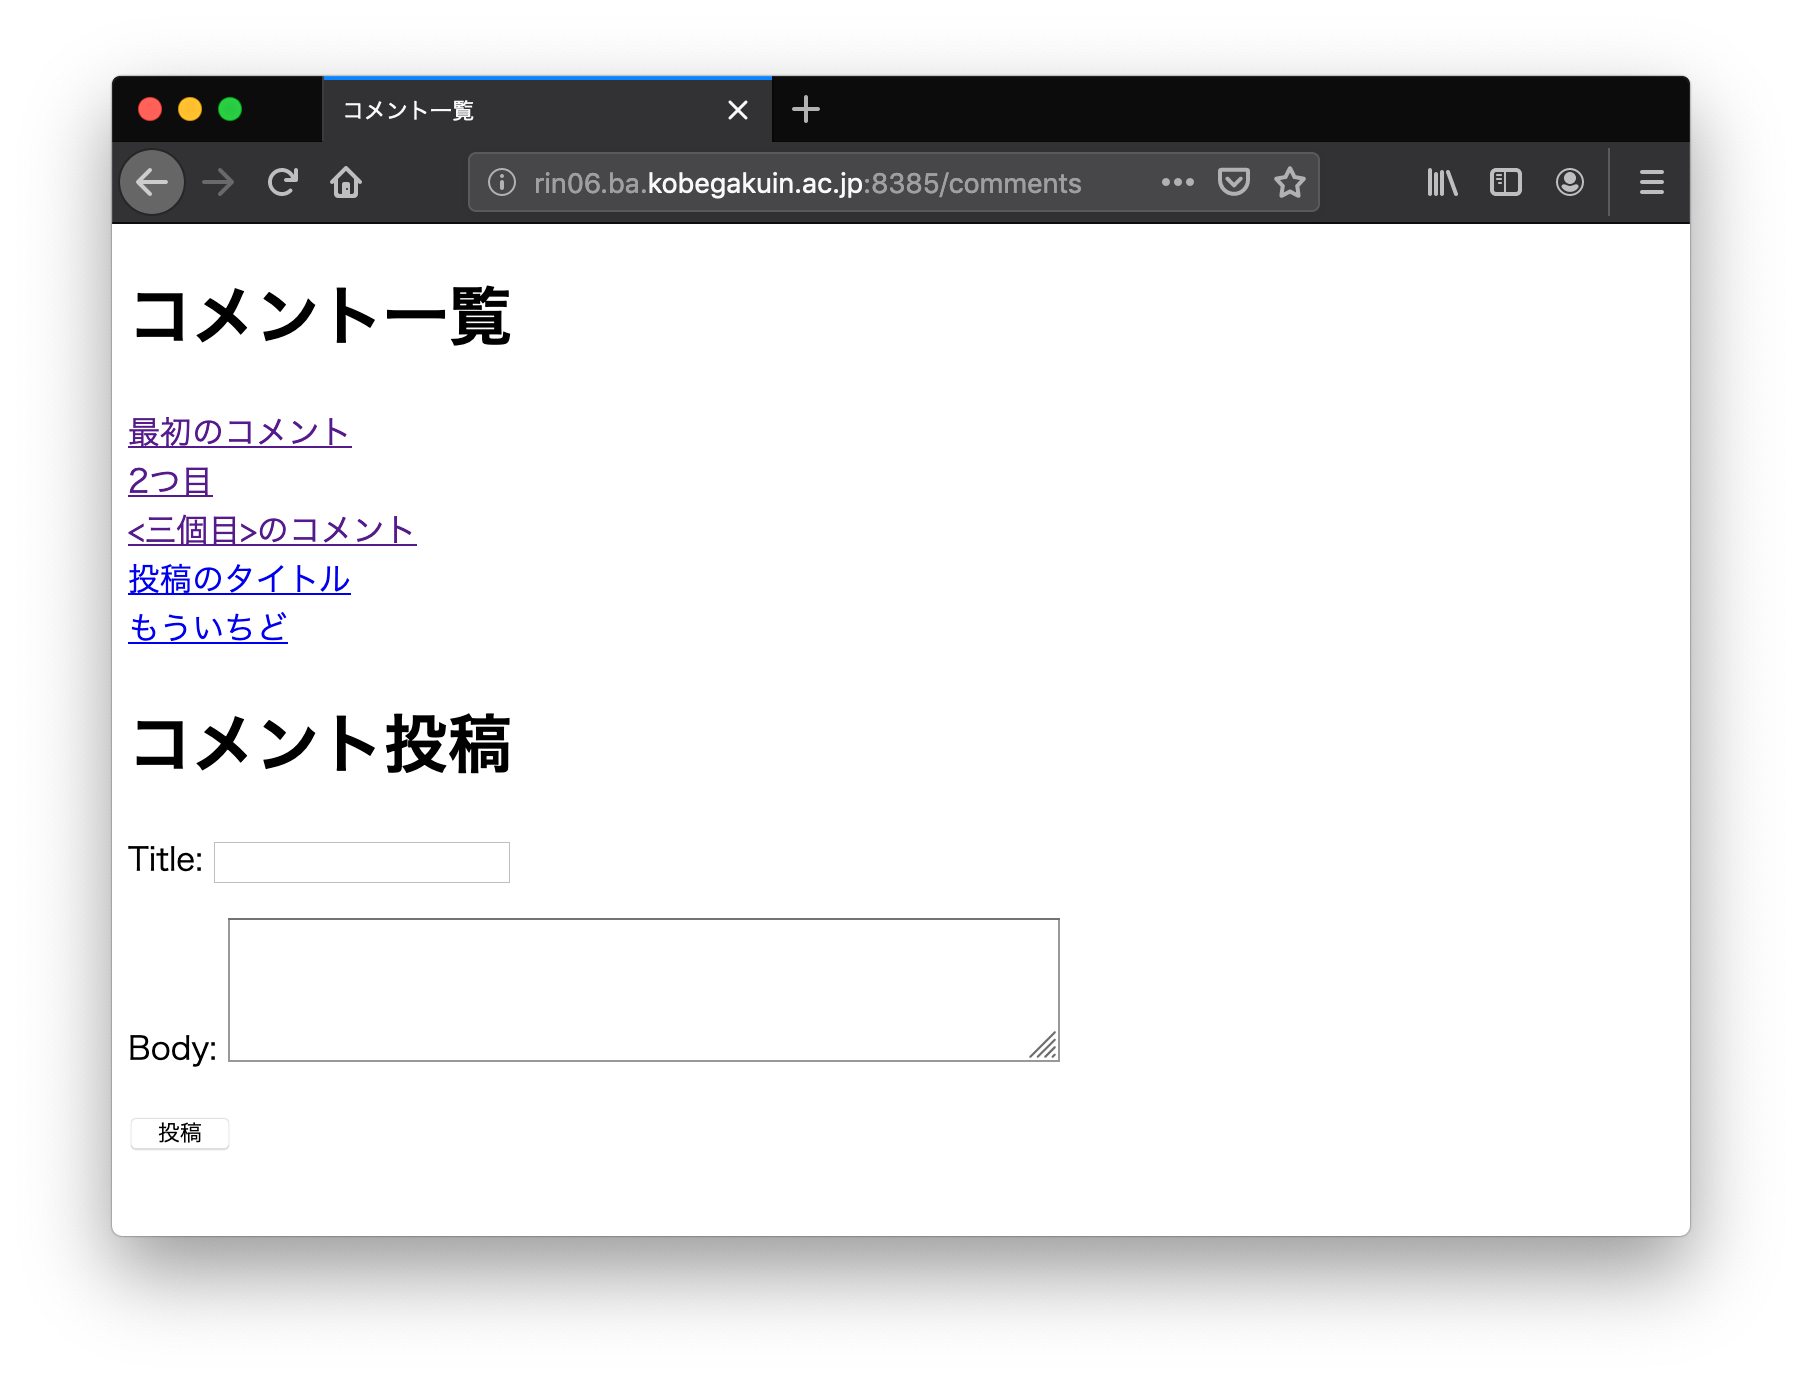
実行時に,/comments にはリンクが設置され,リンクをクリックすれば個別コメントの詳細ページにジャンプできるようになった.

コメント投稿機能を実装しよう
データベースに登録されたコメントを表示できるようになったので,今度は新規にコメントを投稿できるような機能を実装しよう.
まずは,/comments のページに新規投稿フォームを設置する.14行目から30行目に<div>要素を追加し,その中にフォームの要素を記述する.ここで,16行目の @csrf は不正なリクエストを防止するための措置である.Laravelでは @csrf を追加するだけでフォームにトークンが仕込まれ,トークンが異なるリクエストを受け付けないようにでき,簡単にフォームのセキュリティを高めることができる.
resources/views/comments/index.blade.php (抜粋)
<body>
  <h1>コメント一覧</h1>
  <ul>
    @foreach ($comments as $comment)
      <li>
        <a href="{{ action('CommentsController@show', $comment->id) }}">
          {{ $comment->title }}
        </a>
      </li>
    @endforeach
  </ul>

  <h1>コメント投稿</h1>
  <div>
    <form method="post" action="{{ url('/comments') }}">
      @csrf
      <p>
        <label for="title">Title: </label>
        <input type="text" name="title" id="title" value="">
      </p>

      <p>
        <label for="body">Body: </label>
        <textarea name="body" id="body" rows="4" cols="50"></textarea>
      </p>
      <p>
        <input type="submit" value="投稿">
      </p>
    </form>
  </div>
</body>
設置されたフォームのHTMLソースを確認すると,30行目にトークンが仕込まれていることが確認できる.なお,このトークンはランダムな値が自動的に与えられるので,毎回異なるはずである.

次に,フォームの投稿ボタンが押されたときのルートを routes/web.php に定義しよう.上の図のHTMLソース29行目を確認すると,投稿ボタン押下時は /comments に POST メソッドでアクセスすることがわかるので,その処理を次のように定義する.つまり,/comments ページに POST でアクセスしたときに CommentsController の store 関数を呼び出すようにする.
routes/web.php (抜粋)
Route::get('/comments', 'CommentsController@index');
Route::get('/comments/{id}', 'CommentsController@show');
Route::post('/comments', 'CommentsController@store');
ルートが定義できたので,CommentsController に store 関数を定義しよう.とりあえず,入力されたパラメータを取り出してみよう.
app/Http/Controllers/CommentsController.php (抜粋)
  public function store(Request $request)
  {
    dd($request, $request->title, $request->body);
  }
実行して実際に投稿ボタンを押すと,その内容を取り出すことができた.

それでは,投稿内容を実際にデータベースに登録しよう.具体的にはCommentクラスのインスタンスを生成して,投稿内容をセットし,データベースに登録する.最後に /comments ページにリダイレクトする.CommentsController の store 関数を次のように修正しよう.
app/Http/Controllers/CommentsController.php (抜粋)
  public function store(Request $request)
  {
    $comment = new Comment();    // インスタンスを生成する
    $comment->title = $request->title; // タイトルをセット
    $comment->body = $request->body;   // 本文をセット
    $comment->save();                  // データベースに登録
    return redirect('/comments');      // リダイレクト
  }
こんな感じでどんどん投稿できるようになりました.
入力内容を検証しよう
comments テーブルのスキーマは database/migrations/yyyy_mm_dd_hhmmss_create_comments_table.php で定義した.title フィールドは最大255文字まで入力できるが,それ以上の長さの文字列は格納できない.また,title や body が空白の投稿を受け付けても問題がある.したがって,フォームに入力された内容を検証し,問題があればエラーメッセージを表示させるような機能を実装しよう.
Laravel のコントローラには validate() という入力内容を検証するメソッドが準備されているので,これを利用すれば簡単な検証は可能である.CommentsController の store 関数を次のように修正すれば良い.なお,テストをしやすいように,title を最大10文字に設定している.10文字でテストができたら,255文字など任意の値に変更しよう.
app/Http/Controllers/CommentsController.php (抜粋)
  public function store(Request $request)
  {
    $this->validate($request, [
      'title' => 'required|max:10',  // 入力が必須で,最大10文字
      'body' => 'required'           // 入力が必須
    ]);

    $comment = new Comment();    // インスタンスを生成する
    $comment->title = $request->title; // タイトルをセット
    $comment->body = $request->body;   // 本文をセット
    $comment->save();                  // データベースに登録
    return redirect('/comments');      // リダイレクト
  }
上記の3行目から6行目の validate() を追加しただけで,入力内容が検証され,エラーがあると登録されないようになった.しかし,ユーザにどのようなエラーが起こったのかが表示されないのは不親切であるし,以前に入力していた文字が消えてしまうのも使い勝手が悪いので,そのあたりを改善しよう.
このために,まずはビューのフォームにエラー内容を表示させる.resources/views/comments/index.blade.php のフォームを次のように変更する.具体的には8-10行目と16-18行目にエラーがあったときだけエラーメッセージを表示させる記述をしている.
resources/views/comments/index.blade.php (抜粋)
<h1>コメント投稿</h1>
<div>
  <form method="post" action="{{ url('/comments') }}">
    @csrf
    <p>
      <label for="title">Title: </label>
      <input type="text" name="title" id="title" value="{{ old('title') }}">
      @if ($errors->has('title'))
        <span class="error">{{ $errors->first('title') }}</span>
      @endif
    </p>

    <p>
      <label for="body">Body: </label>
      <textarea name="body" id="body" rows="4" cols="50">{{ old('body') }}</textarea>
      @if ($errors->has('body'))
        <span class="error">{{ $errors->first('body') }}</span>
      @endif
    </p>
    <p>
      <input type="submit" value="投稿">
    </p>
  </form>
</div>
実際にタイトルに11文字以上入力し本文は空白で投稿をすると,エラーメッセージが表示され,データベースには登録されていないことがわかる.ただし,せっかく入力した11文字以上のタイトルが消えてしまっている.

さらに,エラー時には以前に入力していた内容を表示させるために,old() ヘルパを使ってみよう.次のようにビューを変更すれば良い.7行目と15行目にそれぞれ {{ old('title') }},{{ old('body') }} を追加している.
resources/views/comments/index.blade.php (抜粋)
<h1>コメント投稿</h1>
<div>
  <form method="post" action="{{ url('/comments') }}">
    @csrf
    <p>
      <label for="title">Title: </label>
      <input type="text" name="title" id="title" value="{{ old('title') }}">
      @if ($errors->has('title'))
        <span class="error">{{ $errors->first('title') }}</span>
      @endif
    </p>

    <p>
      <label for="body">Body: </label>
      <textarea name="body" id="body" rows="4" cols="50">{{ old('body') }}</textarea>
      @if ($errors->has('body'))
        <span class="error">{{ $errors->first('body') }}</span>
      @endif
    </p>
    <p>
      <input type="submit" value="投稿">
    </p>
  </form>
</div>
これでエラー時に入力内容が残るようになった.また,タイトルや本文が空ではなく,空白文字(スペース記号)だけが入力されている場合にどのような動きになるかもチェックしておこう.

投稿内容を編集しよう
投稿内容を後で編集する機能を実装しよう.次のような手順で行います.
- 詳細ページのビューに編集のためのリンクを設置
- editのためのルートを定義
- コントローラにeditメソッドを追加
- 編集のためのフォームを設置
- updateのルートを定義
- コントローラにupdateメソッドを追加
まず,詳細ページのビューに編集のためのリンクを設置する.resources/views/comments/show.blade.php を変更しよう.なお,id = 2 のコメントのに対する編集ページの URI を /comments/2/edit とし,そのコントローラメソッドを edit とする.
resources/views/comments/show.blade.php (抜粋)
<body>
  <h1>コメント</h1>
  <dl>
    <dt>ID:</dt>
    <dd>{{ $comment->id }}</dd>
    <dt>Title:</dt>
    <dd>{{ $comment->title }}</dd>
    <dt>Body:</dt>
    <dd>{{ $comment->body }}</dd>
  </dl>
  <p>
    <a href="{{ action('CommentsController@edit', $comment->id) }}">
      [編集]
    </a>
  </p>
</body>
次にルートを定義する.
routes/web.php (抜粋)
Route::get('/comments', 'CommentsController@index');
Route::get('/comments/{id}', 'CommentsController@show');
Route::post('/comments', 'CommentsController@store');
Route::get('/comments/{id}/edit', 'CommentsController@edit');
CommentsController.php に edit メソッドのひな形を準備する.
app/Http/Controllers/CommentsController.php (抜粋)
  public function edit($id)
  {
    dd($id);
  }
この段階で,ひとまず編集リンクをクリックすれば /comments/{id}/edit のページに移動し,コメントの id が表示されるはず.
次に,edit メソッドでコメントの内容を取り出して,edit ビューに引き渡す処理を記述する.この内容は show メソッドとほぼ同じである.
app/Http/Controllers/CommentsController.php (抜粋)
  public function edit($id)
  {
    $comment = Comment::where('id', '=', $id)
                ->first();
    if (!$comment) {
      return redirect('/comments');
    }
    return view('comments.edit')    // show 関数との違いはここだけ
            ->with('comment', $comment);
  }
さらに編集のための edit.blade.php を新規に作成する.もちろん,show.blade.php などをコピーして適宜変更すれば良い.なお,更新フォームのリクエストメソッドは PATCH を使う(GET でも POST でもない).10行目でPATCHは指定できないので,10行目はPOSTにしておき,12行目にmethod_field() を使って PATCH に変更する.また,セキュリティのため csrf_field() の設定も忘れないようにしよう.また,13行目にはコメントのIDを指定するための隠し項目を hidden 属性で指定しているとともに,フォームにはあらかじめデータベースから取得した文字列を表示するためのコードが16行目と24行目に追加されていることにも注意しよう.
resources/views/comments/edit.blade.php
<!DOCTYPE html>
<html lang="ja">
<head>
  <meta charset="UTF-8">
  <title>コメント編集</title>
</head>
<body>
  <h1>コメント編集</h1>
  <div>
    <form method="post" action="{{ route('comment_update') }}" enctype='multipart/form-data'>
      @csrf
      @method('PATCH')
      <input type="hidden" name="id" value="{{ $comment->id }}">
      <p>
        <label for="title">Title: </label>
        <input type="text" name="title" id="title" value="{{ $comment->title }}{{ old('title') }}">
        @if ($errors->has('title'))
          <span class="error">{{ $errors->first('title') }}</span>
        @endif
      </p>
      <p>
        <label for="body">Body: </label>
        <textarea name="body" id="body" rows="4" cols="50">{{ $comment->body }}{{ old('body') }}</textarea>
        @if ($errors->has('body'))
          <span class="error">{{ $errors->first('body') }}</span>
        @endif
      </p>
      <p>
        <input type="submit" value="更新">
      </p>
    </form>
  </div>
</body>
</html>
次にルートの定義と update メソッドのひな形を作成すれば,更新ボタンを押したときに,そのリクエストの内容が確認できる(もちろん,まだ更新はされない).
routes/web.php (抜粋)
Route::get('/comments', 'CommentsController@index');
Route::get('/comments/{id}', 'CommentsController@show');
Route::post('/comments', 'CommentsController@store');
Route::get('/comments/{id}/edit', 'CommentsController@edit');
Route::patch('/comments/', 'CommentsController@update')->name('comment_update'); // 追加
app/Http/Controllers/CommentsController.php (抜粋)
  public function update(Request $request)
  {
    dd($request);
  }
2つ目のコメントの内容を変更して更新ボタンを押してみた結果は次のようになる.
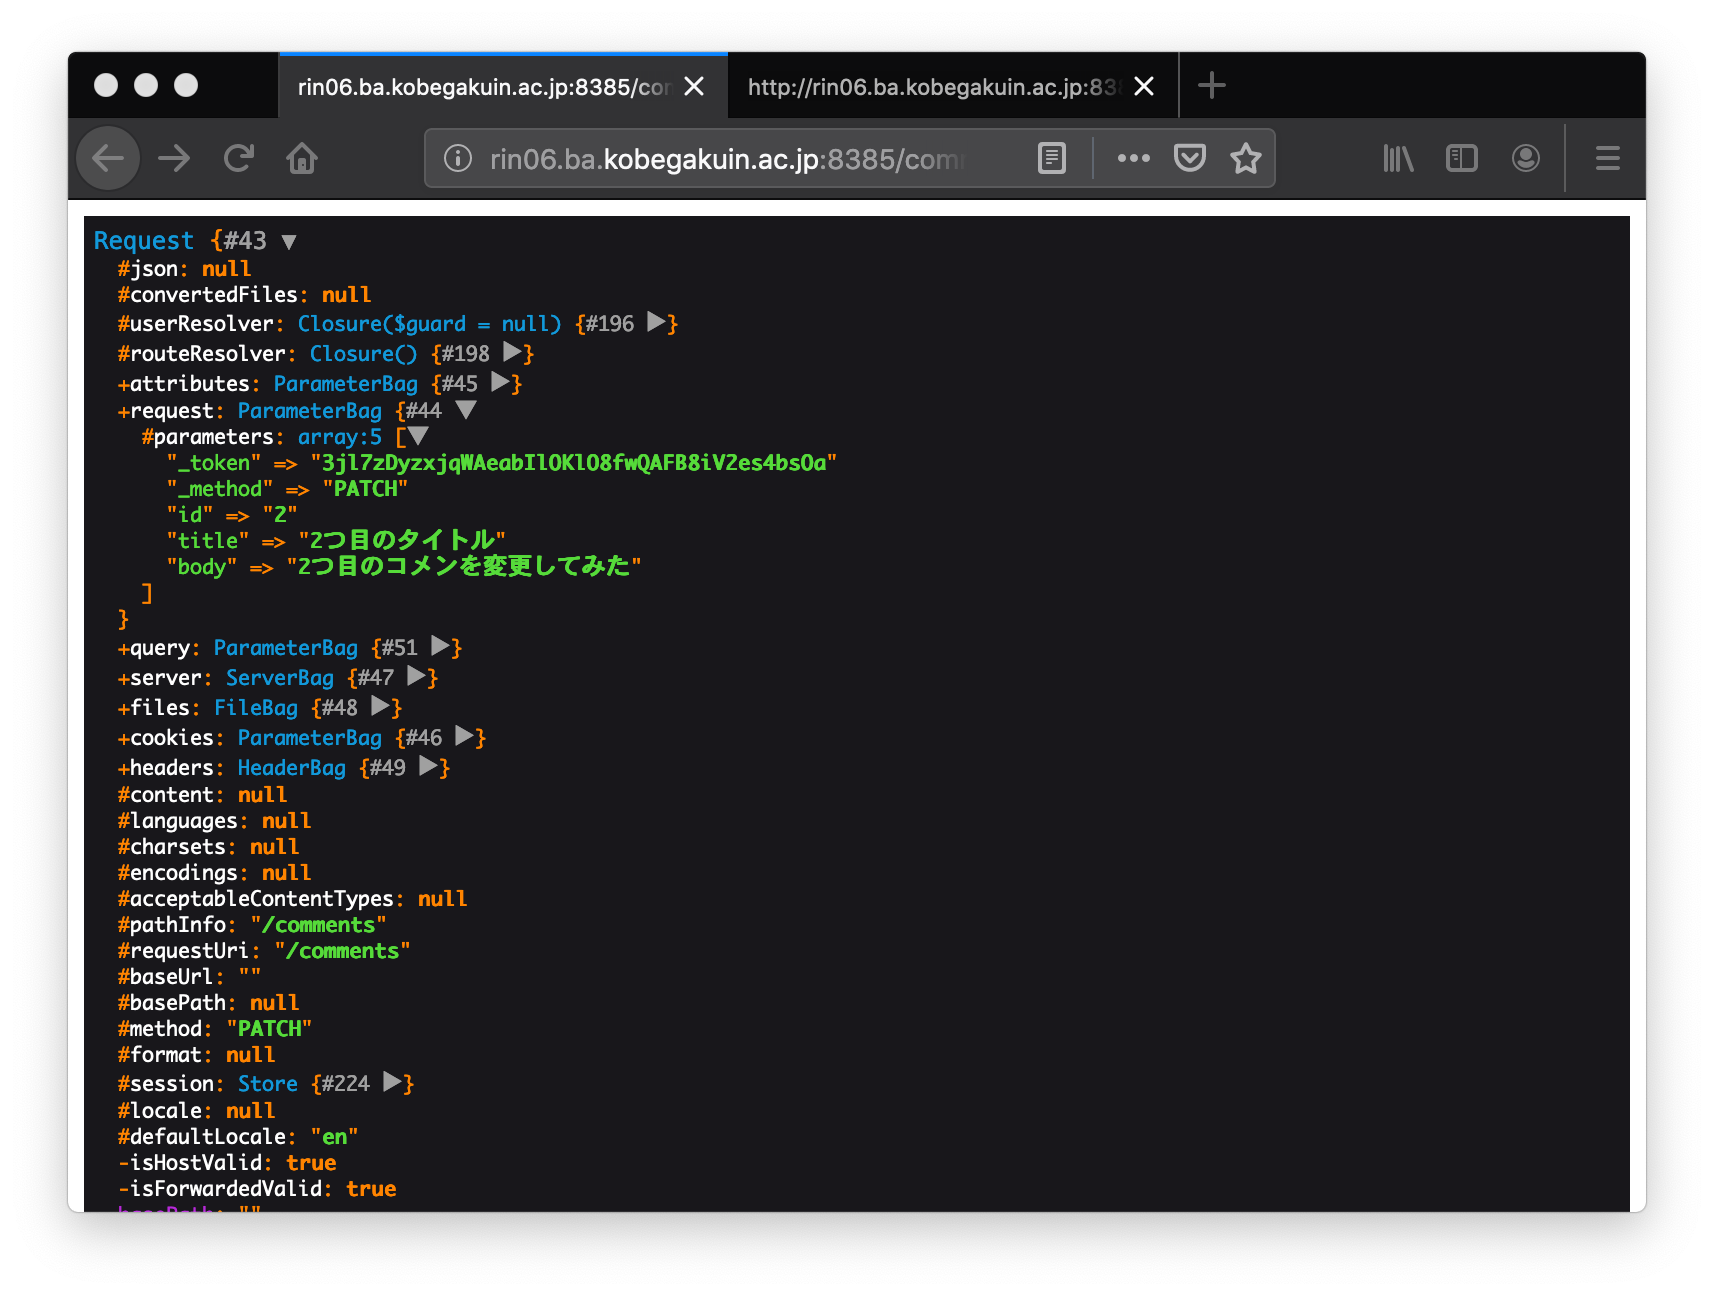
最後に,CommentsController の update メソッドに更新処理を記述しよう.
app/Http/Controllers/CommentsController.php (抜粋)
public function update(Request $request)
{
  $this->validate($request, [
    'title' => 'required|max:10',  // 入力が必須で,最大10文字
    'body' => 'required'           // 入力が必須
  ]);
  $comment = Comment::where('id', '=', $request->id)
              ->first();
  if (!$comment) {
    return redirect('/comments');
  }
  $comment->title = $request->title;
  $comment->body = $request->body;
  $comment->save();
  return redirect()->action('CommentsController@show', $request->id);
}
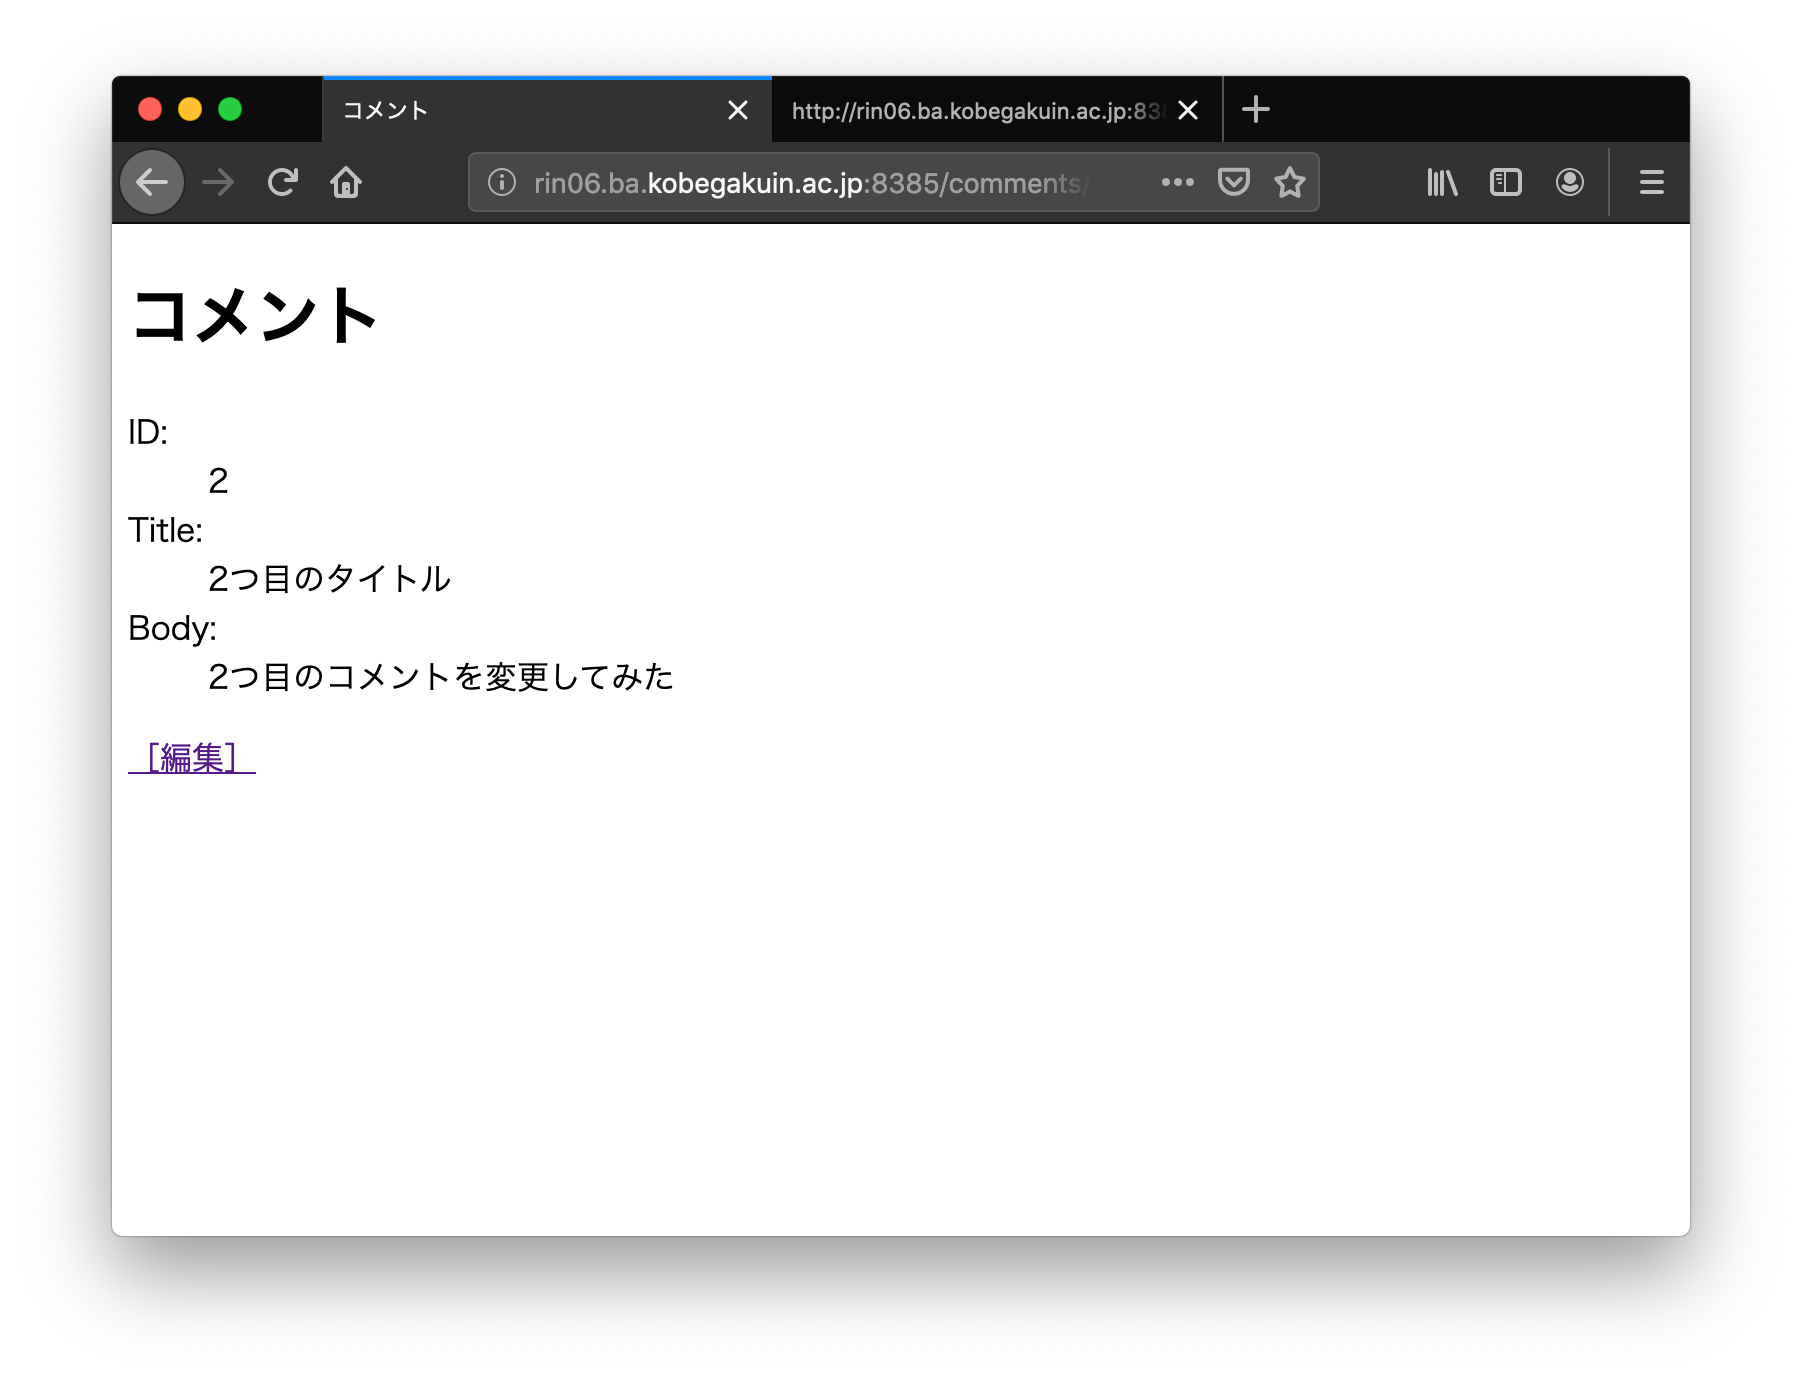
2つ目のコメントの内容を変更して更新ボタンを押してみた結果,コメントの内容が更新され,詳細ページに移動することが確認できました.
投稿を削除しよう
投稿内容を削除する機能を実装しよう.次のような手順で行います.
- 詳細ページのビューに削除のためのリンクを設置
- deleteのためのルートを定義
- コントローラにdestroyメソッドを追加
まず,詳細ページのビューに削除のためのリンクを設置する.resources/views/comments/show.blade.php を変更しよう.ただし,削除は単なるリンクではなく,セキュリティを高めるためにもフォームにしリクエストメソッドをDELETEにする.
resources/views/comments/show.blade.php (抜粋)
<body>
  <h1>コメント</h1>
  <dl>
    <dt>ID:</dt>
    <dd>{{ $comment->id }}</dd>
    <dt>Title:</dt>
    <dd>{{ $comment->title }}</dd>
    <dt>Body:</dt>
    <dd>{{ $comment->body }}</dd>
  </dl>
  <p>
    <a href="{{ action('CommentsController@edit', $comment->id) }}">
      [編集]
    </a>
  </p>
  <div>
    <form action="{{ action('CommentsController@destroy', $comment->id) }}" method="post">
      @csrf
      @method('DELETE')
      <button>コメント投稿の削除</button>
    </form>
  </div>
</body>
次にルートを定義する.
routes/web.php (抜粋)
Route::get('/comments', 'CommentsController@index');
Route::get('/comments/{id}', 'CommentsController@show');
Route::post('/comments', 'CommentsController@store');
Route::get('/comments/{id}/edit', 'CommentsController@edit');
Route::patch('/comments', 'CommentsController@update')->name('comment_update');
Route::delete('/comments/{id}', 'CommentsController@destroy');
CommentsController.php に destroy メソッドのひな形を準備する.
app/Http/Controllers/CommentsController.php (抜粋)
  public function destroy($id)
  {
    dd($id);
  }
この段階で,ひとまず削除リンクをクリックすれば /comments/{id}/ のページに移動し,コメントの id が表示されるはず.ここで,同じ /comments/{id}/ であっても,リクエストメソッドが GET であれば CommentsController@show が処理され,DELETE であれば CommentsController@delete が処理されることがわかる.つまり,ユーザが適当な URI を入力しても削除されることはなく,正しいフォームからボタンを押さなければ削除されない仕組みができていることを理解しよう(難しければそのうち・・・).
最後に,コントローラの destroy メソッドの処理を実装しよう.
app/Http/Controllers/CommentsController.php (抜粋)
public function destroy($id)
{
  $comment = Comment::where('id', '=', $id)
                  ->first();
  if (!$comment) {
    return redirect('/comments');
  }
  $comment->delete();
  return redirect('/comments');
}
コメントの削除もできるようになりました.

2つ目のコメントが削除されました.

なお現段階でのルート定義を確認すると次のようになっています.
[GakuinHana@rin06 myapp]$ php artisan route:list ⏎
+--------+----------+--------------------+----------------+-------------------------------------------------+--------------+
| Domain | Method   | URI                | Name           | Action                                          | Middleware   |
+--------+----------+--------------------+----------------+-------------------------------------------------+--------------+
|        | GET|HEAD | /                  |                | Closure                                         | web          |
|        | GET|HEAD | api/user           |                | Closure                                         | api,auth:api |
|        | GET|HEAD | comments           |                | App\Http\Controllers\CommentsController@index   | web          |
|        | POST     | comments           |                | App\Http\Controllers\CommentsController@store   | web          |
|        | PATCH    | comments           | comment_update | App\Http\Controllers\CommentsController@update  | web          |
|        | GET|HEAD | comments/{id}      |                | App\Http\Controllers\CommentsController@show    | web          |
|        | DELETE   | comments/{id}      |                | App\Http\Controllers\CommentsController@destroy | web          |
|        | GET|HEAD | comments/{id}/edit |                | App\Http\Controllers\CommentsController@edit    | web          |
+--------+----------+--------------------+----------------+-------------------------------------------------+--------------+
[GakuinHana@rin06 myapp]$
テストの自動化を実現しよう
バグをなくし開発システムの信頼性(品質)を保証するために,テストコードを書いて自動的にテストを実行できるようにしたい.また,テストカバレッジ(テスト網羅度)を計測して,テスト漏れがないかを確認したい.まずは,カバレッジを計測するための php-pecl-xdebug をインストールする必要があるが,rin06には既にインストールされています.
[GakuinHana@rin06 myapp]$ yum list installed | grep php ⏎
Repodata is over 2 weeks old. Install yum-cron? Or run: yum makecache fast
php.x86_64                         7.3.3-1.el7.remi           @remi-php73
php-cli.x86_64                     7.3.3-1.el7.remi           @remi-php73
php-common.x86_64                  7.3.3-1.el7.remi           @remi-php73
php-devel.x86_64                   7.3.3-1.el7.remi           @remi-php73
php-gd.x86_64                      7.3.3-1.el7.remi           @remi-php73
php-intl.x86_64                    7.3.3-1.el7.remi           @remi-php73
php-json.x86_64                    7.3.3-1.el7.remi           @remi-php73
php-ldap.x86_64                    7.3.3-1.el7.remi           @remi-php73
php-mbstring.x86_64                7.3.3-1.el7.remi           @remi-php73
php-mysqlnd.x86_64                 7.3.3-1.el7.remi           @remi-php73
php-pdo.x86_64                     7.3.3-1.el7.remi           @remi-php73
php-pecl-mcrypt.x86_64             1.0.2-2.el7.remi.7.3       @remi-php73
php-pecl-xdebug.x86_64             2.7.0-1.el7.remi.7.3       @remi-php73
php-xml.x86_64                     7.3.3-1.el7.remi           @remi-php73
[GakuinHana@rin06 myapp]$
テストのコードは tests/ 以下に保存され, Feature サブディレクトリは機能テスト,Unit サブディレクトリは単体テストである.まずは,ディレクトリの中身を覗いてみよう
[GakuinHana@rin06 myapp]$ ls tests ⏎
CreatesApplication.php  Feature  TestCase.php  Unit
[GakuinHana@rin06 myapp]$ ls tests/Feature ⏎
ExampleTest.php
[GakuinHana@rin06 myapp]$ ls tests/Unit ⏎
ExampleTest.php
[GakuinHana@rin06 myapp]$
新しいテストケースを生成するために,php artisan make:test テストケース名 を実行する.これによって,tests/Feature ディレクトリに新たな機能テストのひな形が生成される.また,--unit オプションを付ければ,tests/Unit ディレクトリにユニットテストのひな形が生成される.
[GakuinHana@rin06 myapp]$ php artisan make:test TopPageTest ⏎
Test created successfully.
[GakuinHana@rin06 myapp]$ ls tests/Feature ⏎
ExampleTest.php  TopPageTest.php
[GakuinHana@rin06 myapp]$ php artisan make:test TopPageTest --unit ⏎
Test created successfully.
[GakuinHana@rin06 myapp]$ ls tests/Unit ⏎
ExampleTest.php  TopPageTest.php
[GakuinHana@rin06 myapp]$
トップページの機能テストのファイル (test/Feature/TopPageTest.php) を見てみよう.すでにトップページ (/) にアクセスして(18行目),その結果 200番のステータスコードを受け取る(20行目),つまり,正しくアクセス出来ることが確認できるようなテストコードが生成されている.
tests/Feature/TopPageTest.php
<?php

namespace Tests\Feature;

use Tests\TestCase;
use Illuminate\Foundation\Testing\WithFaker;
use Illuminate\Foundation\Testing\RefreshDatabase;

class TopPageTest extends TestCase
{
  /**
   * A basic feature test example.
   *
   * @return void
   */
  public function testExample()
  {
    $response = $this->get('/');

    $response->assertStatus(200);
  }
}
次に,存在しない不正なページ (/hoge) にアクセスすれば,404番のステータスコードが得られることを確認するようなテストコードを記述してみよう.
tests/Feature/TopPageTest.php
<?php

namespace Tests\Feature;

use Tests\TestCase;
use Illuminate\Foundation\Testing\WithFaker;
use Illuminate\Foundation\Testing\RefreshDatabase;

class TopPageTest extends TestCase
{
  /**
   * A basic feature test example.
   *
   * @return void
   */
  public function testExample()
  {
    $response = $this->get('/');

    $response->assertStatus(200);
  }

  public function testExample2()  // 関数名が重複するとエラーになるので注意
  {
    $response = $this->get('/hoge');

    $response->assertStatus(404);
  }
}
実際にテストを実行するためには ./vendor/bin/phpunit を実行すれば良い(先頭の . を忘れないように).実行時にテストケースのファイル名を指定すれば,指定したテストケースだけが実行され,指定しなければ全てのテストケースが実行される.大規模なシステムになると,すべてのテストケースを実行するためには相当の時間を要する可能性がある.現状では0.2秒程度で全てのテストに合格していることがわかる.
[GakuinHana@rin06 myapp]$ ./vendor/bin/phpunit tests/Feature/TopPageTest.php ⏎
PHPUnit 7.5.16 by Sebastian Bergmann and contributors.

..                                                                  2 / 2 (100%)

Time: 185 ms, Memory: 18.00 MB

OK (2 tests, 2 assertions)
[GakuinHana@rin06 myapp]$ ./vendor/bin/phpunit ⏎
PHPUnit 7.5.16 by Sebastian Bergmann and contributors.

.....                                                               5 / 5 (100%)

Time: 248 ms, Memory: 18.00 MB

OK (5 tests, 5 assertions)
[GakuinHana@rin06 myapp]$
さらに Comments に関するテストケースを生成し,テストコードを書いてみよう.
[GakuinHana@rin06 myapp]$ php artisan make:test CommentsPageTest ⏎
Test created successfully.
[GakuinHana@rin06 myapp]$
tests/Feature/CommentsPageTest.php
<?php

namespace Tests\Feature;

use Tests\TestCase;
use Illuminate\Foundation\Testing\WithFaker;
use Illuminate\Foundation\Testing\RefreshDatabase;

class CommentsPageTest extends TestCase
{
  /**
   * A basic feature test example.
   *
   * @return void
   */
  public function testExample()
  {
    $response = $this->get('/comments');
    $response->assertStatus(200);
  }

  public function testExample2()
  {
    $response = $this->get('/comments/3');
    $response->assertStatus(200);
  }

  public function testExample3()
  {
    $response = $this->get('/comments/3/edit');
    $response->assertStatus(200);
  }
}
実際にテストを実行してみると,全てのテストをパスできた.
[GakuinHana@rin06 myapp]$ ./vendor/bin/phpunit ⏎
PHPUnit 7.5.16 by Sebastian Bergmann and contributors.

........                                                            8 / 8 (100%)

Time: 337 ms, Memory: 20.00 MB

OK (8 tests, 8 assertions)
[GakuinHana@rin06 myapp]$
このようにコードを変更するたびに自動テストを実施すれば,思わぬバグを作り込んでしまっても発見できる可能性が高くなる.しかし,ソースコードのどの部分のテストはされて,どの部分のテストができていないかを知ることも重要である.このために,テストカバレッジ(網羅度)を計測しよう.
まず,カバレッジ情報を保存するためのディレクトリを任意の場所に作成する.rin06 の場合は,各自の ~/public_html/ 以下にサブディレクトリを作れば,ブラウザから簡単に確認できるので,~/public_html/cv_report/ を作ってみる.なお,~/ はユーザのホームディレクトリを意味するので,例えば GakuinHana というユーザの場合は /home/students/GakuinHana/ と同じ意味になる.
[GakuinHana@rin06 myapp]$ cd ~/public_html/ ⏎
[GakuinHana@rin06 public_html]$ mkdir cv_report ⏎
[GakuinHana@rin06 public_html]$ pwd ⏎
/home/students/GakuinHana/public_html
[GakuinHana@rin06 public_html]$ cd cv_report/ ⏎
[GakuinHana@rin06 cv_report]$ pwd ⏎
/home/students/GakuinHana/public_html/cv_report
[GakuinHana@rin06 cv_report]$ cd ~/Documents/laravel/myapp/ ⏎
[GakuinHana@rin06 myapp]$
テストを実行して,カバレッジレポートを出力するためには --coverage-html オプションを付けて,カバレッジレポートの出力先を指定する.実際にテストを実行してみよう.カバレッジを計算するとテスト要する時間が大幅に長くなるので注意が必要です.
[GakuinHana@rin06 myapp]$ ./vendor/bin/phpunit --coverage-html ~/public_html/cv_report/ ⏎
PHPUnit 7.5.16 by Sebastian Bergmann and contributors.

........                                                            8 / 8 (100%)

Time: 1.34 seconds, Memory: 22.00 MB

OK (8 tests, 8 assertions)

Generating code coverage report in HTML format ... done
[GakuinHana@rin06 myapp]$
カバレッジレポートが作成されているか,ディレクトリの中身を覗いてみよう.index.htmlがレポートのトップページで,ほかにも複数のファイル,ディレクトリが作成されています.
[GakuinHana@rin06 myapp]$ cd ~/public_html/cv_report/ ⏎
[GakuinHana@rin06 cv_report]$ ls
Comment.php.html  Console  Exceptions  Http  Providers  User.php.html  css  dashboard.html  fonts  index.html  js
[GakuinHana@rin06 cv_report]$
ブラウザでカバレッジレポートを確認してみよう.http://rin06.ba.kobegakuin.ac.jp/~ユーザ名/cv_report/ を開くと良い.ユーザ GakuinHana のレポートは http://rin06.ba.kobegakuin.ac.jp/~GakuinHana/cv_report/ です.トップページではカバレッジの全体像が確認できる.例えば,Httpフォルダ以下は62行中,13行がテストされ,カバレッジは20.97%であることが読み取れる.
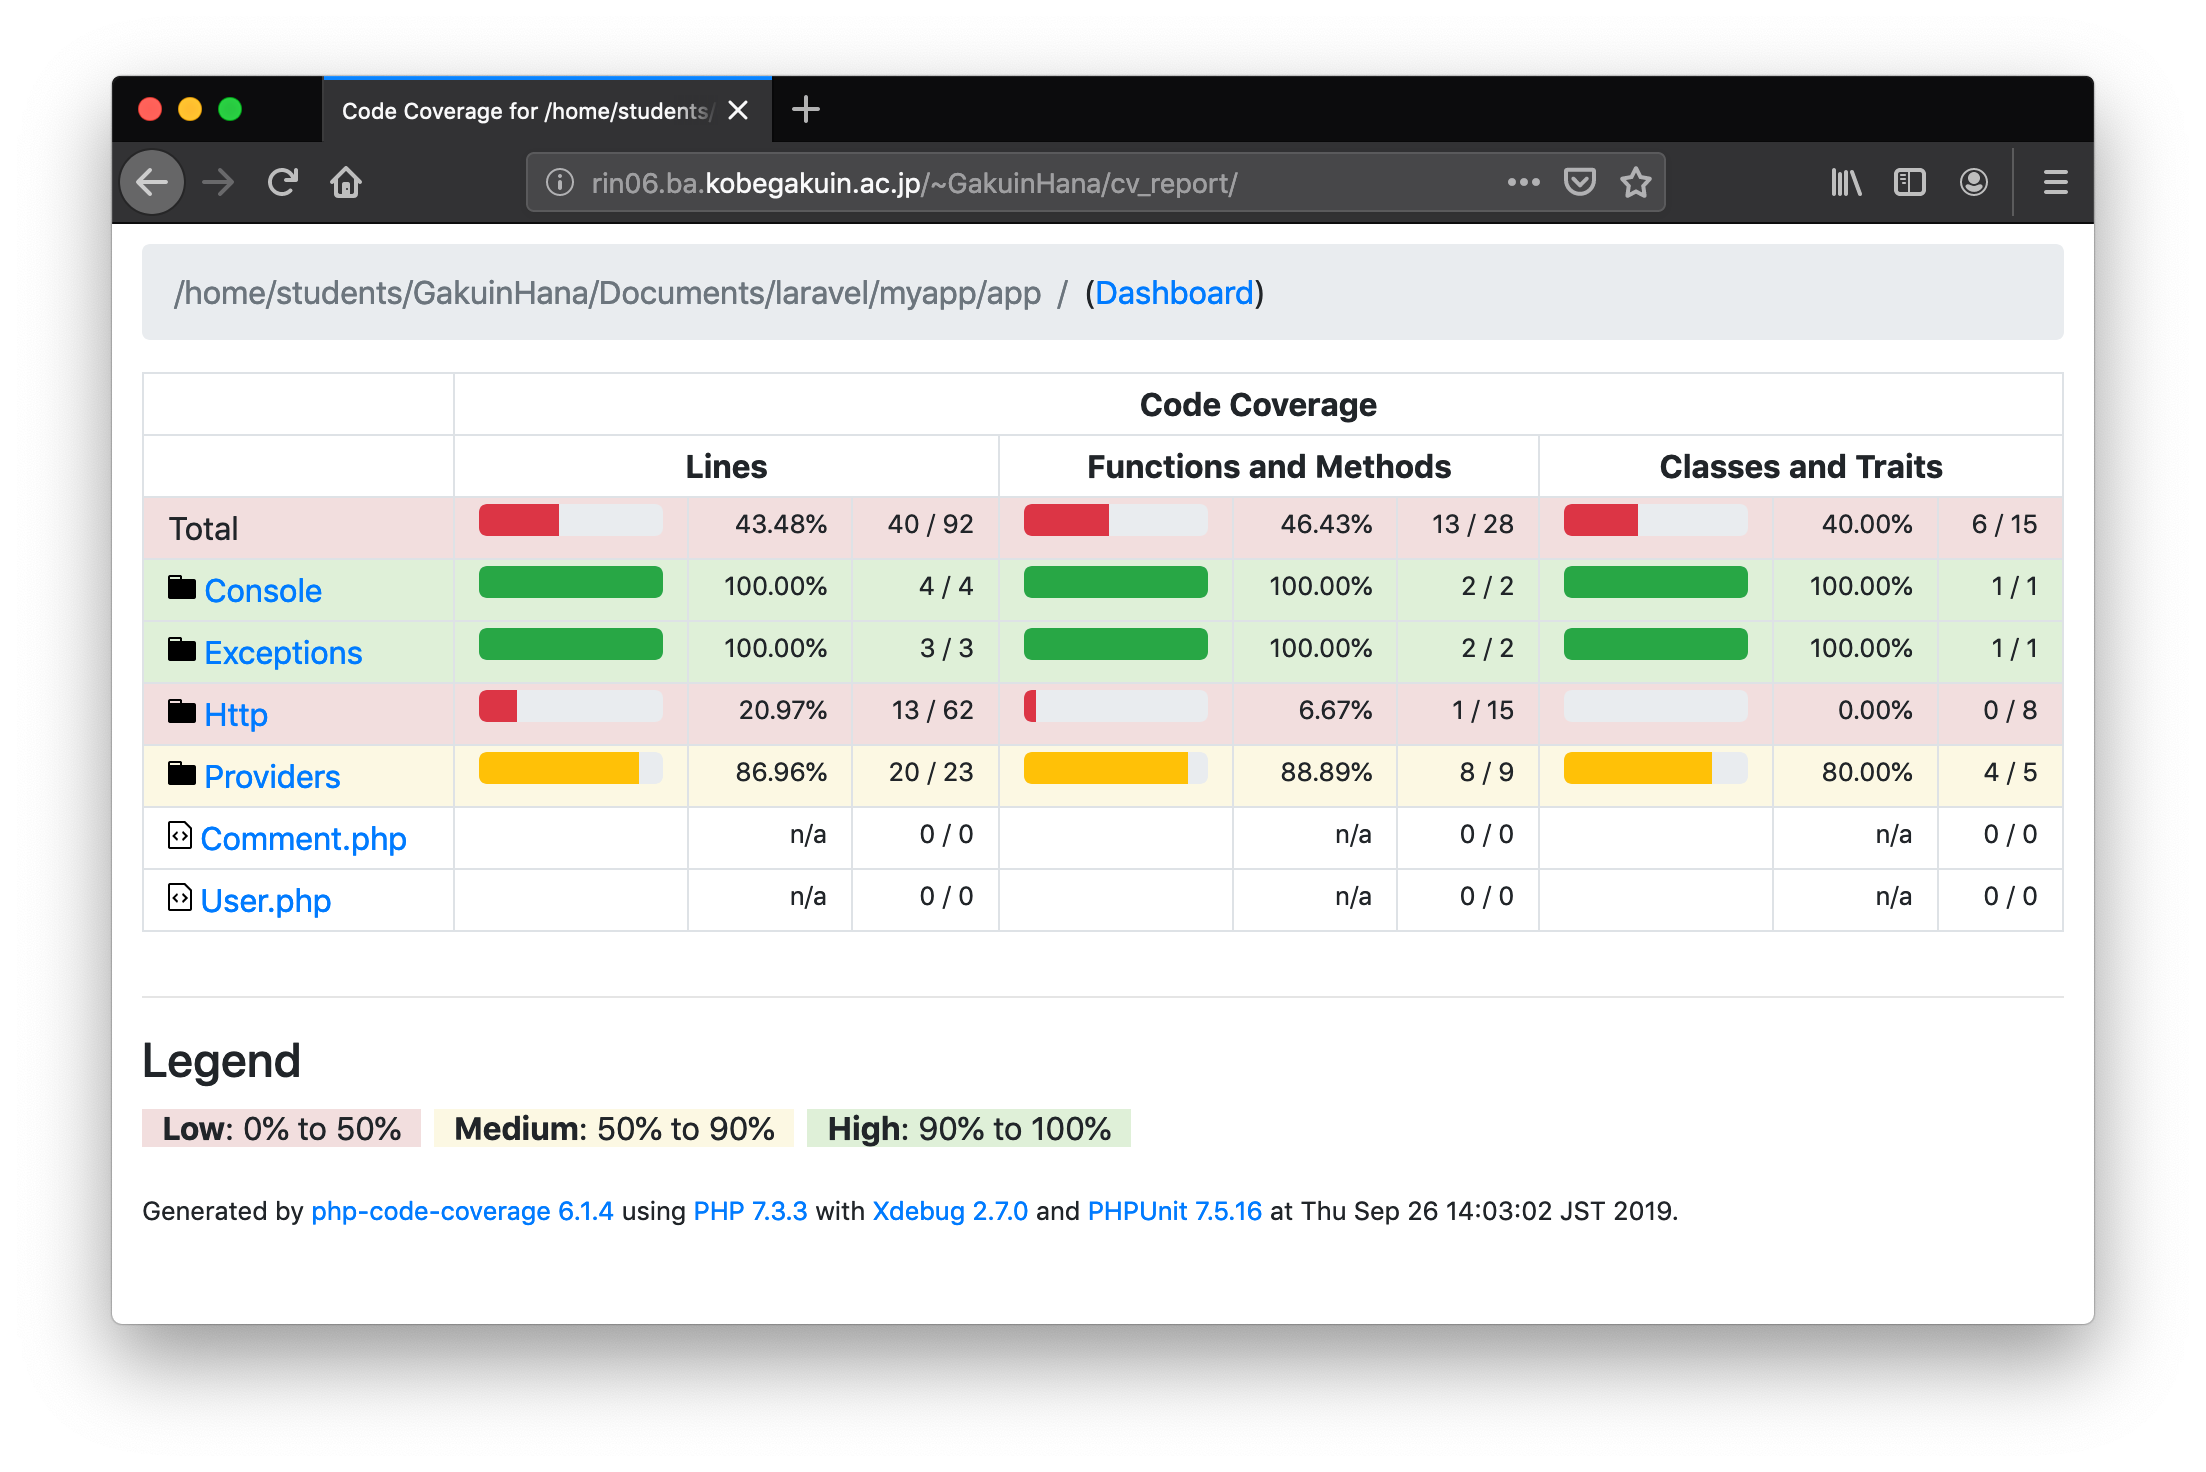
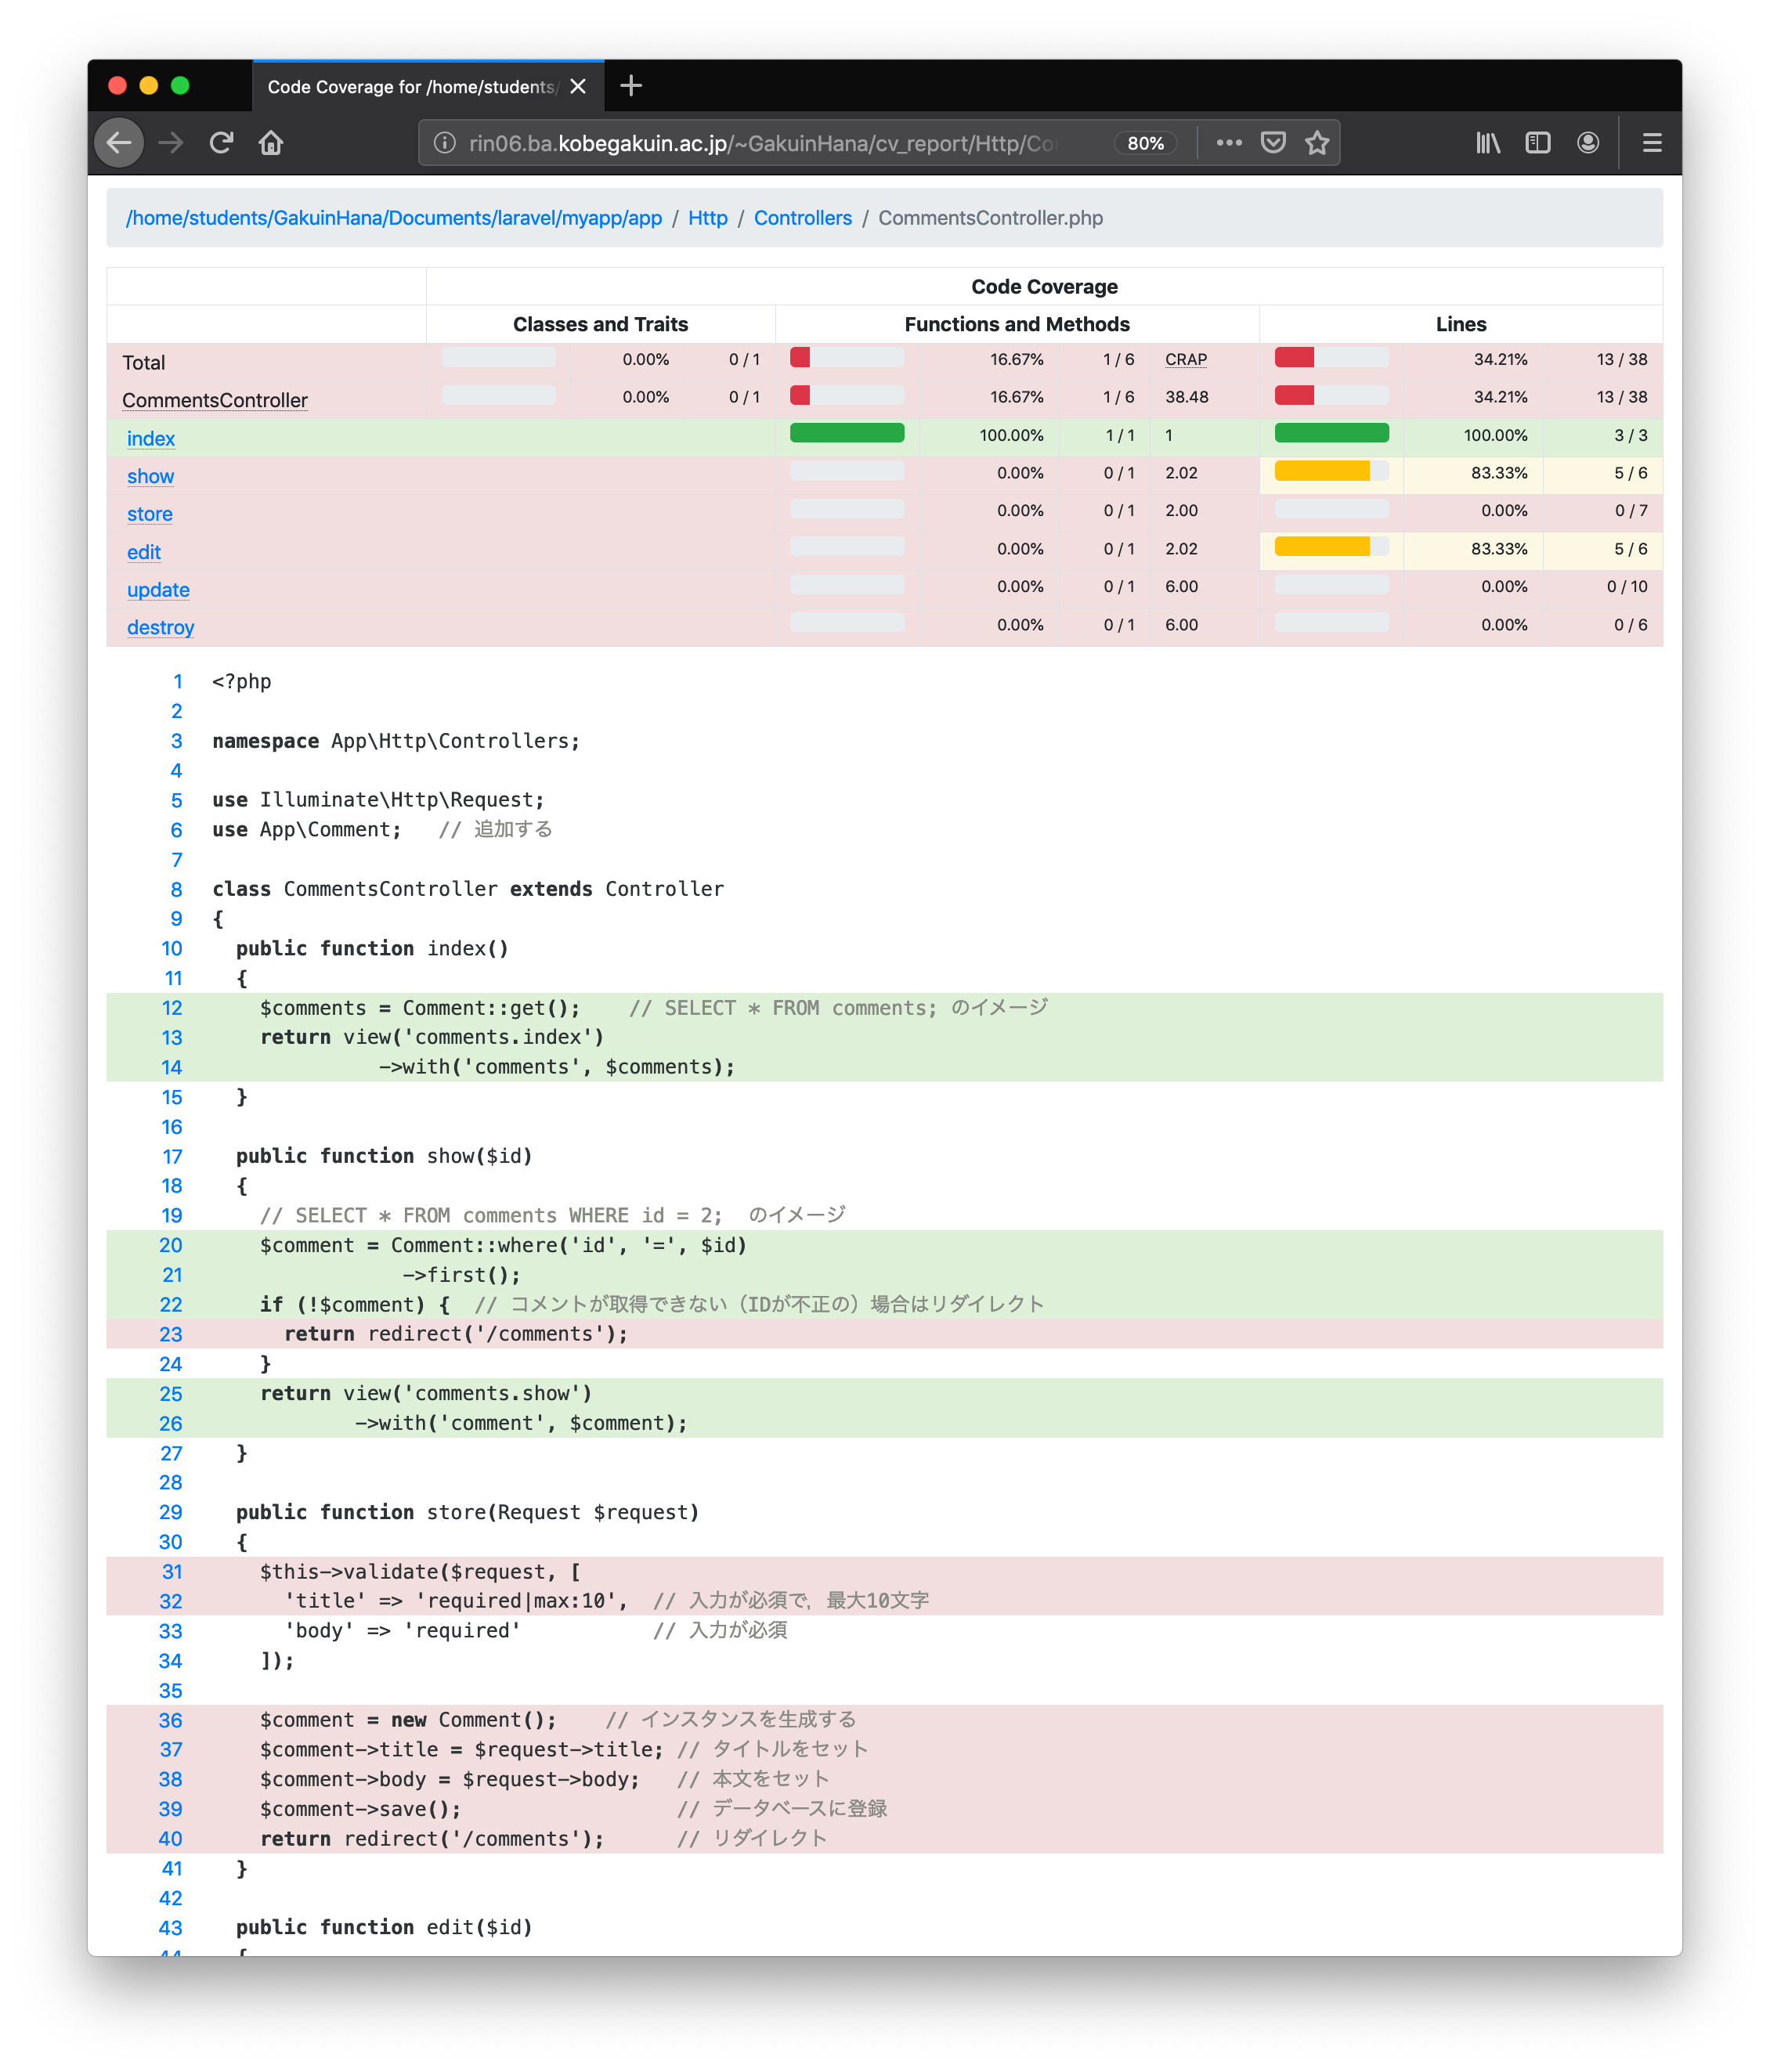
さらに Http, Controllers, CommentsController.php の順にリンクをたどれば,app/Http/Controllers/CommentsController.php のカバレッジを詳細に確認できる.index 関数は全てのコードがテストされており,show関数は23行目だけがテストされていない.このように,どの行がテストされて,どの行がまだテストされていないかこの画面から一目瞭然である.どうやら,テスト項目が足りていないので,全ての行がテストされるようにテストケースを追加し,カバレッジ100%を目指そう.
なお,コメントの投稿や編集,削除などをテストすることも可能である.このような場合は,その都度データベースを初期化してからテストをすると確実である.つまり,ロールバック,マイグレーション,シードの設定を行ってからテストを実行する.
[GakuinHana@rin06 myapp]$ php artisan migrate:rollback ⏎
Rolling back: 2019_09_26_100151_create_comments_table
Rolled back:  2019_09_26_100151_create_comments_table (0 seconds)
[GakuinHana@rin06 myapp]$ php artisan migrate ⏎
Migrating: 2019_09_26_100151_create_comments_table
Migrated:  2019_09_26_100151_create_comments_table (0 seconds)
[GakuinHana@rin06 myapp]$ php artisan db:seed ⏎
Seeding: CommentsTableSeeder
Database seeding completed successfully.
[GakuinHana@rin06 myapp]$ ./vendor/bin/phpunit --coverage-html ~/public_html/cv_report/ ⏎
PHPUnit 7.5.16 by Sebastian Bergmann and contributors.

........                                                            8 / 8 (100%)

Time: 1.37 seconds, Memory: 22.00 MB

OK (8 tests, 8 assertions)

Generating code coverage report in HTML format ... done
[GakuinHana@rin06 myapp]$
毎回,複数のコマンドを連続して実行するのであれば,セミコロン (;) で区切って,一気に実行できる.
[GakuinHana@rin06 myapp]$
php artisan migrate:rollback; php artisan migrate; php artisan db:seed; ./vendor/bin/phpunit --coverage-html ~/public_html/cv_report/ ⏎
Rolling back: 2019_09_26_100151_create_comments_table
Rolled back:  2019_09_26_100151_create_comments_table (0 seconds)
Migrating: 2019_09_26_100151_create_comments_table
Migrated:  2019_09_26_100151_create_comments_table (0.01 seconds)
Seeding: CommentsTableSeeder
Database seeding completed successfully.
PHPUnit 7.5.16 by Sebastian Bergmann and contributors.

........                                                            8 / 8 (100%)

Time: 1.33 seconds, Memory: 22.00 MB

OK (8 tests, 8 assertions)

Generating code coverage report in HTML format ... done
[GakuinHana@rin06 myapp]$
さらに,過去に実行したLinuxコマンドは最新のものが1000件程度 history で確認できる.grep は検索にヒットした行だけを表示するためのコマンドである.history コマンドの履歴番号を指定して同じコマンドを再実行するには !履歴番号 とすれば良い.これが理解できれば,テストやサーバの起動コマンドを覚える必要もない.
history コマンドで履歴を確認すると,一気に流れてしまう.
[GakuinHana@rin06 myapp]$ history ⏎
   88  touch database.sqlite
   89  ls -l
   90  cd ..
   91  ls
   92  php artisan migrate
   93  php ../composer.phar dump-autoload

  ...(中略)...

   1082  php artisan db:seed
   1083  ./vendor/bin/phpunit --coverage-html ~/public_html/cv_report/
   1084  php artisan migrate:rollback; php artisan migrate; php artisan db:seed; ./vendor/bin/phpunit --coverage-html ~/public_html/cv_report/
   1085  history
[GakuinHana@rin06 myapp]$
Web サーバの起動コマンドを serve をキーワードに検索してみる.
[GakuinHana@rin06 myapp]$ history | grep serve ⏎
  831  php artisan serve --host=rin06.ba.kobegakuin.ac.jp --port 8385
  906  php artisan serve --host=rin06.ba.kobegakuin.ac.jp --port 8385
  999  php artisan serve --host=rin06.ba.kobegakuin.ac.jp --port 8385
 1086  history | grep serve
[GakuinHana@rin06 myapp]$
!831 で以前と同じコマンドを実行すると Web サーバーが起動する.
[GakuinHana@rin06 myapp]$ !831 ⏎
php artisan serve --host=rin06.ba.kobegakuin.ac.jp --port 8385
Laravel development server started: <http://rin06.ba.kobegakuin.ac.jp:8385>
^C
[GakuinHana@rin06 myapp]$
テストのための一連のコマンド群を phpunit をキーワードに検索し,!991 で実行する.
[GakuinHana@rin06 myapp]$ history | grep phpunit ⏎
  963  ./vendor/bin/phpunit tests/Feature/TopPageTest.php
  964  ./vendor/bin/phpunit
  965  ./vendor/bin/phpunit tests/Feature/TopPageTest.php
  966  ./vendor/bin/phpunit
  979  ./vendor/bin/phpunit
  986  ./vendor/bin/phpunit --coverage-html ~/public_html/cv_report/
  990  ./vendor/bin/phpunit --coverage-html ~/public_html/cv_report/
  991  php artisan migrate:rollback; php artisan migrate; php artisan db:seed; ./vendor/bin/phpunit --coverage-html ~/public_html/cv_report/
 1005  history | grep phpunit
[GakuinHana@rin06 myapp]$ !991 ⏎
php artisan migrate:rollback; php artisan migrate; php artisan db:seed; ./vendor/bin/phpunit --coverage-html ~/public_html/cv_report/
Rolling back: 2019_09_26_100151_create_comments_table
Rolled back:  2019_09_26_100151_create_comments_table (0 seconds)
Migrating: 2019_09_26_100151_create_comments_table
Migrated:  2019_09_26_100151_create_comments_table (0 seconds)
Seeding: CommentsTableSeeder
Database seeding completed successfully.
PHPUnit 7.5.16 by Sebastian Bergmann and contributors.

........                                                            8 / 8 (100%)

Time: 1.36 seconds, Memory: 22.00 MB

OK (8 tests, 8 assertions)

Generating code coverage report in HTML format ... done
[GakuinHana@rin06 myapp]$
ビューをレイアウト化しよう
ここでは,ビューの共通部分をレイアウト化してみよう.この作業は小さなシステムの開発時には必要性は感じられないかもしれないが,開発規模が大きくなるといずれ有り難みが理解できるであろう.
まず,resources/views/layouts ディレクトリを作成し,default.blade.php にHTMLファイルの共通部分を定義したレイアウトファイルを設置する.通常のHTMLファイルと異なる部分は5行目と9行目の @で始まる部分である.@yield('title') では,セクション名 title を指定して,その場所にそのセクションの内容を取り込むことになる.
resources/views/layouts/default.blade.php
<!DOCTYPE html>
<html lang="ja">
<head>
  <meta charset="UTF-8">
  <title>@yield('title')</title>
</head>
<body>
  <div class="container">
    @yield('content')
  </div>
</body>
つづいて,いま作成した共通レイアウトの親ビューを使用するように resources/views/comments/index.blade.php を修正しよう.1行目の @extends('layouts.default') によって,共通レイアウトが使用されることになる.3行目の @section('title', 'List of Comments') によって title セクションが定義され,title セクションの内容 List of Comments が,共通レイアウトの @yield('title') の部分に埋め込まれる.また,5行目から37行目が content セクションとして定義されたので,共通レイアウトの9行目 @yield('content') の部分に埋め込まれることになる.なお,content セクションの内容は,以前の <body> 〜 </body>内部のコードをそのままコピーするだけで良い.
resources/views/comments/index.blade.php
@extends('layouts.default')

@section('title', 'コメントの一覧')

@section('content')
  <h1>コメント一覧</h1>
  <ul>
    @foreach ($comments as $comment)
      <li>
        <a href="{{ action('CommentsController@show', $comment->id) }}">
          {{ $comment->title }}
        </a>
      </li>
    @endforeach
  </ul>

  <h1>コメント投稿</h1>
  <div>
    <form method="post" action="{{ url('/comments') }}">
      @csrf
      <p>
        <label for="title">Title: </label>
        <input type="text" name="title" id="title" value="{{ old('title') }}">
        @if ($errors->has('title'))
          <span class="error">{{ $errors->first('title') }}</span>
        @endif
      </p>

      <p>
        <label for="body">Body: </label>
        <textarea name="body" id="body" rows="4" cols="50">{{ old('body') }}</textarea>
        @if ($errors->has('body'))
          <span class="error">{{ $errors->first('body') }}</span>
        @endif
      </p>
      <p>
        <input type="submit" value="投稿">
      </p>
    </form>
  </div>
@endsection
このように,HTMLの共通部分をレイアウト化することで,たとえば HTML のヘッダで CSS を読み込むような記述が必要な場合に,レイアウトファイルを修正するだけでシステム全体の設定を変更することができるようになる.レイアウトを使わなければ,index.blade.php, show.blade.php, edit.blade.php など全てのファイルに同様の変更を施さなければならなくなる.
折角なので,show.blade.php と edit.blade.php もレイアウト化しておこう.
resources/views/comments/show.blade.php
@extends('layouts.default')

@section('title', 'コメント')

@section('content')
  <h1>コメント</h1>
  <dl>
    <dt>ID:</dt>
    <dd>{{ $comment->id }}</dd>
    <dt>Title:</dt>
    <dd>{{ $comment->title }}</dd>
    <dt>Body:</dt>
    <dd>{{ $comment->body }}</dd>
  </dl>
  <p>
    <a href="{{ action('CommentsController@edit', $comment->id) }}">
      [編集]
    </a>
  </p>
  <div>
    <form action="{{ action('CommentsController@destroy', $comment->id) }}" method="post">
      @csrf
      @method('DELETE')
      <button>コメント投稿の削除</button>
    </form>
  </div>
@endsection
resources/views/comments/edit.blade.php
@extends('layouts.default')

@section('title', 'コメントの編集')

@section('content')
  <h1>コメント編集</h1>
  <div>
    <form method="post" action="{{ route('comment_update') }}" enctype='multipart/form-data'>
      @csrf
      @method('PATCH')
      <input type="hidden" name="id" value="{{ $comment->id }}">
      <p>
        <label for="title">Title: </label>
        <input type="text" name="title" id="title" value="{{ $comment->title }}{{ old('title') }}">
        @if ($errors->has('title'))
          <span class="error">{{ $errors->first('title') }}</span>
        @endif
      </p>
      <p>
        <label for="body">Body: </label>
        <textarea name="body" id="body" rows="4" cols="50">{{ $comment->body }}{{ old('body') }}</textarea>
        @if ($errors->has('body'))
          <span class="error">{{ $errors->first('body') }}</span>
        @endif
      </p>
      <p>
        <input type="submit" value="更新">
      </p>
    </form>
  </div>
@endsection
最後に,大幅な修正を施したので,テストを実行しておこう.
[GakuinHana@rin06 myapp]$ history | grep phpunit ⏎
  435  php artisan migrate:rollback; php artisan migrate; php artisan db:seed; ./vendor/bin/phpunit
  438  php artisan migrate:rollback; php artisan migrate; php artisan db:seed; ./vendor/bin/phpunit
  440  php artisan migrate:rollback; php artisan migrate; php artisan db:seed; ./vendor/bin/phpunit --coverage-html ~/public_html/cv_report/
  546  history | grep phpunit
[GakuinHana@rin06 myapp]$ !435 ⏎
php artisan migrate:rollback; php artisan migrate; php artisan db:seed; ./vendor/bin/phpunit
Rolling back: 2017_11_28_152639_create_comments_table
Rolled back:  2017_11_28_152639_create_comments_table
Migrating: 2017_11_28_152639_create_comments_table
Migrated:  2017_11_28_152639_create_comments_table
Seeding: CommentsTableSeeder
PHPUnit 5.7.25 by Sebastian Bergmann and contributors.

........                                                            8 / 8 (100%)

Time: 271 ms, Memory: 17.75MB

OK (8 tests, 8 assertions)
[GakuinHana@rin06 myapp]$