目次
- Composerのダウンロードとインストール
- コメント掲示板を作成してみよう
- リレーションシップを使いこなそう
- ユーザ認証の機能を実現しよう
- マルチ認証の機能を実現しよう
- MongoDB に接続しよう
- キューを利用しよう
- コマンド(コンソール)を利用しよう
- 本番環境にデプロイしよう
リレーションシップを使いこなそう
学生の情報を表示・変更・削除する
ここでの概要
ここでは,学生の個人情報を表示するページを作成する.また,学生の履修情報を更新(変更)するためのフォームも作成する.特に,中間テーブルの履修情報を連鎖的に変更したり,削除したりする方法についても解説する.
学生情報の表示
ここでは,学生個人の情報を表示するページを作成しよう.まず,ルートを定義する.たとえば,/students/1 では id = 1 である井上のページを表示する.
routes/web.php (抜粋)
Route::get('/students', 'StudentsController@index');
Route::get('/students/{id}', 'StudentsController@show');
次は,コントローラに show 関数を追加する.まずは,引数だけを表示するようにしておこう.
app/Http/Controllers/StudentsController.php  (抜粋)
cclass StudentsController extends Controller
{
  public function index()
  {
    $students = Student::get();
    return view('students.index')
            ->with('students', $students);
  }

  public function show($id)
  {
    dd($id)
  }
}
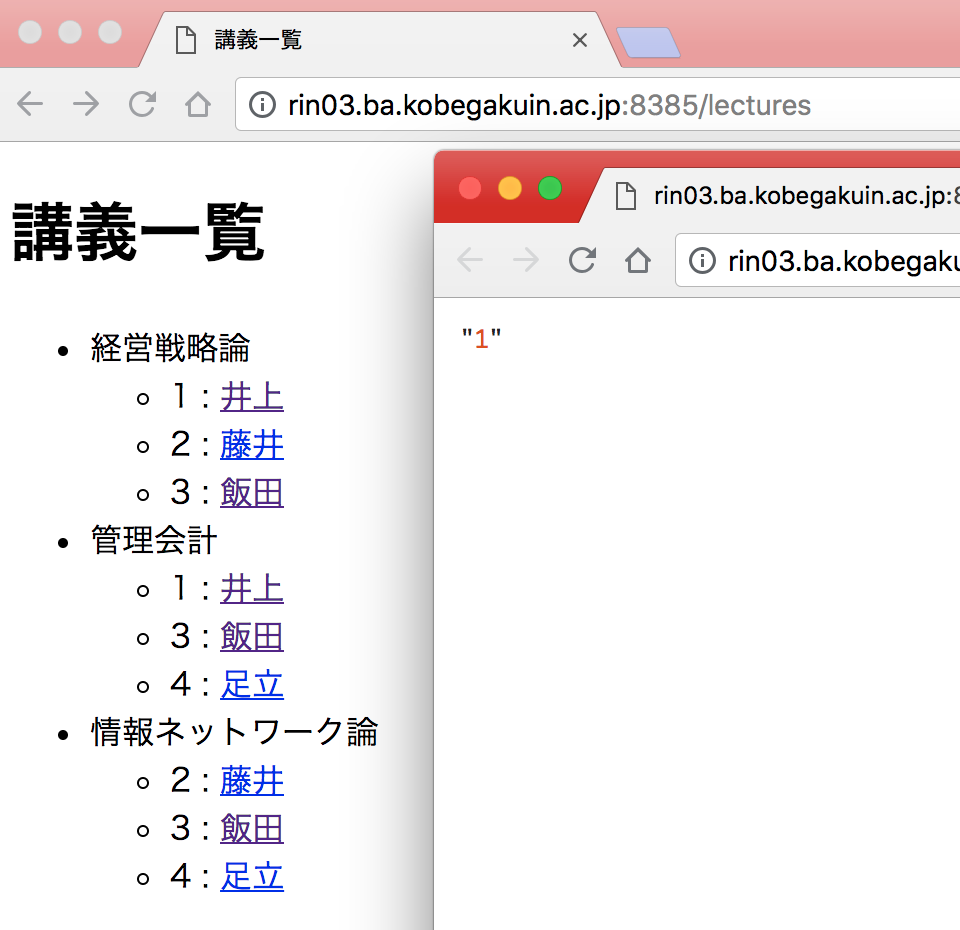
/students と /lectures のページに /students/{id} へのリンクを設置する.ビューを次のように変更すれば良い.
resources/views/students/index.blade.php  (抜粋)
<body>
    <h1>学生一覧</h1>
    <ul>
        @foreach ($students as $student)
            <li>{{ $student->id }} : <a href="{{ action('StudentsController@show', $student->id ) }}">{{ $student->name }}</a></li>
            <ul>
                @foreach ($student->lectures as $lecture)
                    <li>{{ $lecture->name }}</li>
                @endforeach
            </ul>
        @endforeach
    </ul>
</body>
resources/views/lectures/index.blade.php  (抜粋)
<body>
    <h1>講義一覧</h1>
    <ul>
        @foreach ($lectures as $lecture)
            <li>{{ $lecture->name }}</li>
            <ul>
                @foreach ($lecture->students as $student)
                    <li>{{ $student->id
                    }} : <a href="{{ action('StudentsController@show', $student->id ) }}">{{ $student->name }}</a></li>
                @endforeach
            </ul>
        @endforeach
    </ul>
</body>
これによって,下図のように /students や /lecture から /students/1 などへリンクされるようになった.
次は StudentsController の show を編集して,学生情報を実際に取得しビューに渡す処理を記述する.
app/Http/Controllers/StudentsController.php  (抜粋)
  public function show($id)
  {
    $student = Student::where('id', $id)
                        ->first();
    if (!$student) {  // 見つからなかった場合
      return redirect('/students');
    }
    return view('students.show')
            ->with('student', $student);
  }
resources/views/students/show.blade.php を作成し,次のような内容を記述する(index.blade.php とほとんど同じなので,コピーして一部を修正するだけでも良い).
resources/views/students/show.blade.php
<!DOCTYPE html>
<html lang="ja">
<head>
    <meta charset="UTF-8">
    <title>{{ $student->name }}</title>
</head>
<body>
    <h1>{{ $student->name }}</h1>
    <p>学籍番号:{{ $student->id }}</p>
    <p>氏名:{{ $student->name }}</p>
    <h2>履修科目一覧</h2>
    <ul>
        @foreach ($student->lectures as $lecture)
            <li>{{ $lecture->name }}</li>
        @endforeach
    </ul>
</body>
</html>
これで学生の個人情報の表示ページができました.

学生情報(履修)の変更
学生の個人情報のページから履修登録編集のページへリンクを作成しよう.まずはルートの定義を行う.ここでは,編集画面を表示するための定義と,編集画面で「更新」ボタンを押した後の処理を行うための定義を追加しておく.
routes/web.php (抜粋)
Route::get('/students', 'StudentsController@index');
Route::get('/students/{id}', 'StudentsController@show');
Route::get('/students/{id}/edit', 'StudentsController@edit');
Route::patch('/students', 'StudentsController@update');
学生情報ページには編集画面へのリンクを設置しておく.
resources/views/students/show.blade.php (抜粋)
<body>
    <h1>{{ $student->name }}</h1>
    <p>学籍番号:{{ $student->id }}</p>
    <p>氏名:{{ $student->name }}</p>
    <h2>履修科目一覧</h2>
    <ul>
        @foreach ($student->lectures as $lecture)
            <li>{{ $lecture->name }}</li>
        @endforeach
    </ul>
    <hr>
    <p><a href="{{ action('StudentsController@edit', $student->id )}}">[編集]</a></p>
</body>
コントローラに edit と update 関数を追加する.なお,update 関数は更新ボタンが押されたときに,どのような情報が渡されてくるかを確認するためだけのコードを記述しておき,まだ実際にデータベースを更新しないようにしておく.
app/Http/Controllers/StudentsController.php  (抜粋)
use Illuminate\Http\Request;
use App\Student;
use App\Lecture;    // 追加しておく

... (中略) ...

  public function edit($id)
  {
    $student = Student::where('id', $id)
                    ->first();
    if (!$student) {  // 見つからなかった場合
      return redirect('/students');
    }
    $all_lectures = Lecture::get(); // 講義の一覧を取得しておく

    return view('students.show')
            ->with('student', $student)
            ->with('all_lectures', $all_lectures);
  }

  public function update(Request $request)
  {
    dd($request);
  }
resources/views/students/edit.blade.php を作成し,次のような内容を記述する.
resources/views/students/edit.blade.php
<!DOCTYPE html>
<html lang="ja">
<head>
    <meta charset="UTF-8">
    <title>{{ $student->name }} の編集</title>
</head>
<body>
    <h1>{{ $student->name }} の編集</h1>

    <div>
      <form method="post"
      action="{{ action('StudentsController@update') }}"
      enctype='multipart/form-data'>
        {{ csrf_field() }}
        {{ method_field('patch') }}
        <input type="hidden" name="id" value="{{ $student->id }}">
        <p>
          @foreach ($all_lectures as $lecture)
            <input type="checkbox" name="risyu[]" value={{ $lecture->id }}>
            {{ $lecture->name }} <br>
          @endforeach
        </p>
        <p>
          <input type="submit" value="履修科目の変更">
        </p>
      </form>
    </div>
</body>
</html>
ひとまず,各学生の編集ページですべての講義科目のチェックボックスが表示された.まだ,履修中の科目がチェックされていないので,履修中の科目に予めチェックが入るようにしよう.このために,app/Student.php に is_risyu() というメソッドを追加する.これは,指定した科目を指定した学生が履修していれば1を,そうでなければ0を返す関数である.
app/Student.php (抜粋)
// 多対多のリレーションシップ
  public function lectures()
  {
    return $this->belongsToMany('App\Lecture');
  }

  // 履修しているかどうかを判定
  public function is_risyu($lecture_id, $student_id)
  {
    $cnt = \DB::table('lecture_student')
                ->where('lecture_id', $lecture_id)
                ->where('student_id', $student_id)
                ->count();
    return $cnt;
  }
上で定義した is_risyu を使って,履修していればチェックを入れる処理を追加しよう.とくに,13行目の > が17行目に移動して,その間に処理が追加されていることに注意する.
resources/views/students/edit.blade.php (抜粋)
<body>
    <h1>{{ $student->name }} の編集</h1>

    <div>
      <form method="post"
      action="{{ action('StudentsController@update') }}"
      enctype='multipart/form-data'>
        {{ csrf_field() }}
        {{ method_field('patch') }}
        <input type="hidden" name="id" value="{{ $student->id }}">
        <p>
          @foreach ($all_lectures as $lecture)
            <input type="checkbox" name="risyu[]" value={{ $lecture->id }}
            @if ($student->is_risyu($lecture->id, $student->id) == 1)
             checked="checked"
            @endif
            >
            {{ $lecture->name }} <br>
          @endforeach
        </p>
        <p>
          <input type="submit" value="履修科目の変更">
        </p>
      </form>
    </div>
</body>
これまでの作業の結果,学生の個人情報ページの[編集]リンクをクリックすれば,履修科目を編集できるフォームが表示されるようになる.

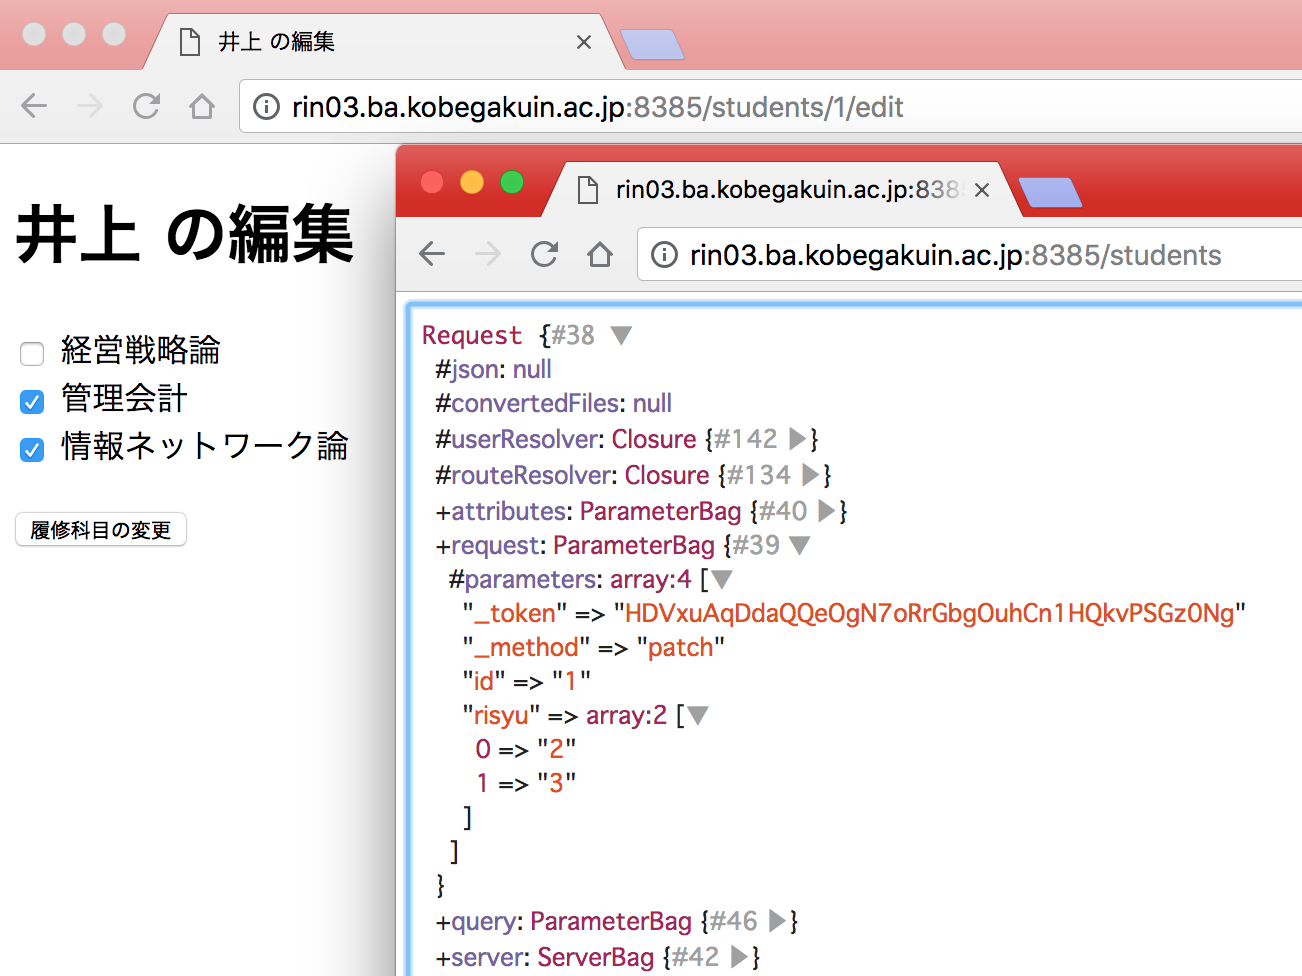
また,履修科目を「管理会計」と「情報ネットワーク論」に変更して「更新」ボタンをクリックすれば,その情報が update 関数に渡されて,「request」の「ParameterBag」の中に格納されていることが確認できた(まだ,実際にデータベースを更新をしているわけではないことにも注意しよう).
では実際にデータベースの更新を行う処理を記述しよう.コントローラの update 関数にその処理を記述する.なお,Laravel では多対多の関連付けを追加するには attach() を,削除するには detach() を利用すれば良い.
app/Http/Controllers/StudentsController.php  (抜粋)
  public function update(Request $request)
  {
    $student = Student::where('id', $request->id)
                        ->first();
    // dd($request->risyu);
    // 一旦,すべての履修を取り消す(関連付けを削除する)
    $student->lectures()->detach();
    // 選択された講義の履修を登録する(関連付けを行う)
    $student->lectures()->attach($request->risyu);

    return redirect()->action('StudentsController@show', $request->id);
  }
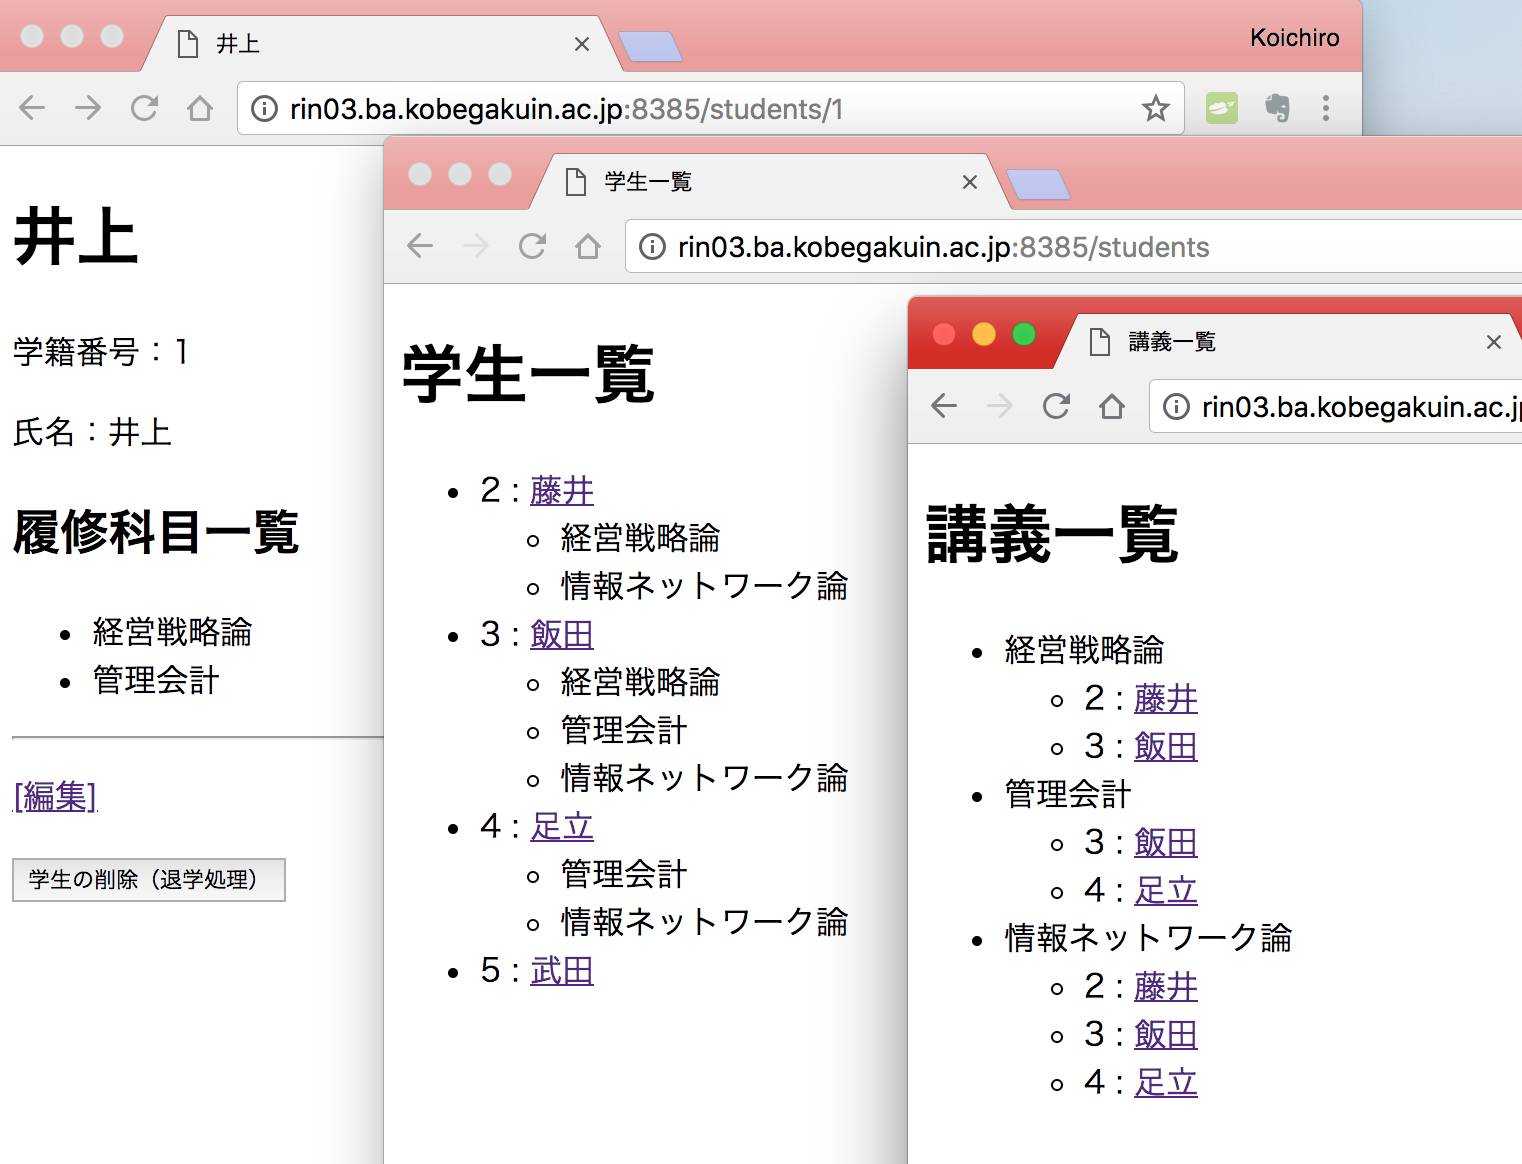
例えば,履修科目を「管理会計」と「情報ネットワーク論」に変更して「更新」ボタンをクリックすれば,正しく更新できていることが確認できる.

なお,上の例では関連付けを一旦全て削除してから,関連付けをやり直した関係で,井上さんは管理会計の変更をしていないにもかかわらず,データベース上では変更したことになっている.sqlite で変更前と変更後の中間テーブルの内容を比較すると理解できるでしょう.もしも,このような変更を登録したくない場合は,変更があったかどうかを判断してから,履修が取り消された科目だけ detach() を実行し,新たに追加された科目だけ attach() を実行するように変更すれば良い.
[GakuinHana@rin06 laravelRelationship]$ sqlite3 database/database.sqlite ⏎
SQLite version 3.7.17 2013-05-20 00:56:22
Enter ".help" for instructions
Enter SQL statements terminated with a ";"
sqlite> select * from lecture_student; ⏎ # 変更前
1|1|1||
2|2|1||  # この行が削除される
3|1|2||
4|3|2||
5|1|3||
6|2|3||
7|3|3||
8|2|4||
9|3|4||
sqlite> select * from lecture_student; ⏎ # 変更後
3|1|2||
4|3|2||
5|1|3||
6|2|3||
7|3|3||
8|2|4||
9|3|4||
10|2|1||  # 一旦削除されたデータがここに登録される
11|3|1||
sqlite> .exit ⏎
[GakuinHana@rin06 laravelRelationship]$
なお,履修変更(編集画面)では,チェックボックス自体をクリックすると on/off の切り替えが可能であるものの,科目名(例えば「経営戦略論」)をクリックしても on/off の切り替えができない.このようなチェックボックスは使いにくいので,科目名をクリックしてもチェックボックスを切り替えられるようにしよう.このためにはチェックボックス一つひとつに id を振り,<label>というタグを使えば良い.ビューを次のように変更しよう.
resources/views/students/edit.blade.php (抜粋)
    <div>
      <form method="post"
      action="{{ action('StudentsController@update') }}"
      enctype='multipart/form-data'>
        {{ csrf_field() }}
        {{ method_field('patch') }}
        <input type="hidden" name="id" value="{{ $student->id }}">
        <p>
          @foreach ($all_lectures as $lecture)
            <input type="checkbox" name="risyu[]" value={{ $lecture->id }} id="risyu{{ $lecture->id }}"
            @if ($student->is_risyu($lecture->id, $student->id) == 1)
             checked="checked"
            @endif
            >
            <label for="risyu{{ $lecture->id }}">{{ $lecture->name }}</label><br>
          @endforeach
        </p>
        <p>
          <input type="submit" value="履修科目の変更">
        </p>
      </form>
    </div>
学生情報の削除
次は,学生情報を削除(退学処理)してみよう.まず,ルートを定義する.
routes/web.php (抜粋)
Route::get('/students', 'StudentsController@index');
Route::get('/students/{id}', 'StudentsController@show');
Route::get('/students/{id}/edit', 'StudentsController@edit');
Route::patch('/students', 'StudentsController@update');
Route::delete('/students/{id}', 'StudentsController@destroy');
次に,show.blade.php に削除リンクを設置する.
resources/views/students/show.blade.php (抜粋)
<body>
    <h1>{{ $student->name }}</h1>
    <p>学籍番号:{{ $student->id }}</p>
    <p>氏名:{{ $student->name }}</p>
    <h2>履修科目一覧</h2>
    <ul>
        @foreach ($student->lectures as $lecture)
            <li>{{ $lecture->name }}</li>
        @endforeach
    </ul>
    <hr>
    <p><a href="{{ action('StudentsController@edit', $student->id )}}">[編集]</a></p>
    <div>
      <form action="{{ url('/students', $student->id )}}" method="post">
        {{ csrf_field() }}
        {{ method_field('DELETE') }}
        <button>学生の削除(退学処理)</button>
      </form>
    </div>
</body>
コントローラに destroy メソッドを記述する.
app/Http/Controllers/StudentsController.php  (抜粋)
  public function destroy($id)
  {
    $student = Student::where('id', $id)
                        ->first();
    if (!$student) {
      return redirect('/students');
    }
    $student->delete();
    return redirect('/students');
  }
これから学生レコードの削除に関する実験を行うので,データベースをロールバック,マイグレーション,シーダーの実行をしておこう.
[GakuinHana@rin06 laravelRelationship]$ php artisan migrate:rollback; php artisan migrate; php artisan db:seed ⏎
「井上」のレコードを削除(退学処理)してみよう.うまく削除できたようである.
レコードの削除をしたあと,sqlite でデータベースの内容を確認すると,students テーブルのレコードを削除すると中間テーブルである lecture_student から関連するレコードが連鎖的に削除されていることが確認できる.もしもバクエンドのデータベースに sqlite を使っている場合で連鎖的に削除されなかった場合はここを参考に外部キー制約を設定すると良い.
[GakuinHana@rin06 laravelRelationship]$ sqlite3 database/database.sqlite ⏎
SQLite version 3.7.17 2013-05-20 00:56:22
Enter ".help" for instructions
Enter SQL statements terminated with a ";"
sqlite> select * from lecture_student; ⏎
3|1|2||
4|3|2||
5|1|3||
6|2|3||
7|3|3||
8|2|4||
9|3|4||
sqlite> .exit ⏎
[GakuinHana@rin06 laravelRelationship]$